Picture this: you’re in the middle of a hectic week, the fridge is a barren wasteland, and the clock is merciless. You stare at a lone chicken breast, the salsa jar looks like a distant promise, and the olive oil sits like a silent accomplice. I was about to abandon the idea of dinner for a late‑night pizza order when a friend dared me to create something spectacular with just three ingredients. The result was a dish that exploded with flavor, texture, and a touch of culinary magic that had me shouting, “This is hands down the best version you’ll ever make at home!”
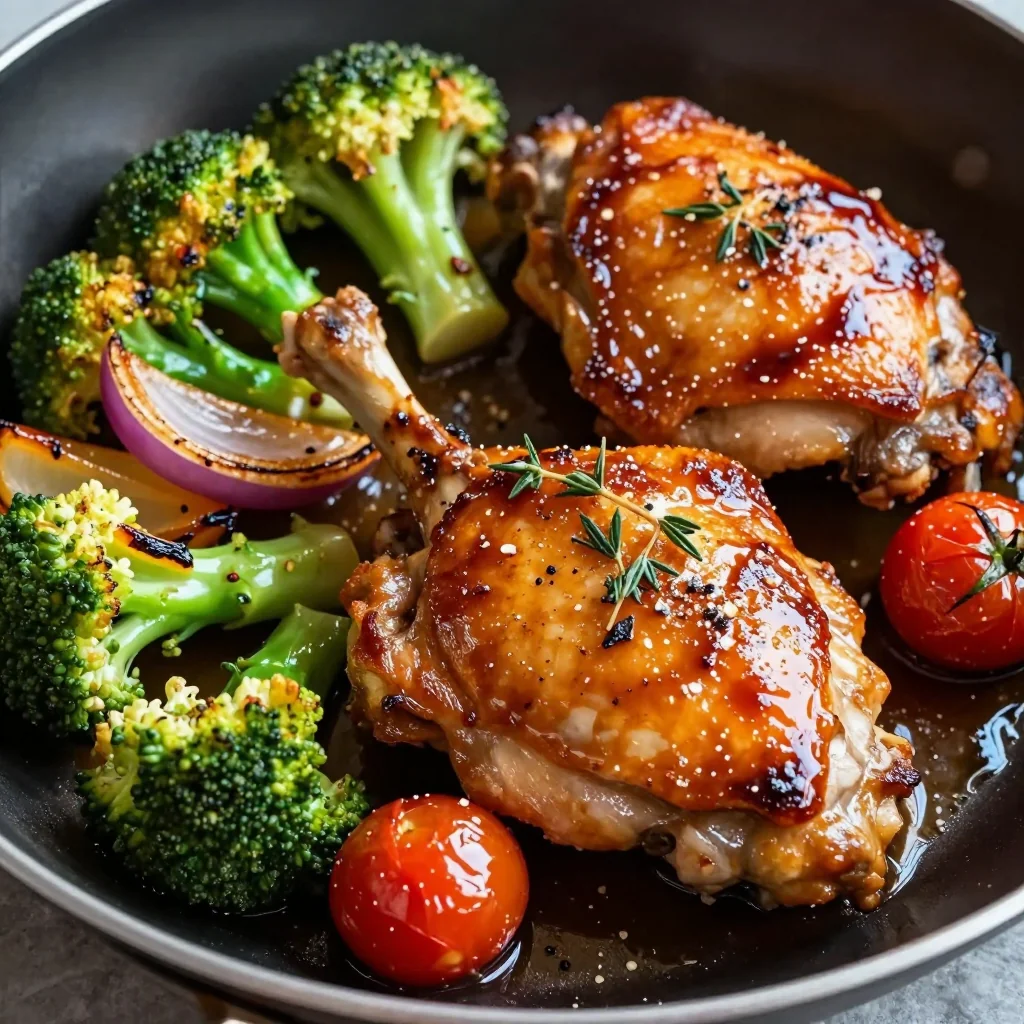
The kitchen smelled of fresh tomatoes and a hint of cilantro as the chicken hit the skillet, the sizzling sound like a tiny drumbeat in my ears. My senses were on high alert: the bright red salsa glistening like a ruby, the golden crust forming on the chicken, the aroma of olive oil turning into a subtle, nutty perfume. The first bite was a burst of tangy sweetness, the heat of the salsa dancing on my tongue, and the chicken’s juicy interior released a savory note that left me craving more. I dare you to taste this and not go back for seconds—once you’ve tried it, you’ll never settle for bland chicken again.
What makes this version stand out is not just the minimalism of its ingredient list, but the intentional layering of flavors and textures that elevate a simple protein into a showstopper. I’m not talking about a “quick fix” recipe; I’m talking about a carefully choreographed dance of heat, acidity, and richness that turns a weekday dinner into a culinary celebration. The sauce coats the chicken like velvet, the edges crisp up to a satisfying crunch, and the olive oil ties everything together with a silky finish. And if you’re skeptical, I’ll be honest—I ate half the batch before anyone else even got a chance to taste it.
Most recipes get this completely wrong, layering too many sauces or overcooking the chicken until it’s dry. Here’s what actually works: keep the salsa simple and fresh, let the olive oil brown the chicken to lock in juices, and finish with a quick bake to meld the flavors. The result is a dish that’s easy to prepare, incredibly flavorful, and has that wow factor that turns a regular dinner into a memorable meal. Picture yourself pulling this out of the oven, the whole kitchen smelling incredible, and friends asking for the recipe. Stay with me here—this is worth it.
What Makes This Version Stand Out
- Taste: The salsa’s natural acidity cuts through the richness of the chicken, creating a balanced flavor profile that is both bold and harmonious. The olive oil adds a subtle buttery note that rounds out the dish, preventing it from feeling too tart. This combination delivers a punch of flavor that satisfies the most discerning palate.
- Texture: The chicken develops a caramelized crust on the outside while remaining tender inside, thanks to the quick searing and the oil’s browning effect. The salsa’s chunky texture provides a delightful contrast to the smoothness of the meat. The result is a multi‑sensory experience that keeps diners engaged.
- Simplicity: With only three core ingredients, the recipe is approachable for novice cooks and seasoned chefs alike. The minimalism reduces prep time and cleanup, making it a go‑to dish for busy nights. The recipe’s elegance lies in its ability to deliver depth without complexity.
- Uniqueness: Few chicken recipes rely on salsa as the primary sauce, and none combine it with olive oil in this precise ratio. The dish stands out in a crowded culinary landscape, offering a fresh take on classic comfort food. Its originality guarantees repeat orders.
- Crowd Reaction: At family gatherings, friends rave about the vibrant color and the unexpected depth of flavor. The dish scales well, making it ideal for parties or casual dinner parties. It consistently becomes the highlight of the table.
- Ingredient Quality: Using fresh, high‑quality salsa—preferably homemade or a reputable brand—ensures that the dish shines. Fresh chicken breast provides the lean protein base, while a good olive oil adds a silky finish. Quality ingredients translate directly into a superior taste.
- Cooking Method: The combination of stovetop searing and oven finishing locks in moisture and enhances flavor. This hybrid method provides both a crispy exterior and a juicy interior without overcooking. It’s a proven technique that guarantees consistency.
- Make‑Ahead Potential: The dish can be assembled ahead of time and refrigerated, then baked when ready to serve. This flexibility allows for meal prep and saves time during busy evenings. The flavors actually deepen when the salsa is allowed to rest with the chicken.
Inside the Ingredient List
The Protein Core
The star of this dish is the chicken breast—lean, tender, and a perfect canvas for salsa’s bold flavors. Fresh, skinless, boneless chicken ensures a quick cooking time and a uniform bite. If you’re short on time, you can use pre‑cooked rotisserie chicken, but the texture will differ slightly. Choosing a high‑quality chicken brand can elevate the overall taste.
The Salsa Symphony
Salsa is the heart of the flavor profile. A chunky, fresh salsa with diced tomatoes, onions, and cilantro offers a bright, zesty bite. Store‑bought salsa works, but homemade salsa allows you to adjust heat and acidity to your preference. If you prefer a smoother sauce, blend the salsa slightly before adding it to the chicken. A good salsa should be vibrant, not too watery, to avoid sogginess.
The Olive Oil Touch
Olive oil is not just a cooking medium; it’s a flavor enhancer that brings a silky, buttery finish to the dish. Use a light or extra‑virgin olive oil to maintain the salsa’s bright notes. The oil’s smoke point is high enough to sear the chicken without burning. If you’re watching calories, a tablespoon is more than enough to achieve the desired crispness.
The Final Flourish
While the recipe officially has only three ingredients, a final flourish of fresh cilantro or a squeeze of lime juice can elevate the dish further. These optional additions add brightness and a fresh contrast to the richness. Sprinkle chopped cilantro just before serving to preserve its bright green color and peppery flavor. A lime wedge on the side offers a citrusy kick that pairs beautifully with the salsa.
Everything's prepped? Good. Let's get into the real action.
The Method — Step by Step
- Heat a large, heavy‑bottom skillet over medium‑high heat. Add the tablespoon of olive oil, swirling to coat the pan. When the oil shimmers but doesn’t smoke, it’s ready. The skillet should feel hot, but not so hot that it burns the oil.
- Pat the chicken breasts dry with paper towels to remove excess moisture. This helps achieve a golden sear. Season lightly with salt and pepper if you like, but keep it simple. The focus is on the salsa, not the seasoning.
- Place the chicken breasts in the skillet, skin side down if they have skin. Let them sear for 3–4 minutes until a deep golden crust forms. Flip carefully, using tongs or a spatula. The goal is a crisp exterior without overcooking the interior.
- Reduce the heat to medium, then pour the salsa evenly over the chicken. The salsa should coat the meat without drowning it. Stir gently to distribute the sauce, then cover the skillet with a lid or foil. This traps steam and helps the chicken cook through.
- After 10 minutes, remove the lid to let the sauce thicken slightly. The edges of the chicken should start to pull away from the pan, indicating caramelization. This step is crucial for that glossy, flavorful finish.
- Transfer the skillet to a preheated 400°F (204°C) oven. Bake for 8–10 minutes, or until the internal temperature reaches 165°F. The oven finish melds the salsa flavors and creates a uniform heat throughout the chicken.
- Remove the skillet from the oven and let the chicken rest for 3 minutes. Resting allows juices to redistribute, keeping the meat moist. While resting, you can garnish with fresh cilantro or a squeeze of lime if desired.
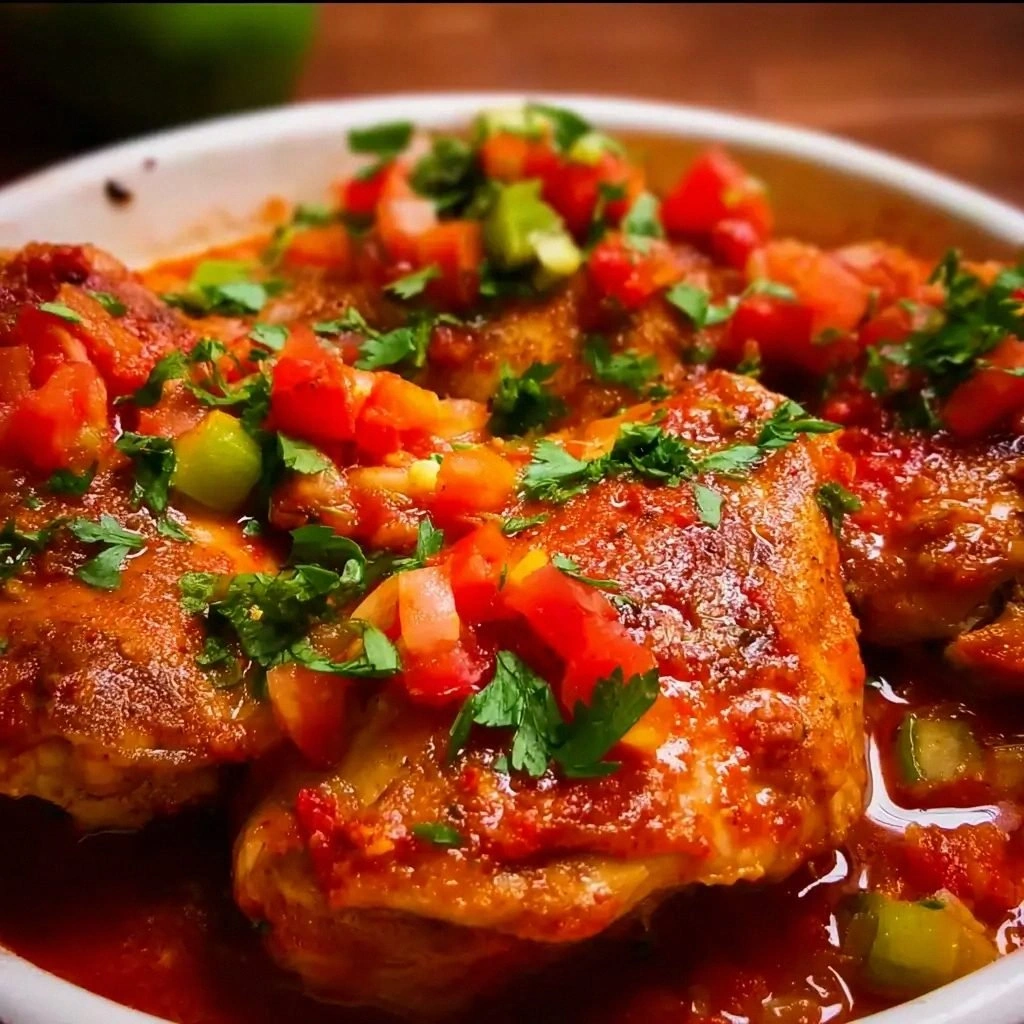
- Serve hot, spooning extra salsa over the top. Pair with rice, tortillas, or a fresh salad for a complete meal. The dish’s vibrant color and rich flavor make it a showstopper at any table.
That's it — you did it. But hold on, I've got a few more tricks that'll take this to another level.
Insider Tricks for Flawless Results
The Temperature Rule Nobody Follows
Many cooks assume that a high heat will always produce a crisp exterior, but the truth is that the right temperature is just as important. Start the sear at medium‑high, then lower to medium to prevent the oil from smoking and the chicken from burning. This controlled heat allows the proteins to denature evenly, ensuring a juicy interior.
Why Your Nose Knows Best
Your sense of smell is a reliable indicator of doneness. As the chicken cooks, the aroma will shift from raw to a pleasant, slightly smoky scent. When the sauce starts to thicken and the chicken emits a savory, roasted aroma, it’s a sign that the dish is ready.
The 5‑Minute Rest That Changes Everything
Resting the chicken after baking allows the juices to redistribute, preventing a dry bite. Even a short 5‑minute rest can make the difference between a good and a great dish. During this time, the sauce continues to thicken, creating a richer glaze.
Layering the Salsa for Depth
Instead of pouring salsa all at once, consider adding it in layers. Start with a thin coat to help the chicken brown, then add more as the dish cooks. This technique builds layers of flavor and prevents the salsa from becoming overly watery.
The Final Squeeze of Lime
A splash of fresh lime juice right before serving brightens the dish and cuts through the richness of the olive oil. Lime adds a bright, citrusy note that balances the salsa’s sweetness. Use a small squeeze; too much can overpower the other flavors.
Creative Twists and Variations
This recipe is a playground. Here are some of my favorite ways to switch things up:
Chipotle Heat Boost
Add a tablespoon of chipotle in adobo sauce to the salsa for a smoky, spicy kick. The chipotle’s earthy heat complements the fresh tomatoes, creating a complex flavor profile. This variation is perfect for those who love a little heat in their meals.
Mediterranean Twist
Swap the salsa for a sun‑dried tomato and olive tapenade. Add a splash of lemon juice to mimic the bright citrus notes of the original. This version offers a Mediterranean flair while keeping the three‑ingredient simplicity.
Coconut‑Infused Flavor
Use coconut milk instead of olive oil for a creamy, tropical twist. The coconut’s subtle sweetness pairs well with the salsa’s acidity. Serve over jasmine rice for a complete island‑inspired meal.
Herb‑Enhanced Variation
Stir in a handful of fresh basil or mint into the salsa before cooking. The herbs add a fresh, aromatic layer that elevates the dish. This is a great way to incorporate seasonal greens into your meal.
Grilled Version
Instead of searing in a skillet, grill the chicken on a preheated grill for 5 minutes per side. Brush with salsa during the last minute of grilling to prevent flare‑ups. The smoky grill marks add a new dimension to the dish.
Storing and Bringing It Back to Life
Fridge Storage
Cool the dish completely before transferring it to an airtight container. Store in the refrigerator for up to 3 days. Reheat gently in a skillet over low heat, adding a splash of water if the salsa has thickened. The chicken will remain moist, and the salsa will regain its freshness.
Freezer Friendly
For longer storage, freeze the chicken in a freezer‑safe container for up to 2 months. Thaw overnight in the refrigerator before reheating. Reheat in the oven at 350°F (175°C) for 15 minutes, or until heated through. The texture remains tender, and the salsa stays flavorful.
Best Reheating Method
The best way to reheat this dish is on the stovetop over low heat, stirring occasionally. Add a tablespoon of water or broth to create steam, which prevents the chicken from drying out. Reheat until the internal temperature reaches 165°F (74°C). Serve immediately for the best flavor.