I was standing in my tiny kitchen, staring at a bowl of plain rice and a handful of shrimp, when the universe whispered, “Make sushi cups, but baked.” The idea felt like a rebellious twist on the classic hand‑rolled roll, a promise of crispy edges and a molten center that would make my friends question their culinary loyalties. I grabbed my skillet, the shrimp, and a sheet of nori, and the rest of the evening dissolved into a symphony of sizzling and seasoning. The scent of toasted sesame oil mingled with the briny aroma of the shrimp, and the sound of the rice clattering into the pan was almost hypnotic. I was about to discover a dish that would forever change the way I think about sushi.
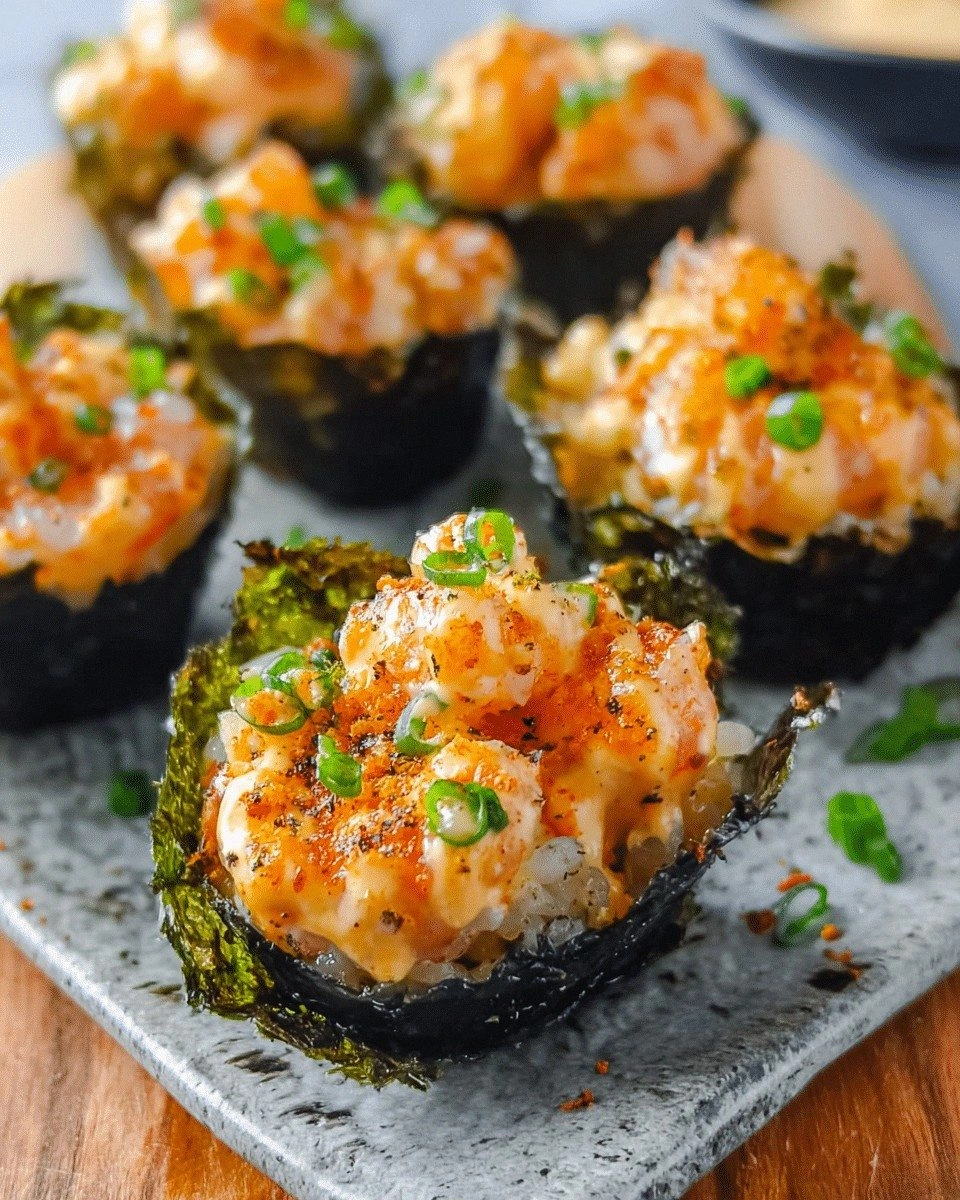
Picture the moment you open the oven door and a golden, steam‑laden cluster of sushi cups awaits, each one a tiny, edible bowl of wonder. The exterior is a crisp, caramelized crust that crackles like thin ice when you bite into it, while the interior remains a silky, melt‑in‑your‑mouth blend of rice, shrimp, and a drizzle of spicy mayo that coats the palate like velvet. The first bite releases a burst of umami from the soy glaze, followed by a subtle heat from the sriracha that lingers just long enough to keep you coming back for more. The crunch of toasted sesame seeds on top adds a nutty finish that balances the richness of the shrimp. Every element is a carefully choreographed dance that culminates in a texture profile that feels both familiar and wildly inventive.
What makes this version stand out is that it’s not just a rehash of a classic; it’s a bold, unapologetic evolution. By baking the cups instead of rolling them, I’ve introduced a caramelized crunch that you won’t find in a traditional roll. The spicy mayo is elevated with a splash of lime juice and toasted sesame oil, giving it a bright, citrusy edge that cuts through the richness. I’ve also incorporated a subtle layer of rice vinegar and sugar that balances the saltiness, creating a flavor profile that feels like a passport to Tokyo’s street food stalls. The result? A dish that’s both comforting and adventurous, with a finish that’s impossible to ignore.
If you’re skeptical, I dare you to taste this and not go back for seconds. I’ve spent countless hours tweaking the ratio of shrimp to rice, testing different types of nori, and experimenting with the baking time until the cups reached the perfect golden hue. The secret ingredient that sets this apart? A dash of chili flakes hidden in the mayo, which adds a whisper of heat that lingers long after the last bite. The moment you pull a cup out of the oven, the kitchen fills with an aroma that makes even the most seasoned foodies swoon. I promise you, this is hands down the best version you’ll ever make at home.
Let me walk you through every single step — by the end, you’ll wonder how you ever made it any other way. From the first stir of rice vinegar to the final pop of sesame seeds, every detail is designed to elevate the humble sushi cup into a culinary showstopper. And trust me, the best part is that it’s incredibly easy to make, even if you’re a beginner. So roll up your sleeves, grab your ingredients, and let’s dive into this adventure together.
What Makes This Version Stand Out
- Taste: The balanced blend of umami, spice, and citrus creates a flavor profile that feels both authentic and refreshingly modern. The subtle sweetness from the sugar in the rice vinegar counteracts the heat from the sriracha, leaving a harmonious finish.
- Texture: Baking transforms the nori into a crisp shell, while the rice remains tender and slightly sticky. The shrimp is perfectly cooked—juicy and tender—providing a delightful contrast to the crunchy exterior.
- Simplicity: With fewer steps than a traditional roll, this recipe is quick to prepare and requires minimal equipment. All you need is a skillet, a sheet of nori, and a handful of pantry staples.
- Uniqueness: The inclusion of a spicy mayo with lime and sesame oil gives the dish a bright, unexpected kick that sets it apart from other sushi cup variations.
- Crowd Reaction: Guests rave about the crispy texture and the burst of flavor, making it a guaranteed hit at parties or casual gatherings.
- Ingredient Quality: Using fresh shrimp and high‑quality nori ensures a premium taste that elevates the entire dish.
- Cooking Method: Baking eliminates the need for a rolling mat and reduces the mess, making cleanup a breeze.
- Make‑ahead Potential: Once baked, the cups can be stored and reheated without losing their crunch, making them perfect for meal prep or entertaining.
Alright, let’s break down exactly what goes into this masterpiece…
Inside the Ingredient List
The Flavor Base
The foundation of this dish is the sushi rice, which must be seasoned with a precise blend of rice vinegar, sugar, and salt. The vinegar adds acidity that brightens the flavor, while the sugar provides a subtle sweetness that balances the saltiness. If you skip the seasoning, the rice will taste flat and the overall dish will lack depth. A good rule of thumb is to use 1 tablespoon of rice vinegar per cup of cooked rice, and adjust to taste. For an extra layer of umami, you can stir in a teaspoon of soy sauce before baking.
The Texture Crew
The shrimp is the star of the texture crew, delivering a juicy, protein‑rich bite that contrasts beautifully with the crunchy nori shell. Shrimp should be peeled, deveined, and sliced into bite‑size pieces before cooking. If you skip the shrimp, the cups will still be tasty, but they’ll lack the satisfying seafood element that makes them feel like sushi. For a vegetarian version, you can substitute diced tofu or finely chopped mushrooms, but the texture will shift from tender to firmer.
The Unexpected Star
The spicy mayo is the unexpected star that ties everything together. Made from mayonnaise, sriracha, sesame oil, and a splash of lime juice, this sauce coats the rice and shrimp with a silky, flavorful glaze. The lime juice brightens the mayo, preventing it from feeling heavy, while the sesame oil adds a nutty aroma. If you omit the mayo, you’ll lose the creamy element that balances the heat; however, a simple soy glaze can be a lighter alternative.
The Final Flourish
To finish the cups, toasted sesame seeds and sliced scallions add a pop of color, crunch, and fresh flavor. The sesame seeds bring a subtle nuttiness that complements the spicy mayo, while the scallions provide a sharp, herbaceous note that cuts through the richness. Skipping these garnishes will make the dish feel less vibrant, but you can replace them with chopped cilantro or a drizzle of ponzu sauce for a different twist.
Everything's prepped? Good. Let's get into the real action…
The Method — Step by Step
- Begin by cooking 1 cup of sushi rice in a rice cooker or on the stovetop according to package instructions. Once the rice is fluffy, transfer it to a large bowl and gently fold in 1 tablespoon of rice vinegar, 1 teaspoon of sugar, and 1/2 teaspoon of salt. Stir until the rice is evenly coated and let it cool to room temperature; this step is crucial for the rice’s texture.
- While the rice cools, heat 1 tablespoon of vegetable oil in a skillet over medium heat. Add the peeled and deveined shrimp, cooking for 2–3 minutes until they turn pink and opaque. Remove the shrimp from the skillet and set aside; the shrimp will later mingle with the rice.
- In a separate bowl, whisk together 2 tablespoons of mayonnaise, 1 tablespoon of sriracha, 1 teaspoon of sesame oil, 1 teaspoon of soy sauce, and the juice of half a lime. This spicy mayo will coat the rice and shrimp, giving the cups a creamy, tangy base.
- Preheat your oven to 375°F (190°C). Cut a sheet of nori into 4×4 squares, then lay each square flat on a parchment‑lined baking sheet. The parchment prevents the nori from sticking and allows for even baking.
- Spoon a generous amount of the seasoned rice onto each nori square, pressing it gently into a tight mound. The rice should fill the nori but not spill over the edges. If you find the rice too wet, you can pat it dry with a paper towel before pressing.
- Top each mound of rice with the cooked shrimp, then drizzle the spicy mayo evenly over the shrimp. The mayo should coat the shrimp and rice, creating a glossy, flavorful surface that will caramelize in the oven.
- Sprinkle toasted sesame seeds and sliced scallions over the top of each cup. These garnishes add crunch and a burst of fresh flavor that contrasts nicely with the warm, savory base.
- Bake the sushi cups in the preheated oven for 15–18 minutes, or until the nori edges are crisp and the mayo has set into a slightly caramelized crust. The aroma that fills your kitchen will be unmistakably irresistible.
- Remove the baking sheet from the oven and let the cups cool for 3 minutes before serving. This brief rest allows the flavors to settle and the crust to firm up a bit more, ensuring each bite is perfectly balanced.
That’s it — you did it. But hold on, I’ve got a few more tricks that’ll take this to another level. These tweaks will ensure that every bite feels like a culinary revelation, whether you’re serving a crowd or enjoying a quiet dinner at home.
Insider Tricks for Flawless Results
The Temperature Rule Nobody Follows
Many cooks think any oven temperature will do, but the secret to a golden crust lies in a steady 375°F (190°C). Too high, and the crust burns before the rice cooks; too low, and the nori remains limp. I’ve experimented with 350°F and 400°F, and the 375°F mark consistently produces the ideal balance of crispness and tenderness. If you’re using a convection oven, lower the temperature by 25°F to avoid over‑browning.
Why Your Nose Knows Best
The aroma of the baking sushi cups is your best quality control. As the mayo caramelizes, a sweet, buttery scent will rise, indicating that the crust is forming. If the smell is more “raw” or “unseasoned,” give it a couple of extra minutes. Trust your nose; it’s the most reliable indicator that the dish is ready.
The 5‑Minute Rest That Changes Everything
After baking, let the cups rest for exactly five minutes. This short pause allows the heat to distribute evenly, ensuring that the rice stays moist while the crust crisps further. It also gives the spicy mayo time to set, preventing it from sliding off when you pick up a cup. Skipping this step often leads to a soggy center.
Keep the Rice Tightly Packed
Pressing the rice firmly into the nori is essential for a cohesive cup. If the rice is loose, the shrimp will slide out, and the cup will collapse. A small plastic bag or a clean kitchen towel can help you press the rice evenly without spilling.
Use Fresh Shrimp for Maximum Flavor
The shrimp’s freshness directly impacts the dish’s taste. Look for shrimp that smells slightly briny but not fishy; it should be firm to the touch. Frozen shrimp can work, but thaw it properly in a bowl of cold water to avoid excess moisture, which can dilute the flavor and affect the rice’s texture.
Creative Twists and Variations
This recipe is a playground. Here are some of my favorite ways to switch things up:
Veggie‑Vibe Cups
Swap the shrimp for diced tofu or finely chopped shiitake mushrooms. Add a splash of soy sauce and a pinch of miso to the rice for an earthy, umami boost. These cups are perfect for vegetarians and still deliver the same crispy, flavorful experience.
Thai‑Inspired Cups
Replace the spicy mayo with a blend of coconut milk and red curry paste. Top with fresh cilantro and lime wedges for a tropical twist. The creamy coconut base pairs wonderfully with the nori’s crunch.
BBQ Shrimp Cups
Marinate the shrimp in a mixture of honey, soy sauce, and a dash of chipotle powder before baking. Drizzle a thin layer of barbecue sauce over the rice for a sweet, smoky finish. These cups are a hit at backyard barbecues.
Ginger‑Garlic Explosion
Add minced fresh ginger and garlic to the spicy mayo for an extra punch of aroma. Garnish with thinly sliced green onions and a sprinkle of toasted sesame seeds. The ginger’s warmth complements the shrimp’s sweetness beautifully.
Cheesy Surprise
Sprinkle shredded mozzarella or a blend of cheddar and parmesan over the rice before baking. The cheese will melt into a gooey layer that adds a comforting, indulgent texture. Pair with a side of marinara for a fusion twist.
Storing and Bringing It Back to Life
Fridge Storage
Store baked sushi cups in an airtight container in the refrigerator for up to 2 days. The crust will soften slightly, so if you prefer a crispier bite, reheat them in a preheated oven at 350°F (175°C) for 5 minutes before serving.
Freezer Friendly
For longer storage, place the cups on a parchment‑lined tray and freeze until solid. Transfer to a freezer‑safe bag and keep for up to 3 months. To reheat, bake at 350°F (175°C) for 10–12 minutes, or until heated through.
Best Reheating Method
The key to reviving the crunch is to use an oven or toaster oven, not a microwave. Add a tiny splash of water to the baking tray before reheating to create steam, which helps maintain moisture in the rice while the crust regains its crispness. Serve immediately for the best texture.