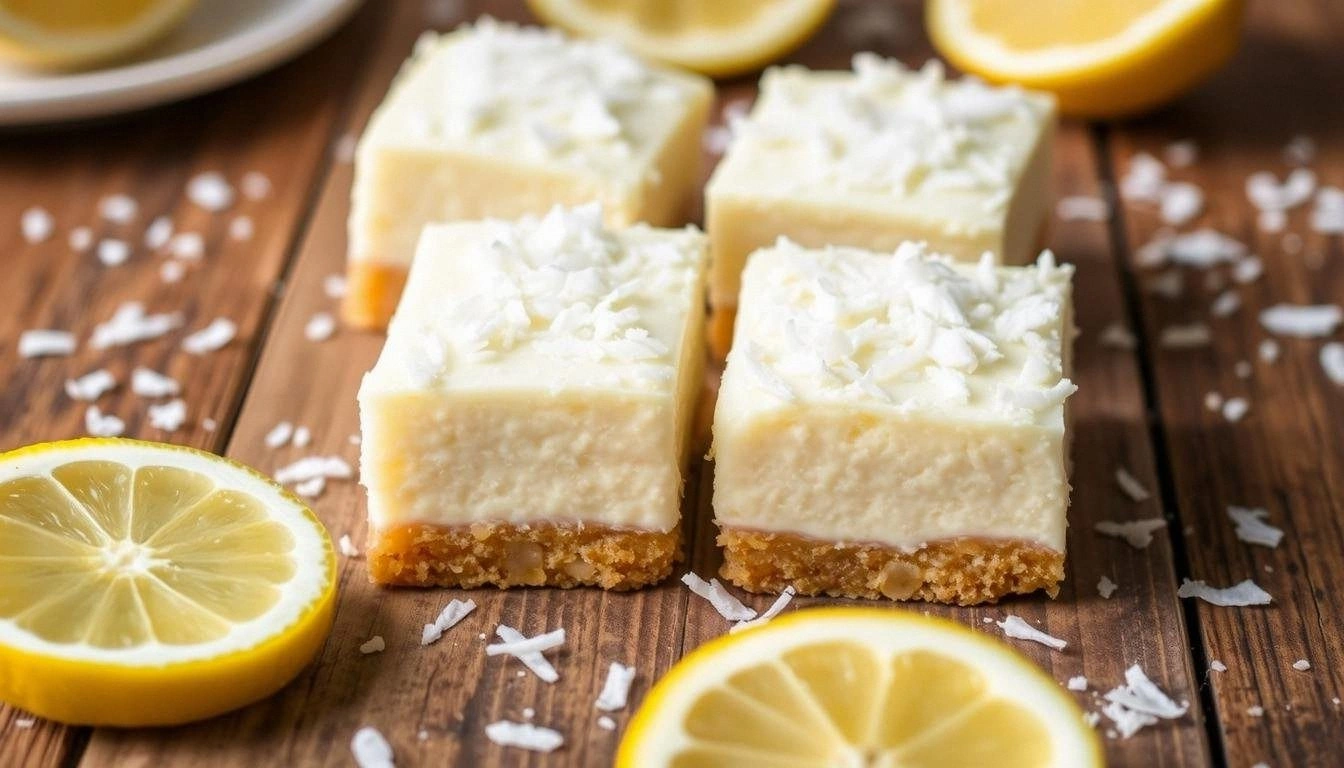
Picture yourself in a cramped kitchen, the air thick with the scent of citrus and toasted coconut, the timer ticking down while your friends are already sampling the first bite. I was halfway through a disastrous batch of lemon bars that turned out more like lemon sludge, and I swore I’d never again settle for anything less than a perfect, silky finish. That night, armed with a handful of pantry staples and a stubborn determination, I crafted a no‑bake lemon‑coconut cheesecake that melted on the tongue like a sun‑kissed cloud. The result? A dessert that is creamy, tangy, and instantly refreshing, with a coconut crunch that gives it an irresistible texture. If you’ve ever tried a lemon dessert that feels like a dry, crumbly mess, this is the antidote you’ve been waiting for.
I dare you to taste this and not go back for seconds. The first bite is a burst of lemon brightness that cuts through the richness of coconut, and the second bite is a velvety smoothness that coats the palate like a gentle wave. The subtle sweetness from the maple syrup balances the tartness, while the coconut oil gives the bars a silky mouthfeel that feels almost indulgent. As soon as the first slice hits your tongue, you’ll know you’re in for a treat that is both sophisticated and comforting. This isn’t just a dessert; it’s a culinary revelation that will become your go‑to recipe for any occasion.
What makes this version stand out is the meticulous attention to each component. I’ve perfected the ratio of coconut milk to coconut cream to achieve a luscious, custard‑like consistency that holds its shape without baking. The use of gluten‑free graham cracker crumbs ensures a crunchy base that’s free of gluten, while the maple syrup provides a natural sweetness that complements the citrus. I’ve also incorporated a subtle hint of lemon extract, a trick that elevates the lemon flavor without overpowering the delicate coconut undertones. Every ingredient is chosen for its ability to enhance texture, flavor, and overall experience, creating a dessert that feels like a luxury treat yet is incredibly simple to make.
And here’s the twist that sets this recipe apart: I’ve added a splash of coconut milk to the lemon‑coconut mixture, which creates a silky, creamy layer that sets like a mousse. This technique turns a standard no‑bake bar into a decadent cheesecake‑style dessert that melts in your mouth. By the end, you’ll wonder how you ever made it any other way. Let me walk you through every single step — by the end, you'll wonder how you ever made it any other way.
What Makes This Version Stand Out
- Taste: The bright citrus is balanced by a subtle coconut sweetness that lingers, creating a flavor profile that’s both refreshing and indulgent.
- Texture: A creamy, mousse‑like interior contrasts with a crunchy, graham‑cracker base, delivering a satisfying mouthfeel in each bite.
- Simultaneous Simplicity: No oven required; everything is assembled in a single bowl and chilled, making it ideal for busy weeknights.
- Uniqueness: The addition of coconut milk and a small amount of lemon extract gives the bars a depth of flavor not found in typical lemon bars.
- Audience Appeal: It’s a crowd‑pleaser at parties, a perfect dessert for a brunch spread, or a sweet end to a summer picnic.
- Ingredient Quality: Using organic coconut milk and fresh lemons elevates the overall taste and ensures a healthier dessert.
- Make‑ahead Potential: The bars can be prepared two days in advance and stored in the fridge, allowing you to focus on other dishes.
- Allergy Friendly: Gluten‑free, dairy‑free, and egg‑free, it’s a safe choice for most dietary restrictions.
Alright, let's break down exactly what goes into this masterpiece...
Inside the Ingredient List
The Flavor Base
Gluten‑free graham cracker crumbs form the foundation of our bars. They provide a subtle sweetness and a satisfying crunch that contrasts with the creamy filling. If you can’t find gluten‑free crumbs, substitute with crushed almond biscotti or finely ground oats. A pinch of sea salt enhances the overall flavor profile, making the lemon bright and the coconut rich.
The Texture Crew
Melted coconut oil and maple syrup are the key to achieving that silky, mousse‑like consistency. The oil keeps the mixture smooth, while the syrup adds a gentle sweetness that balances the tartness of the lemon. Coconut milk and coconut cream work together to create a custard‑like texture that sets perfectly when chilled. If you prefer a lower‑fat version, substitute coconut milk with unsweetened almond milk, but expect a slightly thinner consistency.
The Unexpected Star
Fresh lemon zest is a game‑changer; it delivers a burst of citrus aroma that lingers long after the first bite. Lemon juice adds acidity, preventing the bars from becoming too sweet and giving them that tangy kick. A small splash of lemon extract intensifies the citrus notes without adding extra liquid. If you’re craving a more pronounced lemon flavor, double the zest and juice, but keep the extract to a teaspoon to avoid overpowering the coconut.
The Final Flourish
To finish, we add toasted coconut flakes, which provide a nutty crunch and an extra layer of coconut flavor. The flakes are lightly toasted in a dry skillet until golden, giving them a delightful aroma. A dusting of powdered sugar on top adds a sweet finish and an elegant look. If you’re aiming for a low‑carb option, replace powdered sugar with a natural sweetener like stevia or monk fruit.
Everything's prepped? Good. Let's get into the real action...
The Method — Step by Step
- In a medium bowl, combine the gluten‑free graham cracker crumbs, melted coconut oil, maple syrup, and a pinch of sea salt. Stir until the crumbs are evenly coated and the mixture resembles damp sand. This step is crucial for a cohesive base; if the crumbs remain dry, the bars will crumble when you cut them.
- Press the crumb mixture into the bottom of a 9×9‑inch lined baking pan, creating an even layer about ½ inch thick. Use the back of a spoon or a flat-bottomed glass to compact the crumbs firmly. This ensures the bars hold together and provides a sturdy foundation for the creamy filling.
- In a separate bowl, whisk together the coconut milk, coconut cream, powdered sugar, lemon zest, lemon juice, vanilla extract, and lemon extract until the mixture is smooth and glossy. The goal is a thick, custard‑like consistency that will set when chilled. If the mixture feels too thin, let it rest for a few minutes; the coconut cream will thicken slightly.
- Pour the lemon‑coconut mixture over the pressed crumb base, spreading it evenly with a spatula. The filling should rise to the top of the pan, covering the crumbs completely. This step is the moment of truth; a well‑spread filling ensures every bite has that creamy, citrusy flavor.
- Tap the pan gently on the counter to release any air bubbles and smooth the surface. Let the mixture sit at room temperature for 10 minutes; this allows the coconut oil to fully incorporate and prevents the bars from cracking during chilling.
- Refrigerate the pan for at least 4 hours, or overnight if you have the time, until the bars are firm and the filling has set. The longer you chill, the firmer the texture will be, making slicing easier and cleaner.
- Once set, remove the pan from the fridge and carefully lift the bars using the parchment edge. Transfer them to a cutting board and cut into 12 equal squares or bars with a sharp knife. A clean cut is essential for a polished presentation.
- Sprinkle toasted coconut flakes over the top of each bar, pressing lightly to adhere. The toasted flakes add a nutty crunch and a subtle caramelized flavor that complements the citrus. If you prefer a sweeter finish, dust the bars with powdered sugar before serving.
- Serve chilled, preferably with a small glass of chilled coconut water or a splash of fresh lemon juice on the side. This adds an extra layer of hydration and enhances the citrus notes.
- Enjoy immediately, or store in an airtight container in the refrigerator for up to 5 days. If you need to transport them, wrap each bar individually in parchment paper and place them in a small zip‑lock bag.
That's it — you did it. But hold on, I've got a few more tricks that'll take this to another level. Keep reading for insider tips that will elevate every bite.
Insider Tricks for Flawless Results
The Temperature Rule Nobody Follows
Always chill the coconut milk before mixing it into the batter. Cold coconut milk helps the mixture set faster, preventing the bars from becoming too soft. If you’re in a hurry, place the coconut milk in the freezer for 15 minutes; this quick chill makes the final texture silky and firm.
Why Your Nose Knows Best
Before you add the lemon juice, give the mixture a quick sniff. If the aroma feels flat, add an extra pinch of lemon zest. A strong citrus scent guarantees a bright, refreshing flavor profile that will keep your guests coming back for more.
The 5-Minute Rest That Changes Everything
After pouring the filling, let the mixture rest at room temperature for exactly 5 minutes before refrigerating. This brief pause allows the coconut oil to integrate fully, resulting in a smoother, more cohesive texture that sets beautifully.
The Secret of Even Slices
Use a hot, damp knife to cut the bars. Heat the knife blade in hot water, wipe it dry, and then slice. This technique prevents the bars from tearing and ensures clean, professional cuts.
The Finish That Makes It Instagram‑Ready
Dust the tops with a light coat of coconut flour or a pinch of cocoa powder before serving. The subtle dusting adds visual appeal and a hint of flavor contrast that elevates the overall experience.
Creative Twists and Variations
This recipe is a playground. Here are some of my favorite ways to switch things up:
Tropical Twist
Swap the lemon juice for pineapple juice and add a handful of shredded mango to the filling. The tropical flavors create a vibrant, beach‑side dessert that’s perfect for summer gatherings. Serve with a splash of coconut water for a refreshing contrast.
Chocolate‑Lemon Fusion
Fold in 1/4 cup of melted dark chocolate into the filling and replace the coconut flakes with cocoa nibs. The bittersweet chocolate pairs beautifully with the bright lemon, offering a sophisticated flavor profile that satisfies both sweet and savory palates.
Berry Burst
Add 1/2 cup of fresh blueberries or raspberries into the filling before chilling. The berries infuse the bars with a natural sweetness and a pop of color, making them an eye‑catching centerpiece for any dessert table.
Spiced Citrus
Introduce a pinch of ground ginger or cardamom into the lemon mixture. The warm spices add depth and complexity, turning a simple lemon bar into an exotic treat that’s both comforting and adventurous.
Nutty Crunch
Replace toasted coconut flakes with chopped toasted almonds or pecans. The nutty crunch offers a new texture dimension while maintaining the creamy, citrusy base that defines this dessert.
Low‑Carb Version
Use almond flour instead of graham cracker crumbs and sweeten with erythritol or monk fruit. This variation keeps the flavor profile intact while reducing carbs, making it ideal for keto or low‑glycemic diets.
Storing and Bringing It Back to Life
Fridge Storage
Store the bars in an airtight container in the refrigerator for up to 5 days. Keep them chilled to preserve the creamy texture and prevent the coconut oil from separating. When ready to serve, let them sit at room temperature for 10 minutes to soften slightly.
Freezer Friendly
Wrap each bar individually in parchment paper and place them in a freezer bag. They can be frozen for up to 2 months without losing flavor or texture. Thaw overnight in the fridge before serving.
Best Reheating Method
If you prefer a slightly warmer dessert, microwave the bars on low power for 10–15 seconds. Add a tiny splash of water before reheating to steam the bars back to perfection, preventing them from drying out.