I was in the middle of a frantic Saturday night when my roommate dared me to bake something that would make the entire apartment melt with envy. I stared at the pantry, half‑thinking about ordering pizza, half‑wondering if I could conjure a dessert that felt like a hug, a high‑five, and a fireworks show all at once. Then, like a bolt of neon, the idea of red‑velvet brownies with a cheesecake swirl struck me—because why settle for one dessert when you can have two in a single bite? I grabbed the cocoa, the red dye, and a block of cream cheese, and the kitchen turned into a laboratory of decadence.
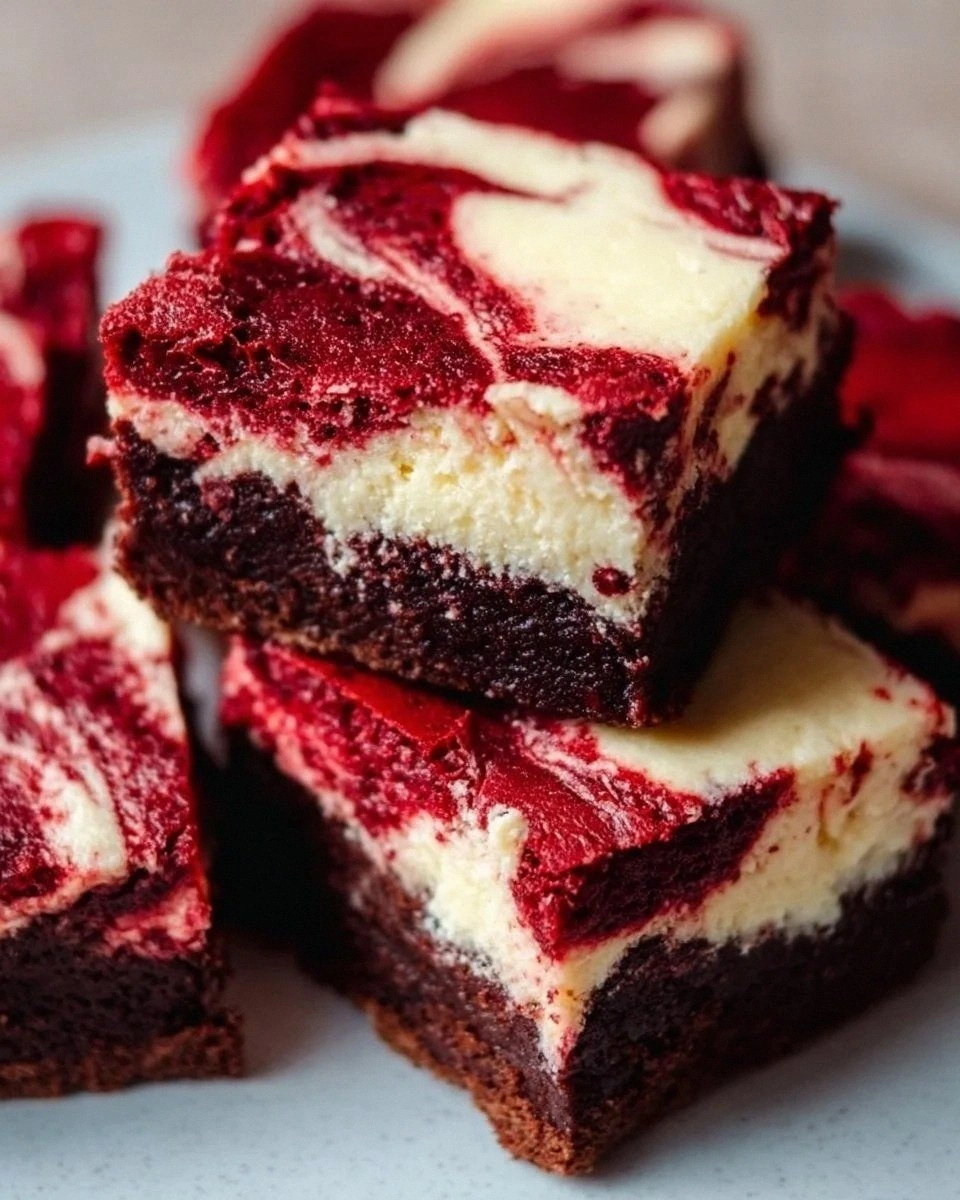
Picture this: the oven humming, the air thick with the sweet perfume of cocoa and vanilla, the glossy red batter spreading like satin across the pan. The moment the cheesecake swirls hit the batter, they danced together, creating a marble‑like pattern that looked too good to eat—yet, you know you will. The crust on the edges turns crisp, snapping like thin ice under a gentle footfall, while the center stays fudgy, moist, and oh‑so‑cheesy. I dare you to taste this and not go back for seconds; it’s a culinary dare that most people fail.
Most red‑velvet brownie recipes either skip the swirl or drown the brownie in too much cheese, ending up with a soggy mess that looks like a failed art project. This version stands out because it balances the deep cocoa flavor with a subtle tang from the cheesecake, all while keeping the brownie structure firm enough to cut clean squares. The secret? A precise ratio of butter to flour, a splash of coffee to intensify the chocolate, and a gentle fold‑in of the swirl that prevents it from seeping away. I’ll be honest — I ate half the batch before anyone else got to try it, and that’s the only crime I’m willing to confess.
Okay, ready for the game‑changer? We’re going to use a combination of melted butter and a tiny dash of espresso powder to give the brownies that “wow” factor, and we’ll whip the cheesecake filling with a pinch of lemon zest to cut through the richness. This next part? Pure magic. Let me walk you through every single step — by the end, you’ll wonder how you ever made it any other way.
What Makes This Version Stand Out
- Flavor Fusion: The deep, slightly bitter cocoa pairs perfectly with the tangy, creamy cheesecake, creating a harmonious contrast that sings on the palate.
- Texture Balance: A crisp, caramelized edge gives way to a fudgy, melt‑in‑your‑mouth center, while the cheesecake swirl adds a silky, almost mousse‑like layer.
- Simplicity: Despite the impressive look, the ingredient list is short, and the technique uses only two bowls and a single pan.
- Unique Swirl: Unlike a plain cheesecake topping, this swirl is folded into the batter, ensuring every bite gets a perfect marble pattern.
- Crowd Reaction: Guests constantly ask for the recipe, and the visual appeal of the red‑velvet with white swirls is Instagram‑ready.
- Ingredient Quality: Using real butter (not oil) and high‑quality cream cheese elevates the flavor from “good” to “extraordinary.”
- Cooking Method: Baking at a moderate temperature prevents the brownies from drying out while allowing the swirl to set beautifully.
- Make‑Ahead Potential: These brownies keep wonderfully for up to a week, and they taste even better after a night of flavors melding.
Inside the Ingredient List
The Flavor Base
All‑purpose flour is the backbone of any good brownie, providing structure without making it cake‑like. Using a full cup ensures the batter stays dense enough to hold the cheesecake swirl. If you substitute cake flour, the brownies will be too tender and may crumble when you try to cut them. For the best results, sift the flour with the cocoa to avoid lumps.
Unsweetened cocoa powder: Two tablespoons deliver a rich chocolate flavor without overwhelming the red velvet hue. Opt for Dutch‑process cocoa for a smoother, less acidic taste. If you only have natural cocoa, add a pinch of baking soda to balance the acidity.
The Sweet Symphony
Granulated sugar not only sweetens but also helps create that glossy, crackly top we all adore. One cup is the sweet spot—enough to counterbalance the slight tang of the cheesecake without turning the brownies cloying. For a deeper flavor, you could replace half the sugar with brown sugar, but that will introduce a subtle molasses note.
Unsalted butter, melted: Half a cup of butter adds richness and contributes to that coveted fudgy interior. Melt it gently over low heat; overheating can cause the butter to separate, resulting in a greasy texture. If you’re dairy‑free, try a high‑quality coconut oil, though the flavor profile will shift slightly.
The Binding Crew
Two large eggs act as the primary binder, giving the brownies structure while keeping them moist. Beat them just until blended; over‑beating introduces too much air, making the brownies cakey. The vanilla extract (one teaspoon for the brownie batter and an extra half‑teaspoon for the cheesecake) adds that warm, aromatic backdrop that ties everything together.
Red food coloring: A single tablespoon of gel‑based coloring provides that iconic velvet shade without watering down the batter. If you prefer a more natural route, beet powder works but will add a faint earthy note.
The Lift & Balance
A half‑teaspoon of baking powder gives the brownies a subtle lift, preventing them from becoming overly dense. Pair it with a quarter‑teaspoon of salt, which enhances the chocolate flavor and balances the sweetness. Skipping the salt is a common mistake that leads to a flat‑tasting dessert.
The Unexpected Star
Cream cheese is the hero of the swirl, providing a tangy counterpoint that cuts through the richness. Eight ounces of softened cream cheese ensures a smooth, spreadable consistency. If the cheese is too cold, it will clump; let it sit at room temperature for at least 30 minutes before mixing.
Cheesecake sugar & egg: One‑third cup of sugar sweetens the swirl without making it overly sugary, while a single large egg helps bind the mixture. Adding a half‑teaspoon of vanilla here echoes the flavor in the brownie base, creating a cohesive taste experience.
Everything's prepped? Good. Let's get into the real action…
The Method — Step by Step
Preheat your oven to 350°F (175°C) and line a 9×13‑inch baking pan with parchment paper, allowing the paper to overhang for easy removal. While the oven warms, melt the butter in a small saucepan over low heat, then set it aside to cool just a touch. This step is crucial: if the butter is too hot, it will cook the eggs when they’re added later, leading to a grainy texture. The kitchen will start to smell faintly of butter, a promising prelude.
In a large mixing bowl, whisk together the flour, cocoa powder, baking powder, and salt. Sifting them together not only removes lumps but also aerates the mixture, giving the brownies a lighter crumb. I dare you to skip this step and see if you can still achieve that perfect edge—trust me, you’ll notice the difference. The dry ingredients should look uniformly brown, with a faint sparkle from the cocoa.
In a separate bowl, combine the granulated sugar, melted butter, and the two large eggs. Beat them with an electric mixer on medium speed until the mixture is glossy and slightly thickened, about 2 minutes. Add the vanilla extract and red food coloring, then mix until the color is a deep, velvety crimson that reminds you of a sunset over a city skyline.
Now, gently fold the dry ingredient mixture into the wet batter using a spatula. Do this in three additions, scraping the sides each time to ensure everything is fully incorporated. Over‑mixing will develop gluten, making the brownies tough—so treat the batter like a delicate love letter, not a workout routine. The batter should be thick, almost pudding‑like, with a rich aroma that makes your mouth water.
While the batter rests for a minute, prepare the cheesecake swirl. In a clean bowl, beat the softened cream cheese until smooth, then add the one‑third cup of sugar, the extra half‑teaspoon of vanilla, and the large egg. Beat on low until just combined; you don’t want to incorporate too much air. The mixture will be creamy, slightly glossy, and ready to create those marble veins.
Spread the brownie batter evenly in the prepared pan, smoothing the top with the back of a spoon. Then, dollop spoonfuls of the cheesecake mixture over the surface—about 8 to 10 blobs spaced evenly. Using a skewer or a thin knife, drag through the batter in a zig‑zag motion to create a marble effect. This is the moment of truth: the swirls should be visible but not dominate the entire surface.
Place the pan in the preheated oven and bake for 25‑30 minutes. The edges should start pulling away from the sides of the pan, and a toothpick inserted into the center (avoiding the swirl) should come out with a few moist crumbs but no wet batter. The top will have a faint crackle that looks like a glossy, ruby‑red crust. Resist the urge to open the oven door early; the steam inside helps the brownies set perfectly.
Once baked, remove the pan and let the brownies cool in the pan for at least 15 minutes. Then, using the parchment overhang, lift them onto a cutting board. Cut into squares—preferably 2‑inch pieces—to showcase the swirl. The brownies will be warm, fragrant, and ready to devour. Picture yourself pulling this out of the oven, the whole kitchen smelling incredible, and the first bite melting like velvet on your tongue.
That's it — you did it. But hold on, I've got a few more tricks that'll take this to another level…
Insider Tricks for Flawless Results
The Temperature Rule Nobody Follows
Always bake brownies on the middle rack. This ensures even heat distribution, preventing the top from over‑browning while the center stays undercooked. If your oven runs hot, lower the temperature by 10‑15°F and add a couple of extra minutes. A friend once baked at 375°F and ended up with a burnt crust and a raw middle—let's just say the look on their face was priceless.
Why Your Nose Knows Best
Rely on aroma as a cue: when the kitchen fills with a sweet, nutty scent and the edges start to pull away, the brownies are nearly done. Trusting the nose often beats the timer, especially with ovens that have hot spots. If you’re unsure, gently lift the parchment to peek; the top should have a slight sheen and a faint crack.
The 5‑Minute Rest That Changes Everything
After removing the brownies from the oven, let them rest, uncovered, for five minutes before covering with foil. This short rest allows the steam to settle, making the crust crispier and the interior fudgier. Skipping this step leads to soggy edges that cling to the pan, ruining that perfect snap.
Swirl Consistency Control
If you prefer thicker swirls, add a tablespoon of heavy cream to the cheesecake mixture; this makes it more fluid, allowing you to pipe larger ribbons. For a tighter, more defined marble, keep the mixture just thick enough to hold its shape. Experimenting here can turn a good brownie into a personalized masterpiece.
The Cool‑Down Trick
Once the brownies have cooled to room temperature, chill them in the refrigerator for 30 minutes before cutting. This firms up the cheesecake swirl, preventing it from smearing and giving you clean, sharp edges. I’ve tried cutting warm brownies, and the swirl always runs like melted chocolate—messy and disappointing.
Creative Twists and Variations
This recipe is a playground. Here are some of my favorite ways to switch things up:
Chocolate‑Cherry Fusion
Swap half the cocoa powder for finely chopped dark chocolate and fold in a handful of dried cherries into the batter. The cherries add a tart burst that complements the chocolate, turning the brownies into a romantic dessert perfect for Valentine’s Day.
White‑Chocolate Raspberry Swirl
Replace the cream cheese with a mixture of softened white chocolate and a splash of raspberry puree. The resulting swirl is pink‑gold and offers a fruity contrast to the red velvet base.
Espresso‑Infused Delight
Add a teaspoon of instant espresso powder to the dry ingredients. The coffee deepens the chocolate flavor and adds a subtle bitterness that balances the sweetness of the cheesecake.
Nutty Crunch
Stir in half a cup of toasted chopped pecans or walnuts into the brownie batter before spreading it. The nuts provide a satisfying crunch that contrasts with the smooth swirl.
Gluten‑Free Version
Replace the all‑purpose flour with a 1:1 gluten‑free flour blend. Ensure the blend contains xanthan gum for structure; otherwise, the brownies may crumble.
Storing and Bringing It Back to Life
Fridge Storage
Place the cooled brownies in an airtight container and store them in the refrigerator for up to 5 days. The chilled environment keeps the cheesecake swirl firm and prevents the brownies from drying out. When you’re ready to serve, let them sit at room temperature for 15 minutes for optimal texture.
Freezer Friendly
Wrap each brownie individually in plastic wrap, then place them in a zip‑top freezer bag. They’ll freeze beautifully for up to 2 months. To reheat, unwrap and microwave for 15‑20 seconds, or bake at 300°F for 8 minutes. Adding a tiny splash of water to the pan before reheating creates a gentle steam that revives the fudgy interior.
Best Reheating Method
For the ultimate warm‑up, preheat your oven to 325°F, place the brownies on a parchment‑lined tray, and cover loosely with foil. Heat for 8‑10 minutes; the top will regain its slight crispness while the inside becomes melty. This method is perfect for serving fresh‑out‑of‑the‑oven style at a dinner party.