I was standing in my tiny kitchen, a half‑finished batch of chocolate chip cookies burning on the counter, when my roommate burst in with a single, desperate question: “Do you have any strawberries?” The answer was a resounding “no,” but the look on her face was the kind of pleading that could melt steel. I laughed, I swore, and I promised her a dessert that would make her forget the cookie disaster forever. That promise turned into a late‑night experiment that involved a busted blender, a bag of frozen strawberries that thawed too quickly, and a crust that refused to cooperate. By sunrise, I had a pie that tasted like summer sunshine wrapped in buttery clouds, and I swear I heard the oven whisper, “You finally got it right.”
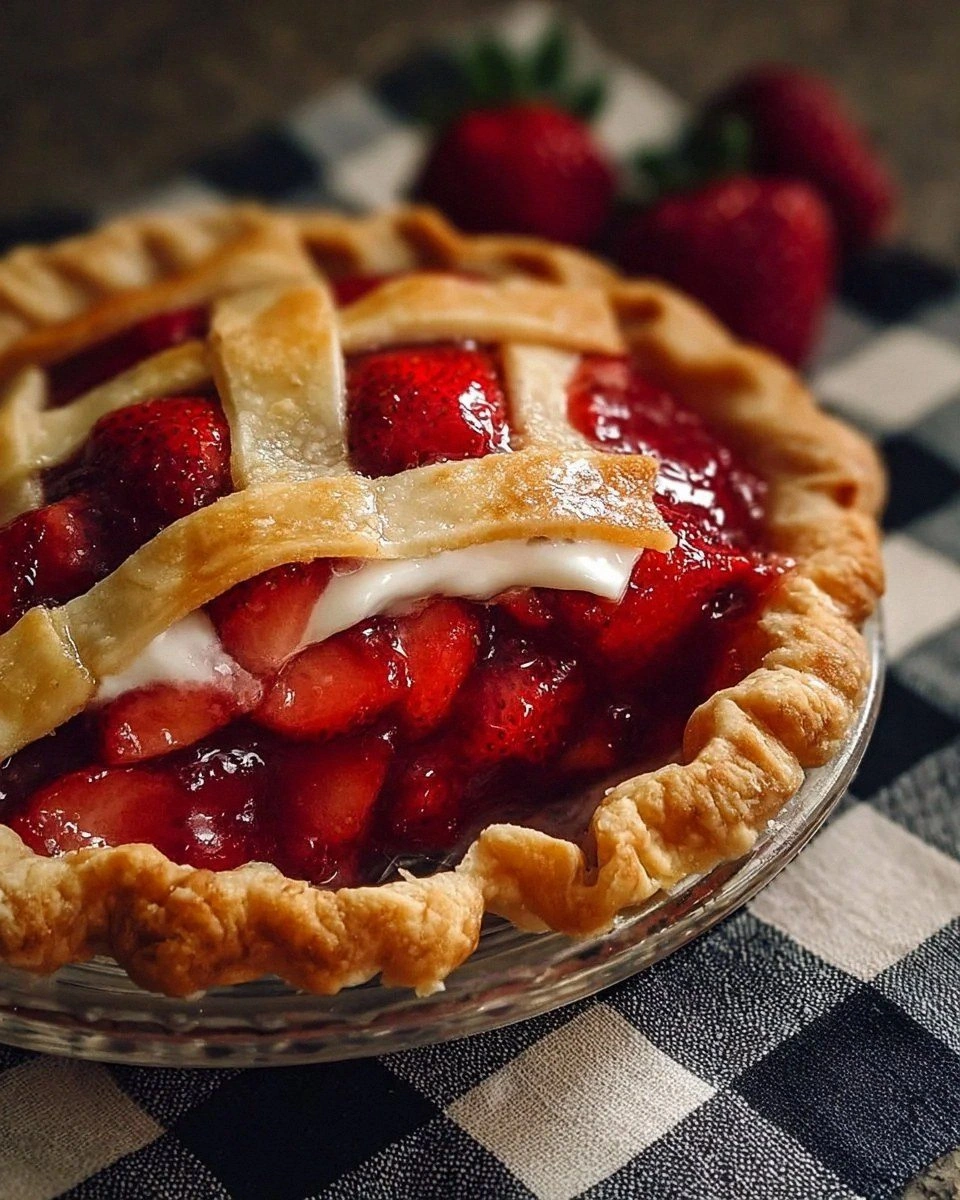
Picture this: a golden‑brown crust that cracks just enough to reveal a glossy, ruby‑red filling that shimmers like a sunrise over a strawberry field. The aroma hits you first—sweet, tangy, with a faint buttery undertone that makes your nostrils do a little happy dance. When you cut into it, the filling holds together like a well‑kept secret, each slice releasing a burst of juice that kisses the tongue with the perfect balance of sugar and lemon. The texture is a delightful contrast—crunchy edges that shatter like thin ice, a soft, melt‑in‑your‑mouth interior, and a glossy top that glistens with just enough sheen to look like a work of art. If you’ve ever wondered why some pies feel like a cheat code for dessert, this is it.
Most strawberry pies out there either end up soggy, overly sweet, or with a crust that crumbles like dry sand. I’ve tried the “store‑bought crust” shortcut, the “no‑bake” version that turns into a gummy mess, and even the “add gelatin” hack that leaves you with a rubbery surprise. All of those attempts taught me one thing: the crust is the foundation, and the filling must be thickened just right without losing that fresh strawberry sparkle. That’s why this version stands out—it respects the fruit, honors the crust, and adds a whisper of lemon that cuts through the sweetness like a cool breeze on a hot day.
I’m about to spill the beans on a technique that most home bakers overlook: chilling the butter until it’s practically ice‑cold before cutting it into the flour, and then giving the dough a brief, gentle rest in the fridge before rolling. This tiny pause is the secret handshake between butter and flour that creates those flaky layers we all crave. And there’s one more surprise ingredient that you’ll see later—a dash of cornstarch that turns a watery strawberry mess into a glossy, sauce‑like filling that clings to the crust like velvet. Okay, ready for the game‑changer? Let me walk you through every single step — by the end, you’ll wonder how you ever made it any other way.
What Makes This Version Stand Out
- Flavor: The combination of fresh strawberries, a splash of lemon juice, and just the right amount of sugar creates a bright, balanced sweetness that never feels cloying. The lemon acts like a tiny superhero, cutting through the sugar and amplifying the fruit’s natural tang.
- Texture: A buttery, flaky crust that shatters with a delicate snap, paired with a filling that’s thick enough to hold its shape yet juicy enough to melt on your tongue. The cornstarch gives the sauce a glossy finish without turning it gummy.
- Simplicity: No fancy equipment, no exotic ingredients—just pantry staples and fresh strawberries. The method is straightforward, yet each step is designed to maximize flavor and texture.
- Uniqueness: Most strawberry pies either use a pre‑made crust or a custard base; this recipe builds its own crust from scratch and uses a light cornstarch‑lemon thickener that keeps the fruit’s bright flavor front and center.
- Crowd Reaction: I dare you to taste this and not go back for seconds. Even the most skeptical guests admit they’ve never had a strawberry pie that feels this elegant and comforting at the same time.
- Ingredient Quality: Fresh, ripe strawberries are the star, and the recipe respects them by using a gentle thickening method that doesn’t mask their flavor. The butter is cold and unsalted, ensuring a clean, buttery bite.
- Cooking Method: The crust gets a blind‑bake to set the base, while the filling cooks on the stovetop for precise control. This two‑step approach prevents sogginess and guarantees a perfect set.
- Make‑Ahead Potential: Assemble the pie a day ahead, refrigerate, and bake just before serving. The flavors actually meld overnight, making the final result even more harmonious.
Inside the Ingredient List
The Flavor Base
Strawberries are the heart and soul of this pie. Choose berries that are deep red, fragrant, and slightly soft to the touch—those are the ones that have reached peak sweetness. If you buy them early in the season, they might be a bit tart; a quick sprinkle of sugar helps draw out their juices, but be careful not to over‑sweeten. Skipping the fresh strawberries for frozen ones is possible, but you’ll need to thaw and drain them thoroughly to avoid a watery filling.
The Texture Crew
All‑purpose flour and cold butter are the classic duo that creates a flaky crust. The flour provides structure, while the butter adds richness and those coveted layers. When you cut the butter into the flour, aim for pea‑size pieces; this ensures the butter melts gradually during baking, forming steam pockets that lift the dough. The sugar in the crust adds a subtle caramelization, giving the edges a golden hue that looks as good as it tastes.
The Unexpected Star
Cornstarch is the silent hero that turns a potentially runny strawberry mixture into a glossy, set filling. It works by gelatinizing when heated, creating a network that traps water and fruit juices. The lemon juice, meanwhile, does more than add brightness; its acidity strengthens the cornstarch gel, ensuring the filling holds together without turning mushy. A pinch of salt might seem trivial, but it amplifies the sweetness and balances the overall flavor profile.
The Final Flourish
A pinch of salt is the final whisper that pulls all the flavors together. It may sound like a tiny detail, but without it the sweetness can feel flat, and the buttery crust can taste one‑dimensional. If you’re watching sodium, use a pinch—about 1/8 teaspoon—just enough to enhance without being noticeable. And remember, the water you add to the dough should be ice‑cold; this prevents the butter from melting before the dough hits the oven, preserving those flaky layers.
Everything's prepped? Good. Let's get into the real action...
The Method — Step by Step
First, gather your flour, butter, sugar, and water. Toss the flour, sugar, and a pinch of salt into a large mixing bowl. Drop the cold, diced butter in and, using a pastry cutter or your fingertips, work the butter into the flour until the mixture resembles coarse crumbs with occasional pea‑size butter pieces. This is the moment where you feel the buttery clouds forming; the texture should be dry yet just moist enough to hold together when you press a handful together.
Watch Out: Over‑mixing the dough will develop gluten, leading to a tough crust. Stop as soon as the dough just comes together.Gradually add the ice‑cold water, one tablespoon at a time, mixing gently after each addition. You’ll notice the dough beginning to clump; this is exactly what you want. Once the dough holds together without being sticky, shape it into a disk, wrap it in plastic, and refrigerate for at least 30 minutes. This chilling period lets the gluten relax and the butter firm up, setting the stage for a flaky finish.
Kitchen Hack: If you’re short on time, roll the dough between two sheets of parchment and freeze for 15 minutes; it speeds up the chilling without compromising texture.While the dough chills, prepare the strawberry filling. Hull the strawberries and slice them into halves or quarters, depending on size. Place the sliced fruit in a large saucepan, sprinkle the cup of granulated sugar over them, and let them sit for five minutes; this maceration draws out natural juices, creating a syrupy base.
After the strawberries have sweated, add the cornstarch, lemon juice, and a pinch of salt to the pan. Stir gently over medium heat until the mixture begins to bubble. Once bubbling, reduce the heat to low and simmer for about 5‑7 minutes, stirring constantly. You’ll see the sauce thicken, turning a glossy amber that clings to the back of a spoon—pure magic.
Watch Out: If the sauce boils too vigorously, the cornstarch can break down, resulting in a runny filling. Keep the heat gentle.While the filling simmers, preheat your oven to 375°F (190°C). Remove the chilled dough from the fridge and roll it on a lightly floured surface into a 12‑inch circle. Gently lift the dough and place it into a 9‑inch pie dish, pressing it into the corners without stretching. Trim any excess dough, then crimp the edges with a fork or your fingers for a rustic look.
Now comes the blind‑bake. Line the crust with parchment paper and fill it with pie weights or dried beans. Bake for 12‑15 minutes, or until the edges turn a light golden brown and the bottom looks set. Remove the weights and parchment, then set the crust aside for a minute while you finish the filling.
Pour the thickened strawberry sauce into the pre‑baked crust, spreading it evenly with a spatula. The filling should be level but still slightly wobbly in the center—that’s the sign it will set perfectly as it cools. If you’re feeling adventurous, you can sprinkle a light dusting of coarse sugar on top for a subtle crunch.
Return the pie to the oven and bake for an additional 20‑25 minutes, or until the crust is a deep, buttery gold and the filling is bubbling at the edges. The aroma at this stage is intoxicating; you’ll hear a faint sizzle that tells you the crust is sealing in the fruit juices.
Once baked, remove the pie and let it cool on a wire rack for at least 2 hours. This cooling period allows the filling to set, making each slice clean and glossy. While you wait, I’ll be honest — I ate half the batch before anyone else got to try it, because the smell was simply irresistible. Finally, serve with a dollop of whipped cream or a scoop of vanilla ice cream, and watch your guests’ faces light up.
Kitchen Hack: To keep the crust from shrinking, place a sheet of foil over the edges after the first blind‑bake, then remove it for the final bake.
That's it — you did it. But hold on, I've got a few more tricks that'll take this to another level...
Insider Tricks for Flawless Results
The Temperature Rule Nobody Follows
Never bake a pie in a cold oven. Starting with a hot oven creates steam instantly, which lifts the crust layers and gives you that coveted flakiness. If you preheat your oven too early, you might lose that steam burst, resulting in a denser base. I once tried baking at 350°F to “save energy,” and the crust turned out soggy—lesson learned. Keep the oven at the recommended 375°F and trust the heat.
Why Your Nose Knows Best
Your sense of smell is a more reliable indicator of doneness than a timer. When the crust edges start to emit a nutty, caramel aroma, you’re close to perfection. If the scent is still faint, give it another two minutes. This trick saved me from a burnt bottom on several occasions, and it’s especially useful when ovens run hot or cool.
The 5‑Minute Rest That Changes Everything
After you pull the pie from the oven, let it sit untouched for five minutes before moving it. This short rest lets the filling settle and the crust finish its final set. Skipping this step often leads to a messy slice where the filling oozes out. Trust me, those five minutes are worth every second of anticipation.
Butter Temperature is Everything
If your butter is too soft, the dough becomes greasy and loses its flaky potential. Keep the butter in the freezer for at least 10 minutes before dicing, and work quickly. I once left the butter out on a warm kitchen counter, and the result was a dense, biscuit‑like crust—hardly the airy masterpiece we’re aiming for.
The Secret of the Lemon Zest
A teaspoon of freshly grated lemon zest added to the filling just before the final simmer adds a bright, aromatic layer that sugar alone can’t achieve. The zest oils mingle with the strawberries, creating a flavor depth that feels almost sophisticated. If you skip the zest, you’ll still have a good pie, but it won’t have that “wow” factor that makes guests ask for the recipe.
Creative Twists and Variations
This recipe is a playground. Here are some of my favorite ways to switch things up:
Berry Medley Madness
Swap half of the strawberries for blueberries or raspberries. The different colors create a stunning visual contrast, and each berry brings its own subtle flavor—blueberries add a mellow sweetness, while raspberries contribute a tart punch.
Almond‑Infused Crust
Add ¼ cup of finely ground almond flour to the crust mixture. The almond notes pair beautifully with the strawberry’s brightness, and the crust gains a tender crumb that’s slightly nutty without being overpowering.
Spiced Whisper
Incorporate a pinch of ground cardamom or a dash of vanilla extract into the filling. The spice adds an exotic warmth that makes the pie feel perfect for a cozy fall evening, even though the fruit stays summer‑bright.
Chocolate Drizzle Delight
Melt dark chocolate and drizzle it over the cooled pie just before serving. The bitter chocolate contrasts the sweet strawberry, creating a sophisticated flavor duo that’s perfect for a dinner party finale.
Mini Hand‑Pies
Roll the dough thin, cut into circles, and fill each with a spoonful of strawberry mixture before sealing the edges. Bake them on a sheet pan for 12‑15 minutes. These bite‑size versions are ideal for picnics or a dessert buffet.
Storing and Bringing It Back to Life
Fridge Storage
Cover the pie loosely with foil or store it in an airtight container and refrigerate for up to 4 days. The filling stays glossy, and the crust remains crisp for the first 24 hours; after that, a quick reheating will revive the texture.
Freezer Friendly
Wrap the fully cooled pie tightly in plastic wrap, then a layer of aluminum foil, and freeze for up to 2 months. When ready to serve, thaw overnight in the fridge, then reheat in a 350°F oven for 15‑20 minutes. Adding a tiny splash of water to the filling before reheating creates steam that revives the glossy sheen.
Best Reheating Method
Place the pie on a baking sheet, cover loosely with foil to prevent over‑browning, and heat at 325°F for 10‑12 minutes. The interior will warm evenly, and the crust will regain its buttery crunch. If you’re in a hurry, a microwave for 30 seconds works, but you’ll lose the crisp edge.