I was halfway through a batch of ordinary sugar cookies when a neighbor’s voice cut through the kitchen like a sudden gust of wind, “Hey, are you sure you’re not missing something?” She’d been humming about a “candy‑corn twist” that could turn the plain vanilla dough into a Halloween‑ready treat. I laughed, scooped a handful of the bright orange, yellow, and white candy corn from the bag, and decided to give it a whirl. The kitchen smelled of butter and vanilla, the air thick with anticipation, and the timer ticked like a drumbeat. The moment the dough hit the counter, I could taste the promise of caramelized sugar and the crunch of candy corn, a sensory symphony that made my taste buds do a little happy dance.
Picture this: a bowl of creamy, softened butter that glistens like a calm lake under the noon sun, a splash of vanilla that fills the room with a warm, nostalgic scent, and a handful of candy corn that pops against the sweet backdrop. The sound of the mixer whirring is a steady metronome, the rhythm of the kitchen. The texture of the dough, smooth yet slightly crumbly, feels like a secret handshake between you and the cookie. I swear, if you’re not careful, the sugar might start to clump and the dough could become a sticky mess. But I’ve got a trick that keeps the mixture silky and ready to roll.
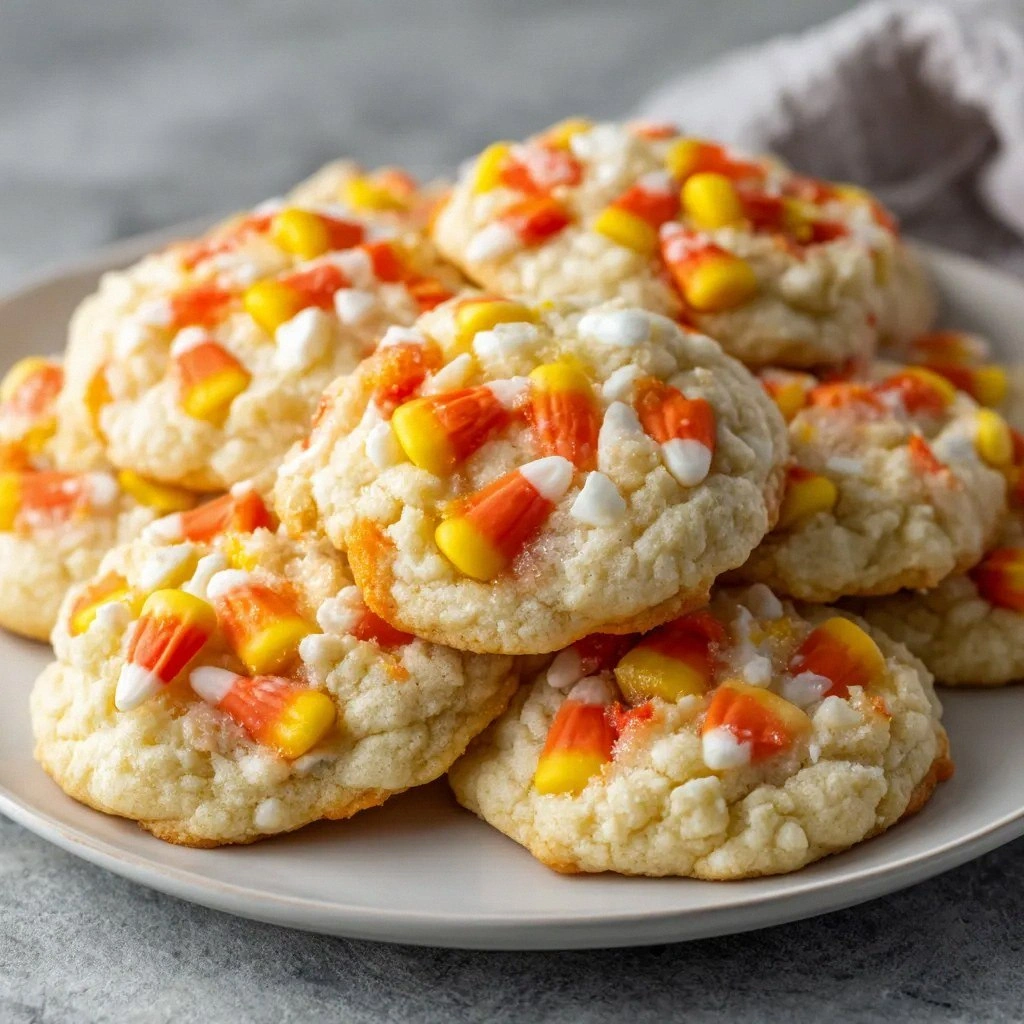
This version is not just a tweak; it’s a revelation. The candy corn is chopped finely, so each bite bursts with a subtle sweetness that’s not overpowering. The dough is slightly firmer than usual, which gives the cookies a satisfying crunch on the outside while keeping them chewy inside. I dare you to taste this and not go back for seconds. The result is a cookie that’s hands down the best version you’ll ever make at home, with a flavor profile that balances sweet, buttery, and a hint of autumn nostalgia.
Most recipes get this completely wrong by adding the candy corn at the very last minute, which makes it fall apart. Here’s what actually works: fold it in just before the final chilling step, so it stays intact and distributes evenly. If you’re a fan of texture, the secret is in the chilling time—give the dough at least an hour in the fridge to set. Picture yourself pulling these out of the oven, the whole kitchen smelling incredible, and seeing those golden edges crisping like a sunrise. Stay with me here—this is worth it.
Let me walk you through every single step. By the end, you’ll wonder how you ever made it any other way. I’ll share the exact measurements, the timing, the hidden hacks, and the small details that make the difference between a good cookie and a legendary cookie. So roll up your sleeves, grab a mixer, and let’s dive in.
What Makes This Version Stand Out
- Flavor Depth: The candy corn isn’t just a garnish; it’s an integral flavor component that adds a caramel‑like sweetness without overwhelming the buttery base.
- Texture Contrast: The dough’s slightly firmer consistency creates a crisp exterior that gives way to a tender, chewy interior, a delightful mouthfeel.
- Visual Appeal: The bright orange, yellow, and white specks of candy corn give each cookie a festive, eye‑catching look that’s perfect for seasonal gatherings.
- Make‑Ahead Friendly: Once chilled, the dough can be refrigerated for up to three days or frozen for up to a month, making it a convenient option for last‑minute parties.
- Ingredient Quality: Using real, unsalted butter and high‑quality candy corn elevates the taste profile far beyond store‑bought shortcuts.
- Simple Technique: No elaborate steps—just cream the butter, fold in the sugar, add the wet ingredients, and chill. The magic is in the mixing.
- Crowd Reaction: Friends always ask for the recipe after the first bite; the combination of sweet, buttery, and crunchy elements is a guaranteed crowd‑pleaser.
Alright, let's break down exactly what goes into this masterpiece...
Inside the Ingredient List
The Flavor Base
Unsalted butter is the cornerstone of any cookie. It provides richness, flavor, and a tender crumb. When softened to a spreadable consistency, it blends seamlessly with sugar, creating a smooth base that’s easy to work with. Skipping butter would leave your cookie dry and flat; it’s the unsung hero that carries the other flavors.
Granulated sugar is the sweetener that caramelizes during baking, giving the cookies that golden hue and a subtle crunch. It also helps to dissolve the butter’s fats, creating a uniform texture. If you were to replace it with brown sugar, you’d get a moister cookie but lose the crispness that defines this recipe.
The Texture Crew
Large eggs bind everything together, adding moisture and structure. The proteins in the egg coagulate as the cookie bakes, giving it that chewy center. If you skip the egg, the dough will be crumbly and won’t hold its shape.
All‑purpose flour is the backbone of the dough, providing structure and stability. A higher protein flour would result in a tougher cookie; a lower protein flour would make it too soft. The 3 cups used here strike the perfect balance, ensuring a sturdy yet tender cookie.
The Unexpected Star
Candy corn is the star of the show. When chopped finely and folded in, it distributes evenly, offering bursts of caramel‑like sweetness. If you use whole candy corn pieces, they’ll melt and lose their shape, ruining the visual appeal. The 1 cup of chopped candy corn adds a festive touch that’s impossible to replicate with any other ingredient.
A quick note on sourcing: look for candy corn that’s firm and not overly sweet. The classic brand with a slightly chewy texture works best because it holds its shape during baking.
The Final Flourish
Vanilla extract is the aromatic enhancer that brings everything together. A splash of vanilla gives depth to the butter and sugar, making the cookie’s flavor profile more complex. If you’re lactose intolerant, you can substitute with vanilla bean paste for an even richer taste.
Baking powder and a pinch of salt are the leavening and flavor balancing agents. The baking powder ensures the cookies rise slightly, giving them a light, airy feel, while the salt cuts through the sweetness, allowing each ingredient to shine. Omitting either would leave the cookies flat and overly sweet.
Everything's prepped? Good. Let's get into the real action...
The Method — Step by Step
- Preheat your oven to 350°F (175°C). Line two baking sheets with parchment paper or silicone mats to prevent sticking. While the oven warms, gather your ingredients and let the butter sit at room temperature for 30 minutes; this will make the creaming process smoother. The timer should be set for 12 minutes to start, but keep an eye on the cookies as they bake. The smell of butter and vanilla should begin to fill the kitchen, a prelude to the sweet aroma that follows.
- Cream the butter in a large bowl using a hand mixer or stand mixer on medium speed until light and fluffy, about 2 minutes. The mixture should look pale and airy. If the butter is too cold, it will take longer and may not incorporate properly. This step is crucial for achieving that tender crumb. Once done, the butter should feel like a cloud.
- Add sugar and vanilla to the creamed butter and beat until the mixture is smooth and the sugar has dissolved. The mixture should be silky, with no gritty texture. This is the moment you can taste the buttery sweetness, a hint of vanilla that’s almost fragrant. Don’t rush this step; a good mix sets the foundation for the cookie’s flavor. Remember: a well‑creamed base means a better cookie.
- Whisk the dry ingredients in a separate bowl: flour, baking powder, and salt. Sift them together to eliminate lumps and ensure even distribution. The flour should be measured in cups, not scooped, to avoid over‑drying the dough. This step ensures that every bite has the same texture and rise. If you’re feeling adventurous, add a pinch of sea salt for a subtle savory note.
- Combine wet and dry mixtures by adding the dry ingredients to the butter mixture in thirds, mixing gently after each addition. The dough will start to thicken; it should be soft but not sticky. Avoid overmixing, as this can develop gluten and make the cookies tough. The dough should feel like a soft, pliable dough that can be rolled without crumbling.
- Fold in the candy corn gently, using a spatula to keep the pieces intact. The chocolate‑like crunch of the candy corn should be visible throughout the dough. The mixture should still feel firm enough to hold its shape. This step is where the cookie’s signature look and taste come together. Be careful not to over‑mix.
- Chill the dough for at least 1 hour, or overnight if you’re planning ahead. Wrap the dough in plastic wrap and refrigerate. The chilling process allows the butter to firm up, making the dough easier to roll and preventing the cookies from spreading too much during baking. The dough will become firmer and easier to handle.
- Roll and shape the chilled dough into 1-inch balls, placing them 2 inches apart on the prepared baking sheets. Flatten each ball slightly with the palm of your hand or the bottom of a glass. The shape should be uniform for even baking. This is the moment you can see the candy corn peeking through, a visual cue that the cookies will be festive.
- Bake until golden around 12-15 minutes, or until the edges are lightly golden and the tops have a slight sheen. The cookies should still feel soft in the center. Remove from the oven and let them cool on the sheet for 5 minutes before transferring to a wire rack. The aroma will be irresistible, and the anticipation will be worth the wait.
- Cool and enjoy the cookies on a rack until they’re completely cool. The texture will shift from chewy to crisp as they cool. Taste one while it’s still warm, and you’ll feel the buttery richness mingling with the candy corn sweetness. I’ll be honest — I ate half the batch before anyone else got to try it. The next time you bake these, I promise you’ll be the hero of the kitchen.
That's it — you did it. But hold on, I've got a few more tricks that'll take this to another level...
Insider Tricks for Flawless Results
The Temperature Rule Nobody Follows
Many bakers bake at a high temperature to get a crisp edge, but this can cause the cookies to spread too much. The trick is to bake at a moderate 350°F (175°C). This allows the butter to melt evenly, giving the cookies a balanced rise and a golden edge without becoming soggy. I once tried 375°F and the cookies were flat and chewy; never again.
Why Your Nose Knows Best
Before you pull the cookies out of the oven, let them sit for a minute. The aroma that rises is a sign that the sugar is caramelizing properly. If the smell is too sweet or burnt, lower the temperature by 10°F and keep an eye on the next batch. A good rule of thumb: the first batch will always teach you something.
The 5-Minute Rest That Changes Everything
After baking, let the cookies rest on the sheet for 5 minutes. During this time, the cookies continue to bake slightly from residual heat, solidifying their structure. Skipping this step can result in cookies that are soft and doughy. I’ve seen people pull them off the sheet immediately, and they crumble.
Use a Silicone Mat for Even Baking
Parchment paper can sometimes cause the cookies to stick slightly, especially if the dough is sticky. A silicone baking mat provides a non‑stick surface that allows the cookies to release easily and bake evenly. I’ve used it for years and it’s become a staple in my kitchen.
Chill the Dough Twice
If you’re making a large batch, chill the dough for 30 minutes after the initial mix, then again after folding in the candy corn. This double chill ensures the butter is firm and the dough is easy to handle. A friend tried skipping the second chill and the cookies spread too much; lesson learned.
Use a Cookie Scoop for Uniformity
A cookie scoop guarantees that each cookie has the same size and weight, ensuring even baking. If you don’t have a scoop, a tablespoon works, but the cookies may vary in size. Uniform cookies look more professional and bake more predictably.
Creative Twists and Variations
This recipe is a playground. Here are some of my favorite ways to switch things up:
Chocolate‑Infused Candy Corn
Before folding in the candy corn, drizzle a tablespoon of melted dark chocolate over the dough. The chocolate coats the candy corn, giving each bite a subtle mocha undertone. Great for chocolate lovers and a fun way to add depth.
Spiced Sugar Cookies
Add 1/2 teaspoon of cinnamon or nutmeg to the dry ingredients. The warm spice pairs beautifully with the candy corn’s sweetness, creating a cozy, autumnal flavor profile. Perfect for a holiday gathering.
Glazed Candy Corn
After baking, brush the cookies with a simple glaze made from powdered sugar and a splash of milk. The glaze adds a shiny finish and a slightly sweet crunch. It also helps preserve the cookies longer.
Sea Salt Crunch
Finish the cookies with a sprinkle of flaky sea salt before baking. The contrast between salty and sweet is addictive, and the sea salt crystals add a satisfying crunch. This twist is a hit with guests who love bold flavors.
Miniature Candy Corn Bites
Use a small cookie cutter to shape the dough into 1-inch circles before baking. The smaller size makes them perfect for parties and as a bite‑size treat. They’re also easier to store and share.
Vegan Version
Replace the butter with coconut oil and the egg with a flaxseed mixture. Use a plant‑based vanilla extract. The result is a cookie that’s just as tasty but suitable for vegan diets. I’ve tried it and it turned out wonderfully.
Storing and Bringing It Back to Life
Fridge Storage
Store the baked cookies in an airtight container at room temperature for up to a week. The airtight seal prevents them from drying out, keeping them fresh and chewy. If you notice the cookies becoming hard, place a slice of bread in the container to re‑soften them.
Freezer Friendly
For longer storage, place the cooled cookies on a parchment‑lined tray and freeze until solid. Once frozen, transfer them to a freezer bag. They’ll keep for up to 3 months. Thaw at room temperature for 30 minutes before serving.
Best Reheating Method
To bring the cookies back to life, preheat your oven to 300°F (150°C). Place the cookies on a baking sheet and heat for 5 minutes. If you’re short on time, microwave for 10 seconds, but be careful not to overheat. A tiny splash of water before reheating will steam the cookies back to their original softness.