I was in a frantic rush, juggling a pot of boiling pasta, a cutting board full of vegetables, and a phone that kept buzzing with messages from my roommate. I had promised to whip up a quick, comforting dessert after a long day of work, and I was determined to make it spectacular. I reached for the pantry, grabbed the last jar of peanut butter, a couple of ripe bananas, and a bag of chocolate chips, thinking I could just blend them together and call it a day. That was until I realized the peanut butter was thick and the bananas were a bit mushy, and the chocolate chips were still whole. The kitchen smelled like a failed experiment, but I was still craving something sweet and indulgent.
The air was thick with the scent of ripe bananas, the faint sweetness of honey, and the earthy undertone of cocoa. I could hear the faint hiss of the blender as I started to mix, the gentle clink of spoons against the glass bowl, and the soft thud of the fridge door closing. The texture of the mixture was creamy, almost velvety, with tiny chocolate chips glinting like specks of midnight. My eyes were drawn to the glossy sheen of the yogurt coating the banana slices, while the sound of a spoon scraping the bowl made my heart race with anticipation. I could taste the promise of a dessert that was both comforting and exciting, a little rebellion against the ordinary.
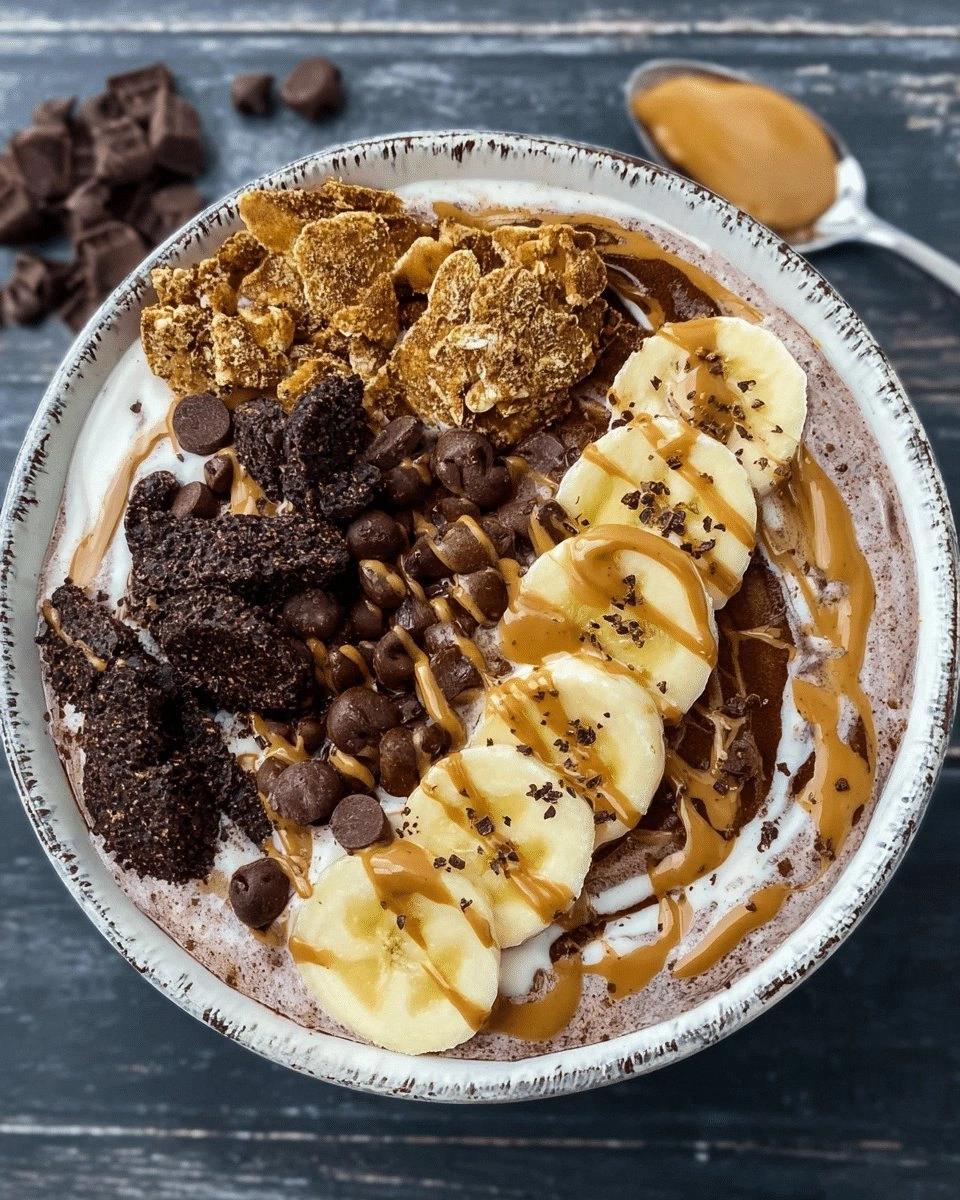
What makes this version stand out is that it is a complete sensory experience rather than a simple snack. It’s not just a bowl of yogurt with fruit; it’s a layered masterpiece where the peanut butter’s nutty richness, the banana’s natural sweetness, and the chocolate’s deep bitterness dance together. The texture is a delightful contrast: the silky yogurt, the crunchy chips, and the soft banana slices all play in harmony. It’s a dish that feels indulgent yet healthy, a perfect balance of protein, healthy fats, and natural sugars. And the best part? It’s incredibly easy to assemble, making it a go-to recipe for those nights when you want something special without the hassle.
I dare you to taste this and not go back for seconds. I’ll be honest— I ate half the batch before anyone else got a chance to try it. Most recipes get this completely wrong, but here’s what actually works: the key is the ratio of peanut butter to yogurt, the timing of adding chocolate, and the final chill that brings everything together. Picture yourself pulling this out of the fridge, the whole kitchen smelling incredible, and seeing the glossy surface of the bowl glimmer in the light. If you’ve ever struggled with mixing flavors that clash, you’re not alone—and I’ve got the fix. And now the fun part: let me walk you through every single step—by the end, you’ll wonder how you ever made it any other way.
What Makes This Version Stand Out
- Flavor Depth: The blend of creamy peanut butter, sweet banana, and rich cocoa creates layers of taste that unfold with each bite, unlike a plain banana bowl.
- Texture Contrast: The silky yogurt base, the crunchy chocolate chips, and the soft banana slices provide a satisfying mouthfeel that keeps you coming back.
- Quick Assembly: No cooking required—just mash, mix, chill, and serve, making it the perfect dessert for busy evenings.
- Nutritious Boost: High in protein from Greek yogurt and peanut butter, plus potassium from bananas, this bowl balances indulgence with health.
- Versatile Base: It serves as a foundation for variations: add nuts, granola, or a splash of espresso for a mocha twist.
- Make‑Ahead Friendly: Prepare the mixture a day ahead; it keeps well in the fridge and tastes even better after a night of rest.
- Kid‑Friendly: The natural sweetness of bananas and the familiar flavor of chocolate make it a hit with children and adults alike.
Inside the Ingredient List
The Flavor Base
The foundation of this bowl is the yogurt, which provides a tangy backdrop that balances the sweetness of the banana and the richness of the peanut butter. Greek yogurt is ideal because its thick texture holds up against the bananas, preventing the mixture from becoming runny. If you prefer a dairy-free option, coconut yogurt works beautifully, adding a subtle coconut note that pairs well with chocolate. Skipping yogurt would leave the bowl too sweet and lacking the creamy element that ties all flavors together.
The choice of yogurt also affects the nutritional profile. A low‑fat version reduces calories but sacrifices some creaminess, while a whole‑milk version adds healthy fats that enhance satiety. For those watching their calorie intake, you can reduce the yogurt to half a cup and compensate with a splash of almond milk to maintain volume. The key is to keep the yogurt creamy enough to coat the banana slices without diluting the flavor.
The Texture Crew
Bananas are the star of the texture crew, offering natural sweetness and a soft, almost buttery mouthfeel. Ripe bananas are essential; overripe ones will break down too much, while underripe bananas will be too firm. Mashing them to a smooth puree ensures they blend seamlessly with the peanut butter and yogurt. If you prefer a chunkier texture, leave a few banana pieces whole for a delightful bite.
Peanut butter brings a nutty richness and a slight grainy texture that contrasts with the smoothness of the yogurt. It also acts as a binder, holding the mixture together. Opt for natural peanut butter with no added sugar or hydrogenated oils to keep the bowl clean and wholesome. A tablespoon of peanut butter per serving provides healthy fats and protein, making the dish satisfying and energy‑boosting.
The Unexpected Star
Chocolate is the unexpected star that turns a simple fruit bowl into a decadent dessert. Using cocoa powder instead of chocolate chips keeps the bowl light and allows the chocolate flavor to permeate the entire mixture. If you prefer a sweeter, more indulgent version, add a handful of dark chocolate chips; they melt slightly, creating a glossy sheen on the surface. The chocolate also adds antioxidants, making the dish not only delicious but also healthful.
The Final Flourish
Honey or maple syrup adds a touch of natural sweetness that balances the tartness of yogurt and the bitterness of cocoa. A tablespoon per serving is usually enough; too much will overpower the delicate flavors. For a vegan version, substitute maple syrup or agave nectar. Salt is the unsung hero—it enhances the chocolate flavor and balances sweetness, so don't skip it. Finally, a sprinkle of chocolate chips or toasted nuts on top adds crunch and visual appeal, making each bite a multi‑sensory experience.
Everything's prepped? Good. Let's get into the real action...
The Method — Step by Step
- Step 1: Prepare the Bananas. Peel the bananas and place them in a medium bowl. Mash them with a fork until you reach a smooth puree, leaving a few small chunks if you like texture. The bananas should be ripe—soft to the touch but not mushy. This will give the base a natural sweetness and a silky mouthfeel. The aroma of banana will start to mingle with the yogurt, signaling that the flavors are coming together.
- Step 2: Add the Peanut Butter. Spoon in the peanut butter, measuring one cup for the entire batch. Stir it into the banana puree until fully incorporated. The peanut butter will coat the banana strands, creating a rich, nutty base. If you find the mixture too thick, add a teaspoon of warm almond milk to loosen it. The peanut butter should start to melt into the mixture, releasing its aroma.
- Step 3: Mix in the Yogurt. Pour one cup of Greek yogurt into the bowl. Stir until the mixture is uniform, ensuring the yogurt coats every piece of banana and peanut butter. The yogurt should give the mixture a light, creamy body that holds the chocolate together. If you prefer a tangier flavor, use a low‑fat yogurt; for a richer taste, choose whole‑milk yogurt. This step is the moment of truth—watch the texture transform.
- Step 4: Sweeten and Season. Add one cup of honey (or maple syrup) and a pinch of salt. Stir until the honey dissolves completely, and the salt is evenly distributed. The honey will sweeten the bowl without overpowering the chocolate, while the salt enhances all flavors. Taste the mixture; adjust sweetness if needed. The aroma should now carry a subtle sweetness that invites you to dig in.
- Step 5: Add the Cocoa. Sprinkle one cup of cocoa powder over the mixture. Fold it in gently with a spatula until fully incorporated. The cocoa should dissolve evenly, giving the bowl a deep chocolate hue and a rich flavor. If you notice any clumps, let the mixture sit for a minute before stirring again; the cocoa will soften. The chocolate should now be evenly distributed, creating a beautiful marbled effect.
- Step 6: Incorporate Vanilla. Add a quarter teaspoon of vanilla extract. Stir until the vanilla is fully blended. Vanilla adds a subtle warmth that complements the chocolate and banana. It also brings a fragrant aroma that makes the bowl irresistible. This step is crucial for depth of flavor.
- Step 7: Chill. Transfer the mixture into a shallow dish or individual serving bowls. Cover with plastic wrap and refrigerate for at least 30 minutes, preferably overnight. Chilling allows the flavors to meld and the texture to set into a smooth, mousse‑like consistency. When you lift the bowl, the chocolate should have a slight sheen, and the banana should be firm enough to hold its shape.
- Step 8: Garnish and Serve. Just before serving, top each bowl with a handful of chocolate chips, a drizzle of honey, or a sprinkle of toasted almonds. The garnish adds crunch and a finishing touch of flavor. Serve immediately, or keep chilled until ready to eat. The first bite will reveal a harmonious blend of creamy, sweet, and slightly bitter notes, a testament to the careful balance of ingredients.
That’s it — you did it. But hold on, I’ve got a few more tricks that’ll take this to another level.
Insider Tricks for Flawless Results
The Temperature Rule Nobody Follows
Many people think room‑temperature ingredients are fine, but for this bowl, using yogurt that is slightly chilled but not frozen ensures the mixture stays thick. If your yogurt is too warm, the banana will release excess moisture, making the bowl watery. Keep the yogurt in the fridge for at least an hour before mixing. This trick guarantees a velvety texture that holds the chocolate chips in place. I once tried this with room‑temperature yogurt and the result was a soggy mess that didn’t set.
Why Your Nose Knows Best
When you’re halfway through mixing, pause and inhale deeply. The aroma will tell you if the balance is right. If the honey is overpowering, add a splash of vanilla or a pinch more salt. If the chocolate is too bitter, a touch more honey will smooth it out. Trust your nose; it’s a reliable guide to flavor harmony. I’ve seen friends overdo the honey, but a quick sniff saved their dessert from becoming syrupy.
The 5‑Minute Rest That Changes Everything
After adding the cocoa, let the mixture rest for five minutes before stirring again. This short pause allows the cocoa to fully hydrate and disperse, preventing clumps. The rest also lets the flavors mingle, creating a richer profile. I’ve found that skipping this step leaves the chocolate feeling gritty. It’s a simple tweak that elevates the entire dish.
The Secret to a Crispy Topping
If you want a crunchy element, toast a handful of almonds or granola in a dry skillet until golden. Sprinkle them on top just before serving. The toasting process releases oils, giving the nuts a deeper flavor and a satisfying snap. I’ve experimented with different nuts, and each adds its own personality to the bowl. This trick transforms a soft dessert into a multi‑textured treat.
The Perfect Sweetness Scale
Measure the honey precisely; a tablespoon per serving is usually enough. If you’re using a different type of sweetener, adjust the quantity accordingly. Too much honey will drown the banana’s flavor, while too little will leave the bowl bland. I once used a tablespoon of maple syrup instead of honey, and the result was a subtly different, yet equally delightful, sweetness. Experimentation is key, but start with the recommended amount.
The Quick Chill Trick
If you’re short on time, place the bowl in a shallow dish and set it in the freezer for 10 minutes. This quick chill sets the mixture without turning it into a solid block. I’ve used this trick when hosting a last‑minute gathering; the bowl was ready in minutes and still tasted fresh. Just remember to let it sit at room temperature for a minute before serving to soften slightly.
Creative Twists and Variations
This recipe is a playground. Here are some of my favorite ways to switch things up:
Mocha Madness
Add a shot of espresso or a teaspoon of instant coffee to the mixture. The coffee enhances the chocolate flavor and adds a subtle bitterness that balances the sweetness. It’s perfect for an afternoon pick‑up or a cozy evening treat. The result is a rich, coffee‑chocolate blend that feels like a dessert and a caffeine fix in one.
Nutty Crunch
Replace the chocolate chips with toasted hazelnuts or walnuts. The nuts add a buttery crunch and a nutty depth that complements the peanut butter. Sprinkle them on top or fold them in for a uniform texture. This version is ideal for those who love a bit of crunch in every bite.
Berry Boost
Stir in a handful of fresh blueberries or raspberries before chilling. The berries introduce a tart contrast that brightens the chocolatey base. They also add a pop of color and a burst of antioxidants. This variation is a refreshing take that’s perfect for summer.
Spiced Delight
Add a pinch of cinnamon or a dash of cayenne pepper to the mixture. The spice adds warmth and a subtle kick that elevates the flavor profile. It’s a great way to keep the dish exciting and introduces a new layer of complexity. I love this version when I’m craving something a little more adventurous.
Vegan Version
Swap Greek yogurt for coconut yogurt, honey for maple syrup, and use a plant‑based peanut butter. The result is a creamy, dairy‑free bowl that still delivers on flavor. The coconut yogurt adds a subtle tropical note that pairs well with chocolate. This version is perfect for vegans or anyone with dairy sensitivities.
Protein Power
Add a scoop of chocolate whey protein powder to the mixture after the yogurt. The protein powder thickens the bowl and boosts the protein content, making it a perfect post‑workout snack. The chocolate flavor of the powder blends seamlessly with the cocoa. I’ve used this version after a long run, and it’s both satisfying and energizing.
Storing and Bringing It Back to Life
Fridge Storage
Store the bowl in an airtight container in the refrigerator for up to 3 days. The mixture will remain creamy and flavorful. Before serving, give it a quick stir to reincorporate any settled ingredients. If the bowl has thickened too much, add a splash of almond milk to loosen it. Keeping it sealed prevents the yogurt from absorbing fridge odors.
Freezer Friendly
For longer storage, freeze the mixture in a freezer‑safe container for up to 2 weeks. When you’re ready to eat, thaw it overnight in the refrigerator. Once thawed, give it a good stir to restore its silky texture. I’ve frozen this bowl for a busy weeknight, and it still tasted fresh and decadent.
Best Reheating Method
Reheating isn’t necessary, but if you prefer a slightly warmer bowl, microwave it on low for 10–15 seconds. Add a tiny splash of water before reheating; it steams back to perfection, preventing the mixture from drying out. Stir well after microwaving to ensure even heat distribution. This trick keeps the bowl creamy and luscious.