I still remember the exact moment these cinnamon sugar pumpkin bites changed my life forever. It was one of those miserable October afternoons where the rain couldn't decide if it wanted to be drizzle or downpour, and I was stuck inside with a half-carved pumpkin, a desperate sweet tooth, and exactly zero patience for another failed Pinterest recipe. My kitchen looked like a flour bomb had exploded, I'd already ruined two batches of something that was supposed to resemble doughnut holes, and I was this close to giving up and ordering takeout dessert like some kind of culinary quitter.
But then — and this is where it gets good — I started playing around with the ratios, adding a bit more pumpkin here, cutting back on the flour there, and suddenly something magical happened. The mixture transformed from a sticky disaster into this gorgeous, pliable dough that rolled like a dream. The smell that wafted from the oven was autumn in its purest form, like someone had bottled up hayrides and sweater weather and crackling fireplaces. When I pulled them out, still steaming, and rolled them in that cinnamon-sugar coating while they were warm enough to make the sugar melt just slightly, creating this crackly, caramelized shell?
Let's just say I ate six of them standing at the counter before I even made it to the photography stage. My neighbors knocked on the door because they could smell them through the walls. My cat, who normally doesn't care about human food, tried to climb my leg like these were made of pure tuna. This isn't just another pumpkin recipe — this is the pumpkin recipe that'll ruin all others for you. The one that makes people close their eyes when they take the first bite, that disappears from potluck tables in under five minutes, that gets requested more than your signature dish.
Okay, ready for the game-changer? Let me walk you through every single step — by the end, you'll wonder how you ever made it any other way.
What Makes This Version Stand Out
Pumpkin-Forward: Unlike those sad, dry pumpkin treats that taste like disappointment, these bites pack a serious pumpkin punch. We're using real pumpkin puree (not that watery stuff), and the result is a moist, tender interior that tastes like you bottled up pumpkin pie filling and made it somehow better.
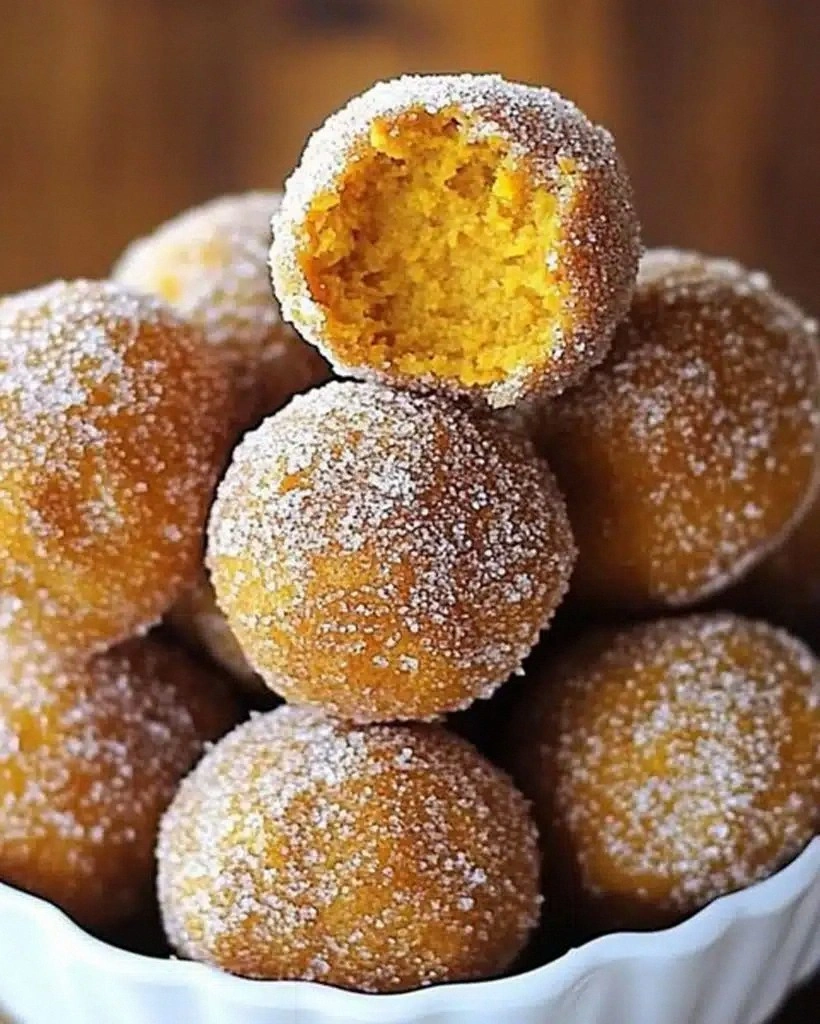
Perfect Texture: The exterior develops this incredible crackly shell from the cinnamon sugar that shatters like thin ice when you bite into it, revealing an impossibly soft, cloud-like center. It's the textural contrast that makes people stop mid-chew and stare at you like you've performed some kind of witchcraft.
Monday-Night Easy: No fancy equipment, no complicated techniques, no waiting for butter to reach room temperature. You can go from zero to pumpkin bites in under 45 minutes, and that includes cleanup. I've made these between Zoom meetings, during halftime, and once when unexpected guests showed up and I needed something impressive fast.
Make-Ahead Magic: These actually get better after sitting for a few hours. The flavors meld, the coating sets up perfectly, and they'll keep for days (if they last that long, which they won't). I always double the batch because they disappear faster than my willpower at a sample sale.
Holiday Hero: These work for every fall occasion — Halloween parties, Thanksgiving dessert tables, tailgates, book clubs, or those nights when you need something sweet but don't want to share. They're finger food, they're elegant enough for company, and they transport beautifully.
Ingredient Genius: We're using a combination of brown sugar and white sugar in the coating that creates this incredible depth of flavor. The brown sugar adds those caramel notes while the white sugar gives you that classic cinnamon-sugar crunch. It's a small detail that makes a massive difference.
Crowd Psychology: There's something about their bite-sized nature that makes people lose all self-control. They're like potato chips — nobody can eat just one. I've watched grown adults hover around the plate like vultures, and I've seen people try to sneak extras into napkins "for later."
Inside the Ingredient List
The Flavor Foundation
Let's start with the pumpkin, because this is where most recipes go wrong. You need exactly one cup of pure pumpkin puree — not pumpkin pie filling, which is basically liquid sugar with delusions of grandeur. The real stuff gives you that earthy, slightly sweet flavor that makes these bites taste like fall on steroids. If all you have is fresh pumpkin, roast it first until it's caramelized and concentrated, then puree it until smoother than your best pickup lines. Skip this and your bites will taste like a sad autumn disappointment.
The Texture Team
All-purpose flour is your reliable best friend here, but we're treating it right by not overmixing. Measure it properly by spooning it into your cup and leveling off — don't scoop directly or you'll pack in too much and create dense, sad bites. The baking powder is your lift, giving these babies their signature puff, while salt might seem weird in a sweet treat but trust me, it makes the pumpkin sing like it's auditioning for American Idol.
The Sweet Ensemble
We're using brown sugar in the dough for moisture and depth, plus white sugar in the coating for that classic crunch. The combination creates this incredible flavor profile that tastes like someone took the best parts of a snickerdoodle and a pumpkin cookie and made them have a beautiful baby. If you only have white sugar, you can substitute, but you'll lose that caramel richness that makes people close their eyes when they bite into these.
The Spice Stars
Cinnamon is obviously the headliner here, but don't sleep on the supporting cast. We're using a blend of cinnamon, nutmeg, and ginger — the holy trinity of fall spices. Each one plays its part: cinnamon brings the warmth, nutmeg adds complexity, and ginger gives you that little kick that makes people ask "what's in these?" in the best way possible. And now the fun part — we're using more spice than you think you need, because the coating will mellow it out perfectly.
The Method — Step by Step
- Start by preheating your oven to 350°F and lining a baking sheet with parchment paper. This might seem basic, but that parchment paper is going to save your sanity later when these release like magic instead of sticking and crumbling into sad little pumpkin casualties. While the oven heats, grab a large bowl and whisk together your flour, baking powder, salt, cinnamon, nutmeg, and ginger. Whisk it like you mean it — you want those spices distributed evenly because nobody wants to bite into a pocket of straight nutmeg that'll make their face contort like they just bit into a lemon.
- In a separate bowl, beat together the pumpkin puree, brown sugar, egg, and vanilla until they're smoother than a jazz saxophone solo. The mixture should be a gorgeous burnt orange color that makes you think of autumn sunsets and cozy sweaters. Add the melted butter and mix until just combined — don't go crazy here or you'll start developing the gluten and your bites will be tough instead of tender.
- Now comes the moment of truth — add the wet ingredients to the dry ingredients and stir with a spatula just until the flour disappears. This is not the time to channel your inner perfectionist. The dough will look shaggy and rough, like it needs more mixing, but trust me, it doesn't. Overmixing is the enemy of tender, fluffy bites, and you'll end up with hockey pucks instead of clouds.
- Use a small cookie scoop or two spoons to drop rounded tablespoons of dough onto your prepared baking sheet. Space them about two inches apart because they're going to puff up and spread a bit. If you want to get fancy, you can roll them between your palms to make perfect little spheres, but I usually just embrace the rustic look because I'm going to demolish them anyway.
- Slide the pan into the oven and bake for 12-15 minutes, but start checking at 10 because every oven is a unique snowflake with its own personality. You're looking for the edges to turn golden brown and the tops to spring back slightly when you press them gently. The bottoms should be a deep caramel color, and your kitchen should smell like you bottled up fall and set it on fire in the best possible way.
- While they're baking, prep your coating by mixing together white sugar, brown sugar, and cinnamon in a shallow bowl. The ratio is crucial here — too much cinnamon and you'll feel like you're eating potpourri, too little and you'll wonder why you bothered. I like to use my fingers to rub the brown sugar into the white sugar to break up any lumps and distribute everything evenly.
- Here's where it gets exciting — as soon as the bites come out of the oven, let them cool for exactly two minutes. Not one minute, not three minutes — two minutes. This is when they're warm enough to melt the sugar slightly but not so hot that they fall apart when you handle them. Working quickly (but carefully), roll each bite in the cinnamon sugar until it's completely coated. The sugar should stick beautifully and create that crackly shell we're after.
- Place the coated bites on a wire rack to cool completely, or if you're like me, eat three of them while they're still warm because you have zero self-control. As they cool, the coating will set up and create this incredible crunchy exterior that gives way to the soft, tender interior. It's like biting into a pumpkin-scented cloud wrapped in a sugar blanket.
- For the ultimate experience, give them a second roll in the cinnamon sugar after they've cooled completely. This creates an extra-thick coating that makes people wonder what kind of sorcery you're practicing. Store them in an airtight container, but I dare you to taste this and not go back for seconds — or thirds, or until you need to unbutton your pants.
That's it — you did it. But hold on, I've got a few more tricks that'll take this to another level...
Insider Tricks for Flawless Results
The Temperature Rule Nobody Follows
Here's the thing that separates the pumpkin bite masters from the amateurs — temperature control. Your ingredients should be at room temperature, but your baking sheet should be cool when you put the dough on it. A hot pan will cause the bottoms to set too quickly while the tops are still rising, creating weird dome-shaped bites that look like they're trying to escape. If you're making multiple batches, run your pan under cool water between uses or keep a couple of pans in rotation.
Why Your Nose Knows Best
Forget timers — your nose is the best tool you have. When these are perfectly baked, they'll smell like someone opened a fall-scented candle store in your kitchen. The aroma changes from raw dough to toasty, caramelized pumpkin magic. If you catch yourself standing near the oven sniffing like a bloodhound, they're probably done. Trust your instincts over the clock every single time.
The 5-Minute Rest That Changes Everything
After you coat them in sugar, let them sit for exactly five minutes before you taste one. This is torture, I know, but it allows the coating to set up properly and the flavors to meld. The difference between eating one immediately versus waiting five minutes is like the difference between a good pumpkin pie and a great pumpkin pie. Your patience will be rewarded with a coating that crackles like a crème brûlée when you bite into it.
Size Matters (But Not How You Think)
Bigger isn't better here. Small, uniform bites cook more evenly and give you a better ratio of crispy coating to tender interior. Aim for about the size of a ping pong ball — any larger and the centers stay doughy while the edges over-brown. Any smaller and you lose that satisfying bite that makes these so addictive.
The Double-Coat Secret
Here's where I confess my true obsession — I actually triple-coat these bad boys. First coat while warm, second coat after cooling, then a light dusting right before serving. It creates layers of sugar that crackle and melt at different rates, giving you this incredible textural experience. A friend tried skipping this step once — let's just say it didn't end well, and I had to eat her share to console myself.
Creative Twists and Variations
This recipe is a playground. Here are some of my favorite ways to switch things up:
The Chai Spice Remix
Replace the cinnamon-nutmeg-ginger blend with equal parts cardamom, allspice, and cloves. Add a teaspoon of black tea powder to the dough for subtle tannic notes. Roll in a mixture of sugar and crushed chai spices for coating that'll make your house smell like your favorite coffee shop. These are perfect for when you want to feel fancy but still eat twelve of them in one sitting.
The Chocolate Lover's Dream
Add two tablespoons of cocoa powder to the dry ingredients and replace half the butter with melted dark chocolate. Roll in a mixture of sugar and cocoa powder, then drizzle with white chocolate after they cool. The chocolate-pumpkin combination is surprisingly addictive — like someone took your favorite hot chocolate and your favorite pumpkin pie and made them have delicious babies.
The Maple Bourbon Edition
Replace half the brown sugar with maple sugar and add a tablespoon of bourbon to the dough. The alcohol cooks off, leaving behind this incredible depth that makes people ask if you went to culinary school. Roll in maple sugar mixed with cinnamon for a coating that tastes like Sunday morning pancakes but better because you can eat twenty of them without judgment.
The Savory-Sweet Surprise
Add a teaspoon of black pepper and a pinch of cayenne to the dough for bites that start sweet and end with a gentle warmth that builds. The sweet-savory combination confuses and delights people — they're not sure if they're eating dessert or some kind of sophisticated appetizer. These disappear at cocktail parties faster than free drinks.
The Citrus Zing Version
Add the zest of one orange and one lemon to the dough, and replace half the cinnamon with ground coriander. The citrus oils brighten everything and make the pumpkin taste fresher and more vibrant. Roll in sugar mixed with citrus zest for a coating that tastes like sunshine captured in pumpkin form.
The Nutty Buddy Variation
Fold half a cup of very finely chopped pecans into the dough, and roll the finished bites in a mixture of sugar and ground pecans. The nuts add texture and richness that takes these from snack to dessert. Toast the pecans first for maximum flavor impact — your kitchen will smell like you're baking in a forest cabin.
Storing and Bringing It Back to Life
Fridge Storage
Here's the thing — these actually don't need refrigeration, but they'll last longer if you store them in an airtight container at room temperature. They'll keep for up to three days, though I've never personally witnessed them survive past day two. If you do refrigerate them, let them come to room temperature before serving because cold kills the flavor party. Add a tiny splash of water before reheating — it steams back to perfection.
Freezer Friendly
These freeze beautifully, which is both dangerous and wonderful. Freeze them uncoated on a baking sheet, then transfer to a freezer bag. When you're ready to serve, thaw for 30 minutes, then warm in a 300°F oven for 5 minutes before rolling in fresh cinnamon sugar. They're like having emergency happiness stashed in your freezer for those days when only pumpkin will do.
Best Reheating Method
If you need to reheat (though they're pretty spectacular at room temperature), wrap them in foil and warm at 300°F for 5-7 minutes. Then give them a fresh roll in cinnamon sugar while they're warm. It's like hitting the reset button on freshness, and your house gets that amazing fall smell all over again.