I was halfway through a week‑long marathon of take‑out, and my kitchen smelled like a burnt pizza and a failed soufflé all at once. The moment the oven door creaked open, I realized the fire alarm was on cue, and I had to dash for the fridge like a culinary superhero. That chaos sparked a craving so fierce it could have powered a small city—slow‑cooked, melt‑in‑your‑mouth beef that could turn any bland dinner into an epic celebration. I dared myself to find a recipe that would rescue my taste buds from the ashes of disappointment, and I found it in the form of a crockpot French dip that would make my friends gasp. Picture the aroma of beef simmering with garlic, onion, and Worcestershire, drifting through the kitchen like a promise of comfort. If you’re ready to turn a kitchen disaster into a culinary triumph, keep reading because this version will change the way you think about every slow‑cooked sandwich.
The first bite was a revelation: the meat was so tender it practically dissolved in my mouth, while the broth wrapped the bread in a silky, savory embrace. The sound of the slow‑cooker bubbling was like a gentle lullaby, coaxing the flavors deeper into each other. The visual spectacle—golden, caramelized edges of the roast against a glossy, herb‑infused liquid—was a feast for the eyes before it even reached the palate. The texture of the bread, crisp on the outside yet soft enough to soak up the sauce, was a delightful contrast that kept me reaching for more. The taste was an orchestra of umami, saltiness, and subtle sweetness from the Worcestershire, all balanced by the mild heat of pepper. The final bite left me with a lingering, comforting warmth that made me feel like I’d just come home from a long journey.
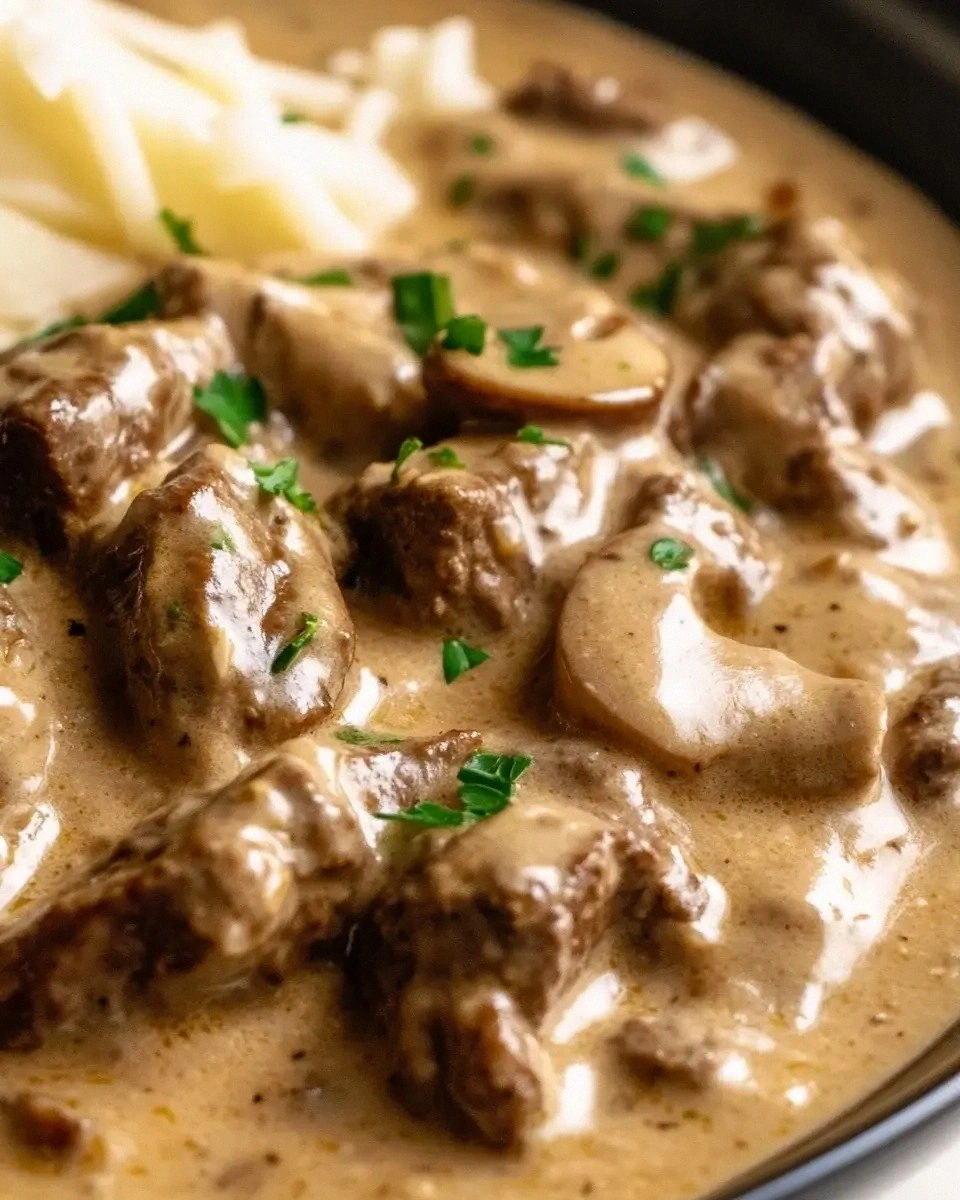
What makes this version stand out is not just the ingredients, but the way each element is orchestrated to create a symphony of flavors. The beef is marbled, ensuring that every bite is juicy, while the slow‑cooking process breaks down connective tissue into a silky, melt‑in‑your‑mouth texture that feels like velvet. The broth, enriched with Worcestershire and a hint of garlic, is thick enough to coat the bread like a luxurious sauce, yet light enough to keep the sandwich from feeling heavy. The cheese—provolone or Swiss—adds a creamy, melty layer that melts into the meat, creating a harmonious blend that is both comforting and indulgent. The hoagie rolls are toasted just enough to hold the sauce without becoming soggy, giving a satisfying crunch that contrasts with the tender meat. Together, these components create a dish that is both simple to make and incredibly sophisticated in flavor.
I dare you to taste this and not go back for seconds; the combination of savory beef, silky broth, and melty cheese will have you craving more. This is hands down the best version you’ll ever make at home because every element is perfected to bring out the best in the others. If you’ve ever struggled with a slow‑cooked sandwich that falls flat, you’re not alone—this recipe is the fix you’ve been searching for. Picture yourself pulling this out of the crockpot, the whole kitchen smelling incredible, and watching your friends’ faces light up as they take that first bite. Stay with me here—this is worth it. Let me walk you through every single step, and by the end, you’ll wonder how you ever made it any other way.
What Makes This Version Stand Out
- Tenderness: The chuck roast’s marbling turns the slow‑cooked meat into a buttery, melt‑in‑your‑mouth experience that feels like a luxury you can afford at home. Each bite releases a burst of savory juices that coat the bread and cheese, creating a flavor profile that lingers long after the last chew.
- Flavor Depth: The blend of garlic powder, onion powder, pepper, and salt, combined with Worcestershire, builds layers of umami that deepen with every simmer. The broth’s subtle sweetness balances the richness of the beef, creating a sauce that is both bold and approachable.
- Texture Contrast: The crusty edges of the hoagie rolls provide a satisfying crunch that contrasts beautifully with the soft, tender meat and creamy cheese. This textural dance keeps the sandwich exciting from the first bite to the last.
- Time Efficiency: While the dish simmers for hours, the active prep time is minimal—just a quick sear and a few minutes to assemble. This makes it perfect for busy weeknights or a last‑minute gathering that still feels special.
- Make‑Ahead Potential: The beef and broth can be prepared a day ahead, and the sandwiches can be assembled just before serving. This flexibility lets you focus on other tasks while still delivering a restaurant‑quality meal.
- Versatility: Whether you’re a fan of provolone or Swiss, or you prefer a spicy kick with a dash of hot sauce, this base can accommodate a range of tastes without compromising its core strengths. It’s a canvas that invites creative twists while remaining fundamentally delicious.
- Crowd‑Pleaser: The hearty, comforting nature of the dish makes it a hit with families, friends, and even the pickiest eaters. The visual appeal of the golden roast and the inviting aroma alone can draw a crowd to the table.
- Ingredient Quality: Using high‑quality chuck roast and fresh cheese ensures that the dish isn’t just a recipe, but an experience that showcases the best of each component. The emphasis on quality elevates every bite.
Alright, let’s break down exactly what goes into this masterpiece. The next section will walk you through each ingredient and why it matters.
Inside the Ingredient List
The Flavor Base
The beef is the star of the show, and choosing a cut with good marbling like chuck roast ensures a juicy, flavorful result. Marbling acts like a natural fat reservoir that melts into the meat as it cooks, creating a tender, succulent texture. Skipping this step and using a leaner cut would result in a dry, less satisfying sandwich. When shopping, look for a roast with visible streaks of fat—those are the places where the magic happens. If you’re in a pinch, you can substitute a brisket, but the flavor profile will shift slightly toward a richer, more robust taste.
The Seasoning Crew
Garlic powder and onion powder form the aromatic backbone of the broth, providing depth without the need for fresh aromatics that might burn. Black pepper adds a subtle heat that balances the richness of the beef, while salt pulls all the flavors together. If you prefer a smoky twist, a pinch of smoked paprika can be added, but it’s best kept subtle so it doesn’t overpower the other elements. Seasoning is key; under-seasoned meat can feel flat, whereas over-seasoning can mask the beef’s natural flavor. A good rule of thumb is to taste the broth before adding the meat, ensuring the seasoning is balanced.
The Unexpected Star
Worcestershire sauce is the secret sauce that gives the broth its signature depth and umami punch. Its blend of molasses, anchovies, and spices creates a complex flavor that feels both hearty and sophisticated. If you’re vegetarian, you can omit it and replace with soy sauce for a similar savory note, but the dish will lose a bit of its traditional character. Adding a splash of balsamic vinegar can also give a subtle tang that complements the cheese. The sauce’s acidity also helps break down the connective tissue in the beef, making the meat even more tender.
The Final Flourish
The hoagie rolls provide the perfect vessel for the beef and broth, offering a sturdy yet absorbent base. Toasting the rolls lightly before assembly adds a layer of crunch that contrasts with the tender meat. The cheese—whether provolone or Swiss—melts into the beef, creating a creamy, gooey layer that ties everything together. If you’re a cheese lover, you can add a few slices of sharp cheddar for a sharper bite. The bread’s crusty exterior also serves as a sturdy platform that keeps the sandwich from becoming soggy.
Everything's prepped? Good. Let’s get into the real action.

The Method — Step by Step
- Step 1: Prep the Beef – Start by patting the chuck roast dry with paper towels; this helps it sear properly. Season the meat generously on all sides with garlic powder, onion powder, black pepper, and salt. Let the roast rest at room temperature for about 15 minutes; this ensures even cooking. If you’re feeling fancy, you can add a splash of olive oil to the seasoning mix for extra flavor. The goal is to create a flavorful crust before it goes into the slow cooker.
- Step 2: Sear the Roast – Heat a large skillet over medium‑high heat and add a tablespoon of oil. Once hot, sear the roast for 2–3 minutes on each side until a golden brown crust forms. This caramelization locks in juices and adds a depth of flavor that the slow cooker alone can’t achieve. Don’t overcrowd the pan; sear in batches if necessary. Let the meat rest for a minute after searing before adding to the crockpot.
- Step 3: Build the Broth – In the crockpot, combine 2 cups of beef broth, 1 cup of water, and 1 tablespoon of Worcestershire sauce. Stir gently to mix the liquids and bring them to a gentle simmer. The broth’s base should be fragrant and ready to soak the beef. If you prefer a thicker sauce, you can add a tablespoon of flour or cornstarch to the broth before adding the meat. This step ensures a silky texture that clings to the bread.
- Step 4: Add the Roast – Place the seared roast into the crockpot, nestling it into the liquid. Cover and set the cooker to low for 6–7 hours or high for 3–4 hours. The low setting allows the connective tissue to break down slowly, yielding a melt‑in‑your‑mouth texture. If you’re in a hurry, the high setting still works but be mindful of potential texture changes. Check the roast’s internal temperature; it should reach at least 145°F for safe consumption.
- Step 5: Slice the Beef – Once the roast is done, remove it from the crockpot and let it rest for 10 minutes. This resting period allows juices to redistribute. While it rests, shred the meat using two forks or slice it thinly against the grain. The goal is to break the meat into bite‑sized pieces that soak up the broth. If you prefer a more rustic feel, leave the meat in large chunks.
- Step 6: Toast the Rolls – Slice the hoagie rolls in half lengthwise and toast them in a skillet with a little butter until golden brown. The toasted surface provides a sturdy base that resists sogginess. If you’re short on time, you can skip toasting and use the rolls as is; the broth will still keep them moist.
- Step 7: Assemble the Sandwiches – Lay a generous portion of shredded beef onto each roll. Layer with 1–2 slices of provolone or Swiss cheese on top of the meat. The cheese will melt into the warm beef, creating a creamy layer that ties the flavors together. If you’re adventurous, add a sprinkle of fresh parsley for a burst of color and freshness.
- Step 8: Serve with the Dip – Place the assembled sandwiches on a platter and pour a small amount of the remaining broth into a shallow dish. Encourage guests to dip the sandwich into the sauce, ensuring every bite is drenched in flavor. The broth should be thick enough to coat the bread but not so liquid that it overwhelms the sandwich. Enjoy the harmony of textures and flavors that only a slow‑cooked masterpiece can deliver.
That’s it— you did it. But hold on, I've got a few more tricks that'll take this to another level. The next section will reveal insider tips that can elevate the dish from great to unforgettable.
Insider Tricks for Flawless Results
The Temperature Rule Nobody Follows
Many cooks assume that “low and slow” is always the best approach, but the truth is the roast’s internal temperature is the real magic number. Aim for 155°F for a tender, juicy result that still holds its shape. If you’re short on time, a quick 3‑hour high setting can work, but remember to check the temperature to avoid overcooking. A thermometer is your best friend; a quick glance can save you from a dry sandwich. The right temperature ensures the meat stays moist and flavorful.
Why Your Nose Knows Best
The aroma of slow‑cooked beef is a powerful cue that the dish is ready. When the broth starts to bubble gently and the scent fills the kitchen, it’s time to pull the roast. If you’re unsure, give the meat a gentle squeeze; it should feel firm yet yield slightly under pressure. Trusting your nose can save you from overcooking or undercooking, because the scent evolves as the flavors mature. The scent is the first indicator that the slow‑cooked magic is happening.
The 5‑Minute Rest That Changes Everything
After removing the roast from the crockpot, let it rest for at least 10 minutes before slicing. This short pause allows juices to redistribute, ensuring every bite is juicy. Skipping this step can leave the meat dry and less flavorful. Some chefs even let it rest on a warm plate to keep it warm while slicing. The rest period is a small but crucial part of the process that guarantees a melt‑in‑your‑mouth experience.
Add a Dash of Heat for Extra Layer
A splash of hot sauce or a pinch of cayenne pepper can give the broth a subtle kick that contrasts with the rich beef. If you’re a spice lover, experiment with adding a few dashes of Tabasco right before serving. This adds a layer of complexity that keeps the dish exciting. Just remember to balance it with the cheese to avoid overpowering the delicate flavors. The heat can elevate the sandwich from comforting to bold.
Serve With a Fresh Herb Garnish
A handful of chopped parsley or basil can add a pop of color and freshness that lifts the entire dish. The herbs’ bright, citrusy notes cut through the richness of the beef and cheese. Sprinkle them over the assembled sandwiches right before serving to keep the flavors bright. A fresh herb garnish not only enhances the look but also adds a subtle aroma that makes the dish feel complete. It’s a simple step that makes a big difference.
Creative Twists and Variations
This recipe is a playground. Here are some of my favorite ways to switch things up:
The BBQ Twist
Swap Worcestershire for a smoky BBQ sauce to give the broth a sweet, smoky flavor. Add a tablespoon of molasses or brown sugar for extra depth. The sauce will caramelize slightly, giving the sandwich a glossy, sweet glaze. Pair it with a crunchy coleslaw for a satisfying contrast. This version works well for summer cookouts.
The Italian Flair
Add a handful of sun‑dried tomatoes and a sprinkle of oregano to the broth for an Italian-inspired twist. Use mozzarella instead of provolone for a milder, sweeter cheese. The tomatoes bring a sweet acidity that balances the richness of the beef. Serve the sandwiches on ciabatta rolls for a rustic feel. This version feels like a hearty Italian panini.
The Vegan Vibe
Replace the beef with a plant‑based steak or seitan for a vegan version. Use vegetable broth, a splash of soy sauce, and nutritional yeast for depth. Swap the cheese for a vegan cheese slice that melts well. Toast the rolls and serve with a side of pickled veggies. This version keeps the comfort factor while catering to plant‑based diets.
The Southwestern Kick
Add a teaspoon of chipotle powder and a dash of lime juice to the broth for a smoky, citrusy flavor. Use pepper jack cheese for a spicy melt. Garnish with fresh cilantro and sliced jalapeños. The combination of heat and brightness elevates the sandwich to a fiesta on a plate. This version is perfect for those who love bold flavors.
The Breakfast Bonanza
Serve the sandwiches with a side of scrambled eggs and a drizzle of hot sauce. Use a croissant instead of a hoagie roll for a buttery, flaky texture. The eggs add protein and richness, making it a hearty breakfast or brunch. The combination of savory beef, cheese, and eggs creates a breakfast that feels like a feast.
The Quick Fix
If you’re short on time, use a pre‑seasoned rotisserie chicken instead of slow‑cooked beef. Add a splash of the same broth to keep the sandwich moist. The result is a quick, flavorful sandwich that still delivers the comforting essence of the original. This version is ideal for busy weekdays or last‑minute gatherings.
Storing and Bringing It Back to Life
Fridge Storage
Store the assembled sandwiches in an airtight container for up to 2 days. Keep the broth in a separate container to avoid sogginess. When ready to eat, reheat the sandwich in the microwave for 1–2 minutes, then place it under a broiler for 2 minutes to melt the cheese. The cheese will re‑melt and the broth will reheat evenly. This method preserves the sandwich’s texture and flavor.
Freezer Friendly
Wrap the beef and broth separately in freezer‑safe bags. Freeze the rolls individually, then reheat them in a toaster or oven. When you’re ready, thaw the beef and broth in the refrigerator overnight. Reheat on the stovetop or in the microwave, adding a splash of water to keep it moist. This approach allows you to enjoy the dish anytime without sacrificing quality.
Best Reheating Method
The best way to reheat the sandwich is to place it on a baking sheet and bake at 350°F for 10 minutes. If you’re in a hurry, use the microwave but add a teaspoon of water to keep the sandwich from drying out. After reheating, let the sandwich rest for a minute to allow the cheese to set. This method ensures the sandwich tastes as good as when it was first made.