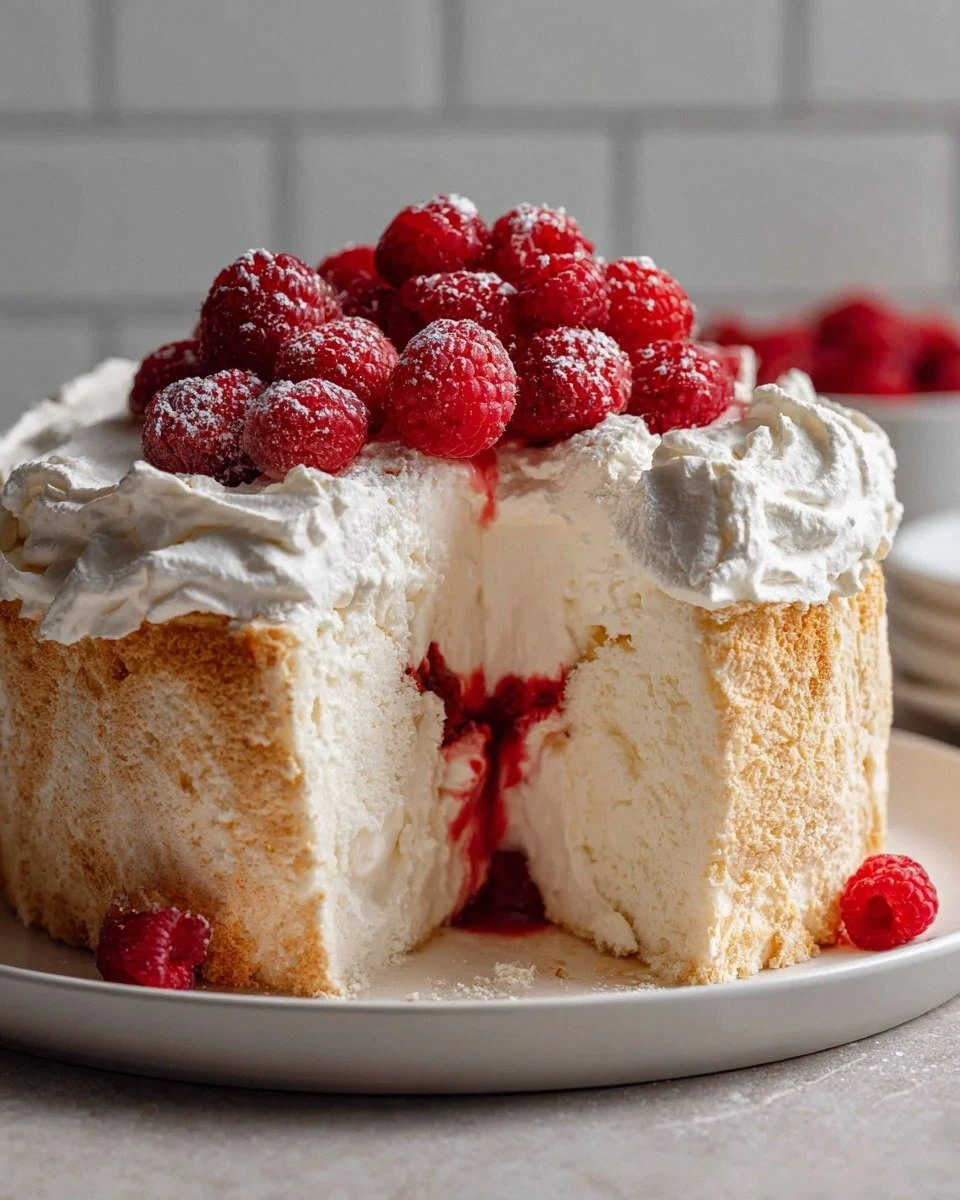
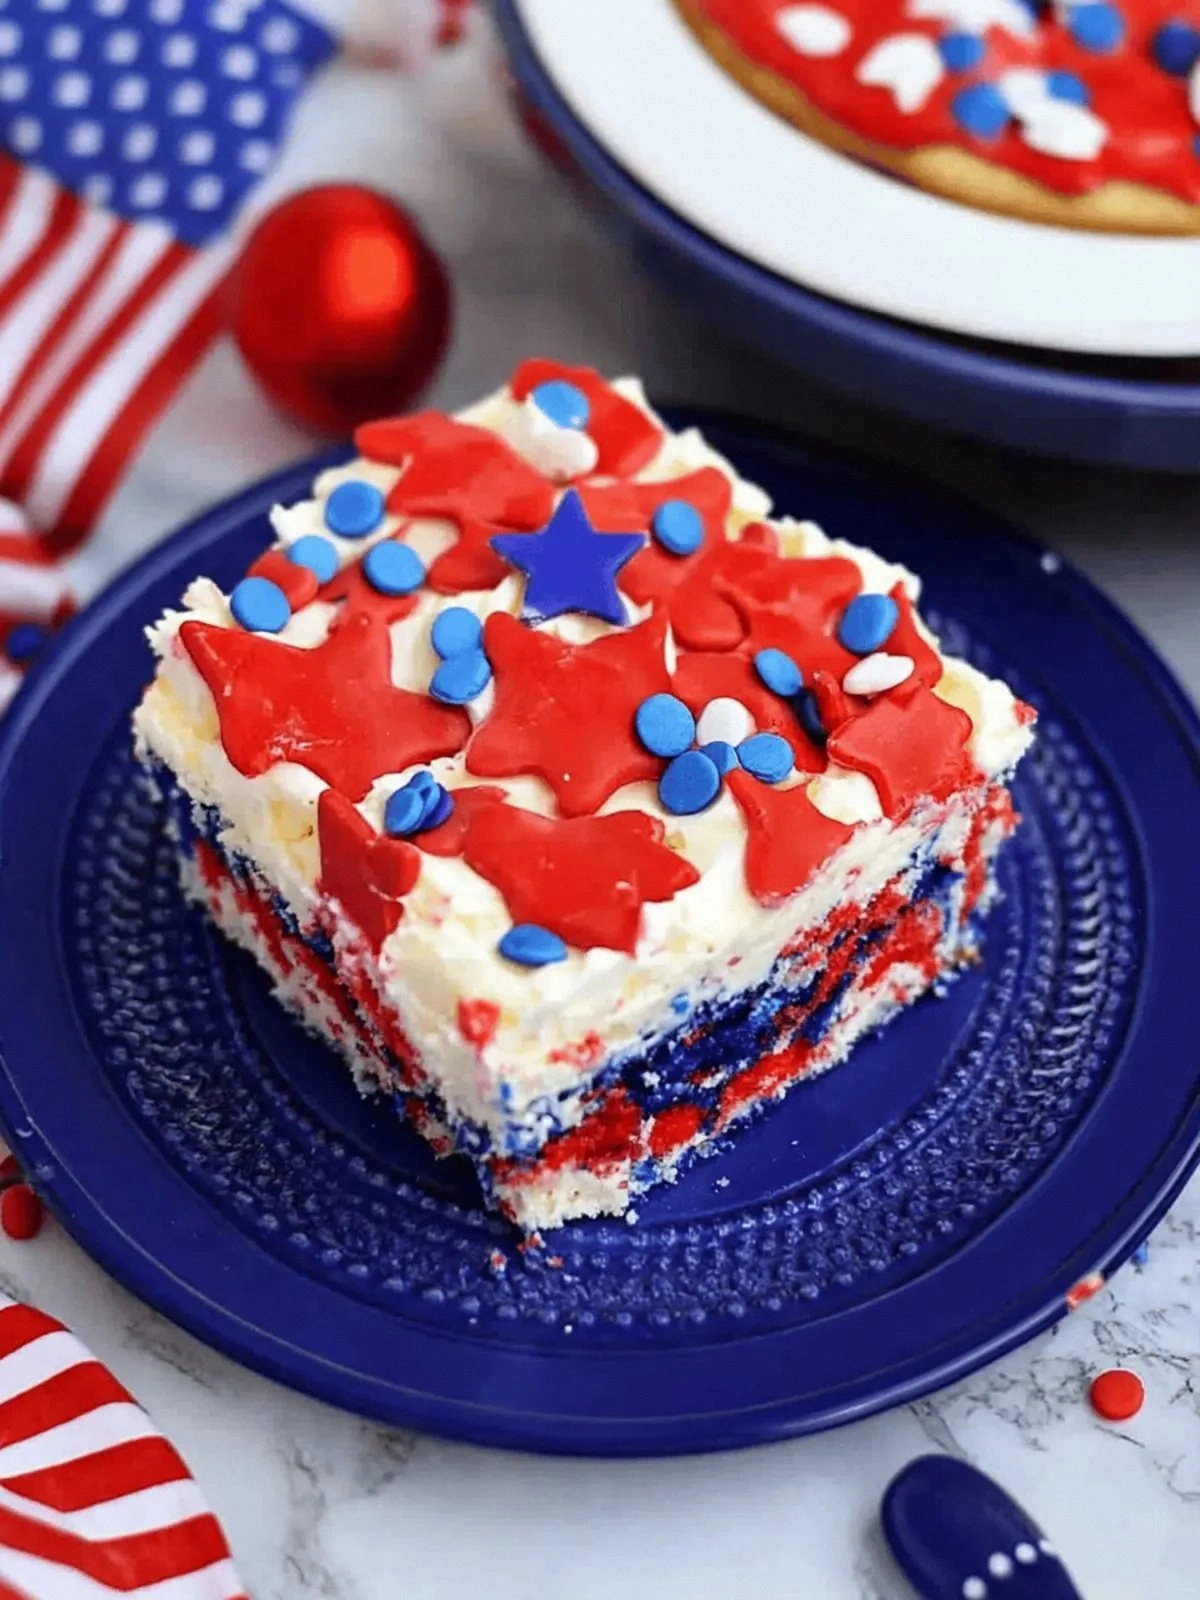
I was in the middle of a midnight bake-off with my best friend when the kitchen lights flickered, the oven door creaked, and the cake batter went rogue, splattering across the counter like a neon paint explosion. I stared at the mess, heart racing, and thought, “If I could turn this chaos into a showstopper, it would be legendary.” That moment sparked the creation of the Delicious Patriotic Poke Cake, a dessert that marries the boldness of red, white, and blue with the comfort of a classic cake‑cheesecake hybrid. The result is a towering, glossy masterpiece that looks like a flag and tastes like a sweet victory.
Picture this: the oven hums like a contented engine, the aroma of vanilla and chocolate lacing the air, the sound of a timer tick‑to‑tick, and a golden crust that crackles when you press it. The cake’s surface is a glossy, shimmering canvas, and when you slice through it, you see a rainbow swirl of red and blue frosting that feels almost liquid. The first bite delivers a buttery, moist crumb that melts in your mouth, followed by a tangy, creamy cheesecake layer that balances the sweetness like a well‑played duet. The final flourish is a dusting of patriotic sprinkles that add a crunch, a pop of color, and a celebratory sparkle.
What makes this version stand out? It’s not just the colors; it’s the fusion of textures and flavors that keep your palate dancing. The cake mix provides a familiar, comforting base, while the instant cheesecake pudding mix introduces a silky, tangy contrast that elevates the whole experience. Gel food coloring is used in a way that preserves the natural sweetness of the batter, preventing the cake from tasting like a science experiment. The Cool Whip topping adds a fluffy, airy finish that feels like a cloud on your tongue, and the sprinkles give a satisfying crunch that signals the end of the bite. The result is a dessert that feels both playful and refined, perfect for holiday gatherings, patriotic celebrations, or any moment that calls for a touch of flair.
I dare you to taste this and not go back for seconds. The first bite will have you reaching for a fork, the second will make you question why you ever ate anything else. Most recipes get this completely wrong by over‑baking the cake or under‑mixing the cheesecake layer, but I’ve cracked the perfect balance. Picture yourself pulling this out of the oven, the whole kitchen smelling incredible, and watching guests’ eyes widen as they see the vibrant colors. And when you serve it, the applause will be louder than a drumroll.
If you’ve ever struggled with cake that turns out dry or cheesecake that’s too dense, you’re not alone, and I’ve got the fix. The secret lies in the precise ratio of liquid to dry ingredients and the careful layering of the two distinct textures. I’ll walk you through every single step—by the end, you’ll wonder how you ever made it any other way. Let’s dive in, and I promise the journey will be as rewarding as the dessert itself.
This isn’t just a cake; it’s a conversation starter, a centerpiece, and a memory in the making. The moment you slice through the first layer and reveal the bright, swirling frosting, you’ll hear the room gasp. That gasp will turn into applause, laughter, and the kind of photo that will haunt your social media feeds forever. I’ve spent hours tweaking the recipe to ensure that every bite delivers the same explosion of flavor. And now, I’m handing you the playbook—so grab your apron and let’s get baking.
What Makes This Version Stand Out
- Taste: The combination of vanilla cake and tangy cheesecake creates a layered flavor profile that feels like a symphony of sweet and savory. Each bite offers a distinct yet harmonious experience, ensuring no single component overpowers the others.
- Texture: The cake is moist and fluffy, while the cheesecake layer is silky and dense, providing a delightful contrast that keeps your mouth moving.
- Simplicity: With only eight basic ingredients, this recipe is accessible to both novice bakers and seasoned chefs alike, requiring minimal prep time and equipment.
- Uniqueness: The use of gel food coloring in a two‑tone palette gives the cake a striking, patriotic appearance that sets it apart from ordinary desserts.
- Crowd Reaction: Guests are drawn in by the visual appeal, and the taste keeps them coming back for more. The dish has become a staple at family gatherings and holiday parties.
- Ingredient Quality: The recipe relies on high‑quality cake mix and cheesecake mix to deliver consistent flavor and texture, while the Cool Whip adds a creamy, airy finish that elevates the overall experience.
Inside the Ingredient List
The Flavor Base
The white cake mix is the backbone of this dessert, offering a light, buttery flavor that pairs beautifully with the cheesecake layer. It contains vanilla and sugar, which create a subtle sweetness that doesn’t overpower the other components. If you skip the cake mix, the entire structure collapses, leaving you with a dense, unbalanced treat. For a healthier twist, consider using a low‑sugar or whole‑grain cake mix, though the texture may change slightly.
The Texture Crew
Eggs bind the batter together, ensuring a tender crumb and structural integrity. The vegetable oil adds moisture, preventing the cake from drying out during baking. The instant cheesecake pudding mix contributes a dense, creamy layer that balances the lightness of the cake. If you replace the pudding mix with fresh cream cheese, the result will be richer but require more time to chill. The Cool Whip topping is the final touch that introduces a fluffy, airy layer, giving the dessert a cloud‑like finish.
The Unexpected Star
Gel food coloring is the secret weapon that turns an ordinary cake into a patriotic masterpiece. The red and blue colors are layered in a swirling pattern that resembles a flag, making the dessert visually striking. The coloring is non‑toxic, food‑grade, and doesn’t alter the flavor profile, preserving the natural sweetness of the batter. If you prefer a more subtle hue, use half the amount of coloring; the cake will still look festive.
The Final Flourish
Patriotic sprinkles add a final crunch and sparkle that completes the patriotic theme. They’re typically made from sugar, corn syrup, and natural colorants, offering a sweet, slightly caramelized bite. Sprinkles can be swapped with edible glitter or colored sugar for a different visual effect. If you’re hosting a gluten‑free event, ensure the sprinkles are certified gluten‑free to avoid cross‑contamination.
Everything's prepped? Good. Let's get into the real action.
The Method — Step by Step
- Preheat the oven to 350°F (175°C). While the oven warms, line two 9‑inch round cake pans with parchment paper, ensuring the paper extends slightly beyond the rim to prevent sticking. Place the pans on a level surface, as uneven pans can cause the cake to rise unevenly. Let the oven reach the set temperature before adding the batter—this guarantees a consistent rise.
- Prepare the cake batter by mixing the white cake mix, vegetable oil, and eggs in a large bowl. Use a hand mixer or stand mixer on medium speed until the batter is smooth and glossy, with no dry patches. The batter should be thick enough to hold its shape but still pourable. This step is crucial; over‑mixing can make the cake tough, while under‑mixing leaves lumps.
- Color the batter by adding a few drops of red gel food coloring to one portion of the batter and blue to the other. Gently swirl the colored batters together with a spoon to create a marbled effect. The swirl should be visible but not too thick—think of a gentle ribbon of color. If you prefer a more uniform color, simply mix the colors together thoroughly before adding to the batter.
- Divide the batter evenly between the prepared pans. Tap the pans gently on the counter to release any air bubbles. The batter should fill the pans to about 2/3 capacity to allow room for rising. Overfilling can cause the cake to spill over the edges during baking.
- Bake the cake for 20–25 minutes, or until a toothpick inserted into the center comes out clean. The cake should have a golden‑brown crust and feel firm to the touch. If the top browns too quickly, tent it with foil to prevent burning. Once baked, remove the cakes from the oven and let them cool in the pans for 5 minutes before transferring them to a wire rack to cool completely.
- Make the cheesecake layer by mixing the instant cheesecake pudding mix with 2 cups of milk in a separate bowl. Whisk until the mixture thickens and becomes smooth. The pudding mix should be fully dissolved to avoid a grainy texture. Allow the mixture to sit for 5 minutes so it can thicken further before spreading.
- Assemble the cake by placing one cake layer on a serving plate. Spread the cheesecake mixture evenly over the top, using a spatula to create a smooth surface. Place the second cake layer on top, gently pressing down to ensure even contact between layers. The cake should be stable and ready for frosting.
- Apply the Cool Whip topping by piping it in a decorative swirl or fan pattern over the entire cake. Use a piping bag fitted with a star tip for an elegant finish. The Cool Whip should be firm enough to hold its shape but still soft enough to melt slightly when the cake is sliced. This adds a creamy, airy layer that contrasts beautifully with the dense cheesecake.
- Decorate with sprinkles by sprinkling the patriotic sprinkles over the Cool Whip. Shake the cake gently to distribute the sprinkles evenly. The sprinkles should be visible and add a subtle crunch. If you’re using a large quantity, consider placing them in a decorative pattern for a more artistic look.
- Chill and set the cake in the refrigerator for at least 2 hours before serving. This allows the layers to firm up and the flavors to meld together. A chilled cake will slice cleanly and hold its shape better, making it easier to serve. Keep the cake covered with a lid or plastic wrap to prevent it from absorbing odors from other foods.
That's it—you did it. But hold on, I've got a few more tricks that'll take this to another level. Keep reading for insider tips that will ensure every bite is flawless.
Insider Tricks for Flawless Results
The Temperature Rule Nobody Follows
Many bakers bake at a slightly higher temperature to get a quick rise, but this can cause the cake to dry out. Keep the oven at 350°F (175°C) and use a calibrated oven thermometer to ensure accuracy. A temperature deviation of even 10°F can affect the texture. If your oven runs hot, reduce the temperature by 10–15°F and extend the baking time by a couple of minutes. This simple adjustment guarantees a moist crumb.
Why Your Nose Knows Best
When you first open the oven door, you’ll notice a subtle scent of vanilla and caramel. That aroma is the cake’s first hint of success. If the smell feels flat or overly sweet, it indicates that the batter was too dry or the cake was over‑baked. Trust your nose; it’s a reliable gauge for doneness. If you’re unsure, use the toothpick test for a definitive check.
The 5‑Minute Rest That Changes Everything
After baking, let the cake rest in the pan for exactly five minutes before transferring it to a rack. This brief pause allows the steam to settle, preventing the bottom from becoming soggy. It also makes the cake easier to handle, reducing the risk of cracking when you lift it. Many bakers skip this step, but the difference is noticeable in the final texture.
Keep It Cool, Keep It Fresh
Store the assembled cake in the refrigerator, covered with plastic wrap or a lid, for up to three days. If you need to keep it longer, freeze the cake for up to a month. When reheating, let the cake sit at room temperature for 10–15 minutes to soften the frosting. A quick splash of milk on the frosting can restore moisture if it has dried out during storage.
The Secret to Sparkling Sprinkles
Sprinkles can lose their sparkle if exposed to air for too long. Keep them in an airtight container until just before use. If you’re using fresh sprinkles, a quick rinse under cold water removes excess sugar, giving them a cleaner look. For a dramatic effect, dust the cake with powdered sugar after adding the sprinkles to create a subtle sparkle.
Creative Twists and Variations
This recipe is a playground. Here are some of my favorite ways to switch things up:
Chocolate‑Red Swirl
Add a handful of dark chocolate chips to the batter before baking. The chocolate will melt into pockets of rich flavor, complementing the sweet cake. The chocolate will also deepen the red swirl, creating a more dramatic visual effect.
Citrus Zest Surprise
Incorporate a tablespoon of lemon or orange zest into the cake batter. The bright citrus notes will cut through the sweetness, giving the cake a fresh, lively finish. The zest also adds a subtle aroma that elevates the overall experience.
Almond Crunch Layer
Stir toasted almond slivers into the cheesecake layer. The crunch will contrast nicely with the silky cheesecake, adding texture and a nutty flavor. Almonds also pair well with the patriotic colors, giving the cake a sophisticated twist.
Berry‑Infused Frosting
Blend a cup of fresh or frozen berries into the Cool Whip before piping. The berries will infuse the frosting with natural sweetness and a pop of color. This variation adds a fruity dimension that works well for summer celebrations.
Spiced Apple Core
Add a dash of cinnamon and a few diced apples to the cake batter. The warm spice and tart apple will create a comforting, autumnal flavor profile. The apples will also add moisture, keeping the cake from drying out.
Minty Green Surprise
Swap the blue coloring for green and add a few drops of mint extract. The cool mint flavor pairs beautifully with the sweet cake and the creamy cheesecake. The green hue will give the cake a fresh, summery look.
Storing and Bringing It Back to Life
Fridge Storage
Keep the assembled cake in the refrigerator for up to three days. Cover it tightly with plastic wrap or a lid to prevent the frosting from drying out. If you’re serving the cake later in the day, let it sit at room temperature for 10–15 minutes to soften the frosting.
Freezer Friendly
Wrap the cake tightly in plastic wrap, then place it in a freezer‑safe container or bag. Freeze for up to one month. When you’re ready to serve, thaw the cake overnight in the refrigerator. Let it come to room temperature before slicing to restore the frosting’s texture.
Best Reheating Method
If the cake has been frozen, reheat it in a preheated 300°F (150°C) oven for 10–15 minutes, just until the frosting is soft again. Alternatively, let the cake sit at room temperature for an hour, then add a splash of milk to the frosting before serving. The milk will steam the frosting back to its original fluffy state, ensuring every bite is as delightful as the first.