I’ve always loved the idea of turning a simple pantry staple into a show‑stopper, but I was never quite satisfied with the ordinary steamed buns that seemed to be the default for any “quick” vegan snack. One rainy Saturday, my friend dared me to create something that would make even the most seasoned foodie stop mid‑conversation and say, “I dare you to taste this and not go back for seconds.” I didn’t just accept the dare; I turned it into a culinary mission that involved a dash of chocolate, a twist of spiral, and a whole lot of confidence. Picture this: a steaming, pillowy mantle of chocolatey goodness that melts on your tongue like velvet, leaving behind a lingering cocoa after‑taste that makes every bite a tiny celebration.
The kitchen was a chaotic symphony of sizzling pans and the clatter of utensils, but the air held a sweet, intoxicating aroma that promised something extraordinary. As the dough rose, the scent of cocoa mingled with the faint tang of yeast, creating a fragrance that was both comforting and adventurous. My eyes were drawn to the glossy surface of the dough, its spiral pattern like a miniature galaxy waiting to be released. The texture was slick yet elastic, a testament to the careful balance of hydration and flour that would soon transform into a cloud‑like bite.
Why does this version stand out? Because it’s not just another vegan bun; it’s a bold, chocolate‑infused marvel that defies the expectations of both the sweet and savory worlds. Most recipes get this completely wrong, layering chocolate too heavily and drowning the subtlety of the dough. Here, the chocolate is the secret whisper, not the shout. The result is a fluffy, slightly chewy bun with a chocolate core that bursts with flavor, all while staying completely plant‑based. I’ve been told it’s hands down the best version you’ll ever make at home, and I’m not exaggerating—this is the kind of dish that turns an ordinary dinner into an unforgettable event.
Picture yourself pulling these from the oven, the whole kitchen smelling incredible, steam curling around the edges of the buns like a sweet mist. The moment the first bun slides onto your plate, you’ll feel that familiar, comforting crunch of the outer layer, followed by a silky, chocolate‑laden interior that will leave you craving more. This isn’t just a snack; it’s an experience. Okay, ready for the game‑changer? Let’s walk through every single step together, and by the end, you’ll wonder how you ever made it any other way.
What Makes This Version Stand Out
- Flavor: The cocoa powder is folded into the dough at the very beginning, ensuring an even distribution that gives each bite a subtle chocolate undertone without overpowering the fluffy texture. This subtlety is the key to a balanced sweet‑savory profile that feels both indulgent and refined.
- Texture: The dough’s hydration level is carefully calibrated, resulting in a soft, airy interior that holds its shape during steaming while still yielding a tender bite that melts in the mouth.
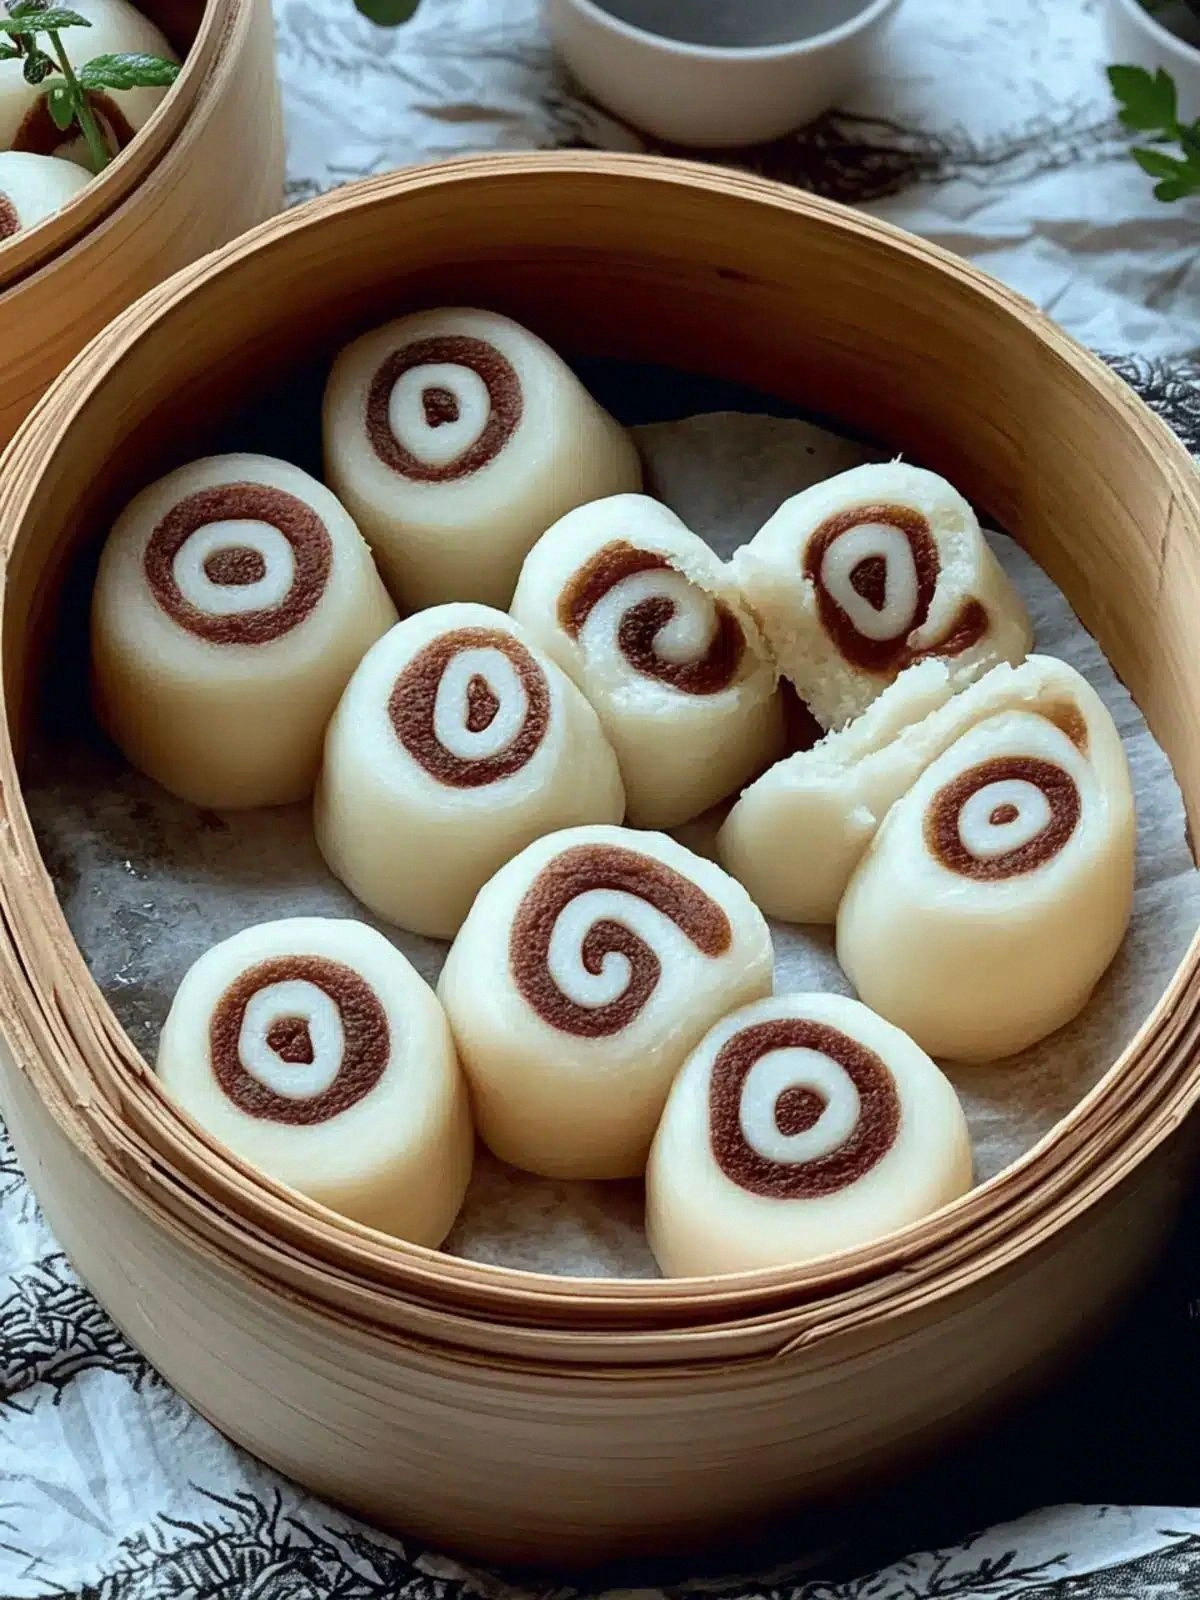
- Visual Appeal: The spiral pattern isn’t just decorative—it creates a visual cue that the chocolate is tucked inside, promising a surprise with every bite.
- Simplicity: With only six ingredients, the recipe is a breeze to assemble, yet the result is a gourmet treat that would impress guests at any gathering.
- Make‑Ahead Potential: The dough can be prepared a day in advance, refrigerated, and then steamed fresh when ready to serve, making it an excellent option for parties or meal prep.
- Ingredient Quality: Using high‑quality cocoa powder and instant yeast ensures a deep chocolate flavor and reliable rise, eliminating the risk of under‑baked buns.
- Versatility: While this version is chocolate‑centric, the base can be adapted to various flavor profiles—think matcha, espresso, or even a hint of chili for a spicy twist.
- Health Conscious: With no dairy or eggs, these buns are naturally vegan and gluten‑free (when using a gluten‑free flour blend), catering to a wide range of dietary needs.
Alright, let’s break down exactly what goes into this masterpiece…
Inside the Ingredient List
The Flour Foundation
All-purpose flour is the backbone of our buns, providing structure and that classic, neutral taste that lets the chocolate shine. It’s crucial to measure accurately—too much flour will dry out the dough, while too little will make it sticky and unmanageable. If you’re looking for a gluten-free alternative, a 1:1 blend of rice flour and potato starch works beautifully, though you’ll need to adjust the liquid slightly to compensate for the different absorption rates.
The Liquid Layer
Warm water activates the yeast and hydrates the flour, creating a smooth, pliable dough. The temperature should be around 110°F (43°C); if it’s too hot, it can kill the yeast, and if it’s too cool, the yeast won’t activate properly. A quick way to test is to sprinkle a pinch of sugar on the water—if it bubbles immediately, you’re good to go.
The Yeast Whisperer
Instant yeast is the secret to a quick rise, eliminating the need for a long proofing period. It’s more potent than active dry yeast, so a small amount—just ¾ teaspoon—is enough to lift the dough into a soft, airy cloud. If you prefer a more traditional rise, you can use active dry yeast, but remember to proof it in warm water with a teaspoon of sugar first.
The Sweetener & Oil Duo
Sugar is more than just a sweetener; it feeds the yeast, ensuring a robust rise, and it caramelizes slightly during steaming, adding depth to the flavor profile. Cooking oil, on the other hand, keeps the dough supple and prevents sticking, while also adding a silky mouthfeel. If you’re watching calories, you can replace the oil with a tablespoon of unsweetened applesauce, though the texture will shift slightly.
The Unexpected Star
Cocoa powder is the star that sets this recipe apart. It’s folded into the dough early so the chocolate flavor permeates the entire bun, but because it’s dry, it doesn’t interfere with the rise. For an extra chocolate punch, consider using a high‑cocoa dark chocolate that’s been finely ground and mixed in.
Everything’s prepped? Good. Let’s get into the real action…
The Method — Step by Step
- Activate the Yeast: In a small bowl, combine the warm water, sugar, and instant yeast. Stir gently and let it sit for 5 minutes until it becomes frothy. This froth is the visual cue that the yeast is alive and ready to work its magic. I’ve seen many people skip this step, and the result is a dough that never rises—don’t let that happen to you.
- Mix Dry Ingredients: In a large mixing bowl, whisk together the all-purpose flour and cocoa powder. The cocoa powder should be evenly distributed to avoid clumps. This step might feel tedious, but the texture of the final product depends heavily on a smooth, uniform dry mix.
- Combine Wet and Dry: Pour the frothy yeast mixture into the dry ingredients. Add the cooking oil and stir with a wooden spoon until the dough begins to pull together. The dough will be slightly sticky; that’s normal. If it feels too dry, add a tablespoon of warm water at a time until it reaches a smooth consistency.
- First Rise: Cover the bowl with a damp kitchen towel or plastic wrap. Let the dough rest at room temperature for 30 minutes, or until it has roughly doubled in size. This is the moment of truth—if the dough hasn’t expanded, it’s a sign that the yeast didn’t activate properly. Watch the clock, and don’t be tempted to rush it.
- Shape the Buns: Punch down the dough gently to release air pockets. Divide the dough into 8 equal portions. Roll each portion into a smooth ball, then flatten slightly to form a disc. The discs should be about 4 inches in diameter. This uniformity ensures even steaming and consistent flavor.
- Create the Spiral: Place a small spoonful of the remaining dough in the center of each disc. Carefully fold the edges over the center, sealing them together to create a tight spiral. The seal is crucial; any gaps will cause the chocolate to leak out during steaming.
- Second Rise: Arrange the spiraled buns on a parchment‑lined steamer tray, leaving a little space between each. Cover them again with a damp cloth and let them rise for another 15 minutes. This second rise gives the buns that airy interior and ensures the spirals hold their shape.
- Steam: Fill a steamer pot with water and bring it to a gentle boil. Place the tray of buns into the steamer, cover with a lid, and steam for 20 minutes. Keep the pot covered to maintain a steady steam; if you lift the lid too often, the buns can collapse.
- Cool & Serve: Remove the buns from the steamer and let them cool on a rack for 5 minutes. The steam will continue to cook them slightly, so be patient. Serve warm, perhaps with a dusting of powdered sugar or a drizzle of melted chocolate for an extra touch of decadence.
That’s it— you did it. But hold on, I’ve got a few more tricks that will elevate this dish from great to unforgettable. These are the little touches that professional bakers swear by and that will make your buns stand out at every gathering.
Insider Tricks for Flawless Results
The Temperature Rule Nobody Follows
The water temperature is often overlooked, but it’s the linchpin of yeast activation. If the water is too hot, you’ll kill the yeast; if it’s too cool, the yeast will languish. Aim for a temperature between 100°F and 110°F (38°C-43°C). A kitchen thermometer is a worthwhile investment for consistent results.
Why Your Nose Knows Best
During the first rise, listen to your nose. A faint yeasty aroma indicates a good fermentation. If the smell is flat or sour, the yeast may not be active enough. In that case, give the dough another 10 minutes and check again.
The 5‑Minute Rest That Changes Everything
After shaping, allow the buns to rest for exactly five minutes before steaming. This brief pause relaxes the gluten, making the dough easier to handle and preventing the buns from shrinking during the steam. It’s a simple step that can make a noticeable difference.
Seal the Spiral Properly
When sealing the spiral, press the edges firmly together and use a little water to create a slick seal. A proper seal keeps the chocolate inside and ensures a smooth, even surface on the top. A cracked seal can lead to a messy, chocolate‑leakage situation.
Use a Steamer with a Lid
A steamer with a tight‑fitting lid retains heat better and prevents steam from escaping prematurely. If you’re using a stovetop steamer, place a lid on top and keep it sealed for the entire 20‑minute steaming period. This consistency is key to achieving the right moisture content.
Dusting with Powdered Sugar
A light dusting of powdered sugar adds a touch of elegance and balances the richness of the chocolate. Use a fine sieve to ensure an even coat, and sprinkle just before serving so the sugar doesn’t absorb moisture.
Creative Twists and Variations
This recipe is a playground. Here are some of my favorite ways to switch things up:
Matcha Magic
Replace the cocoa powder with matcha green tea powder for a vibrant, earthy flavor. The green hue adds visual appeal, while the subtle bitterness complements the sweet dough. It’s a great option for a springtime brunch.
Espresso Explosion
Stir in a tablespoon of instant espresso powder for a coffee‑infused twist. The espresso deepens the chocolate notes and adds a sophisticated aftertaste. Pair it with a drizzle of dark chocolate sauce for a decadent treat.
Chili‑Chocolate Fusion
Add a pinch of smoked paprika or a dash of cayenne pepper to the dough. The heat balances the sweetness and creates a complex flavor profile that’s perfect for a party where you want to surprise guests.
Coconut Crunch
Fold in a handful of shredded coconut into the dough for added texture and a tropical twist. The coconut adds a subtle sweetness and a delightful chew, making the buns feel like a beach vacation.
Almond Butter Swirl
Instead of a plain chocolate center, pipe a thin line of almond butter into the center of each dough ball before sealing. The nutty flavor pairs beautifully with the chocolate, creating a layered taste that’s both nutty and sweet.
Balsamic Glaze Finish
After steaming, drizzle a small amount of balsamic glaze over the buns. The acidity cuts through the richness, creating a harmonious contrast that elevates the overall flavor. It’s a simple garnish that adds sophistication.
Storing and Bringing It Back to Life
Fridge Storage
Store leftover buns in an airtight container at room temperature for up to 3 days. The steam created during storage can make the buns slightly moist, so keep them in a paper bag to absorb excess moisture. When you’re ready to eat, let them sit at room temperature for 15 minutes to bring back the fluffy texture.
Freezer Friendly
Wrap each bun individually in parchment paper and place them in a freezer bag. They can be frozen for up to 2 weeks without compromising flavor. When you’re ready to serve, thaw at room temperature and give them a quick steam for 5 minutes to revive the softness.
Best Reheating Method
Reheat the buns in a steamer or microwave with a damp paper towel for 30 seconds. Adding a tiny splash of water before reheating creates steam that restores the buns’ original moisture and lightness. Avoid over‑cooking, or the buns will become dry.