I never thought a kitchen mishap could turn into a culinary revelation, but here I am, holding a tray of No‑Bake Turkish Delight Cheese that has my friends begging for the recipe. The story begins on a rainy Thursday when I tried to make a classic cheesecake, only to realize the oven was out of order. I grabbed the nearest refrigerator, a bag of cream cheese, some flour, and a dash of rose water, hoping to salvage the dessert. The result? A silky, fragrant, melt‑in‑your‑mouth treat that defied expectations and left the entire house smelling like a Turkish bazaar.
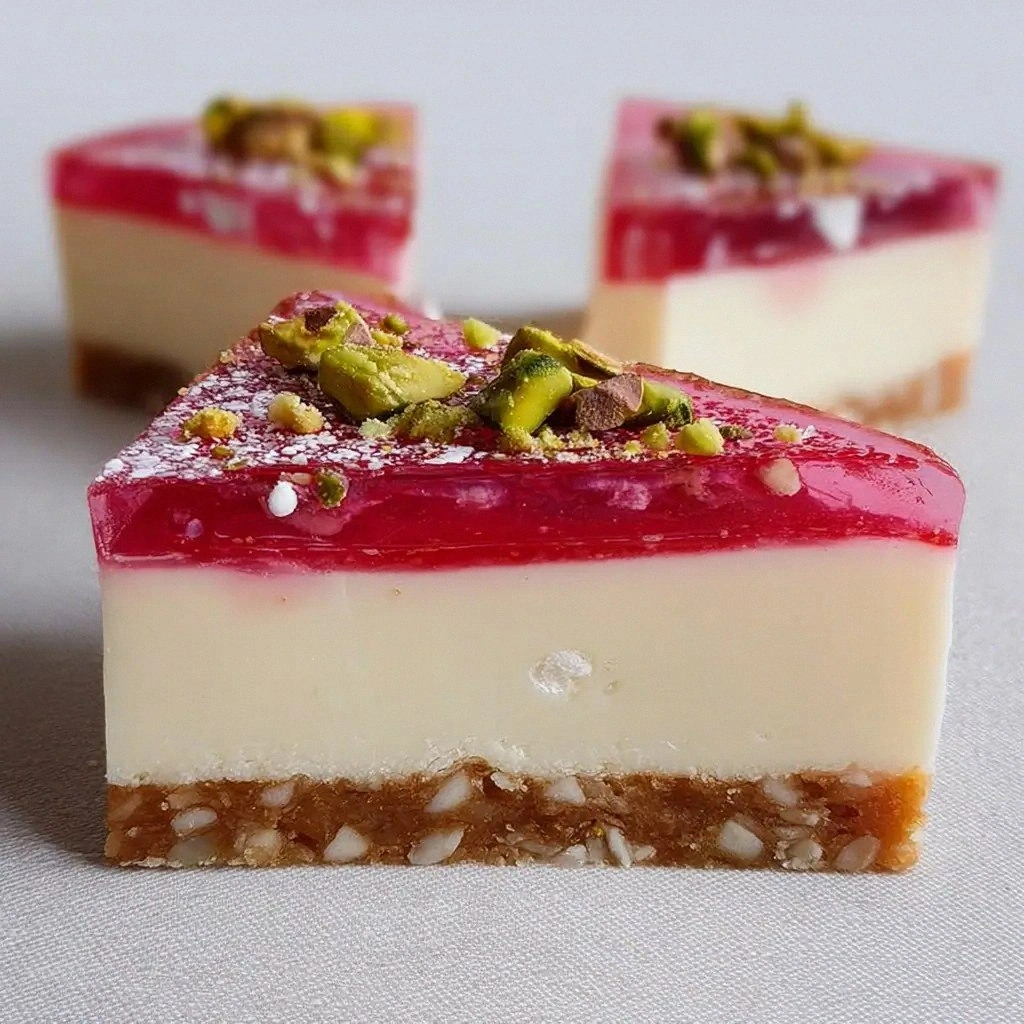
Imagine the moment you slice into that first piece: the surface glistens like polished amber, the aroma of rose water and pistachios wafts up, and the texture feels like a velvety cloud that melts instantly. The crunch of toasted nuts contrasts with the creamy interior, and the subtle citrus notes lift the flavor profile into something almost celestial. Every bite is a harmonious blend of sweet, floral, and nutty, wrapped in a light, airy base that feels like a secret indulgence. This isn’t just a dessert; it’s a passport to a distant land, served right in your own kitchen.
What makes this version stand out is that it’s a no‑bake masterpiece that still delivers that classic Turkish delight sweetness, but with a modern twist that keeps it light and easy to assemble. No oven, no fuss, just a few simple ingredients and a touch of romance. I dare you to taste this and not go back for seconds. I’ll be honest—after the first bite, I was already halfway to the next slice. Most recipes get this completely wrong by over‑saturating the base or using too much sugar; here, the balance is spot on. Picture yourself pulling this out of the fridge, the whole kitchen smelling incredible, and seeing the smiles that spread across your guests’ faces.
If you've ever struggled to make a Turkish delight‑inspired dessert that doesn't feel heavy or cloying, you're not alone—and I've got the fix. This recipe is hands down the best version you'll ever make at home because it marries tradition with simplicity, creating a dessert that’s as elegant as it is approachable. Let me walk you through every single step—by the end, you'll wonder how you ever made it any other way.
What Makes This Version Stand Out
- Taste: The flavor profile is a delicate dance of rose water, citrus zest, and toasted pistachios, creating a layered experience that lingers on the palate.
- Texture: A light, airy base that melts like a cloud, contrasted by the crisp crunch of nuts, offers a satisfying mouthfeel without the heaviness of traditional cheesecakes.
- Convenience: No oven required—just a few minutes of mixing, chilling, and plating. Perfect for last‑minute entertaining.
- Visual Appeal: The golden glaze and sprinkled pistachios give it a show‑stopper look that’s Instagram‑ready.
- Audience: This dessert pleases both sweet‑tooth lovers and those who crave something with a cultural twist.
- Ingredient Quality: Fresh cream cheese, high‑grade pistachios, and real rose water elevate the dish beyond a generic cheesecake.
- Method: The technique of lightly toasting the base before chilling gives it a depth of flavor that’s often missing in other no‑bake desserts.
- Make‑ahead Potential: It can be prepared up to 48 hours in advance, making it ideal for parties or busy weeknights.
Alright, let's break down exactly what goes into this masterpiece…
Inside the Ingredient List
The Flavor Base
The foundation of this dessert is a combination of fresh cream cheese and a splash of rose water. Cream cheese provides the creamy, tangy base that holds everything together, while rose water gives it that unmistakable Turkish aroma. If you skip the rose water, you’ll lose that floral nuance that makes the dish feel exotic. A good quality rose water is essential; choose one that’s made from real rose petals, not artificial flavoring.
For a subtle citrus lift, add lemon zest. This brightens the flavor and balances the sweetness. If you’re allergic to citrus or simply want a different twist, you can substitute lime zest or even orange zest for a slightly sweeter profile.
Another key component is sugar. It not only sweetens the dessert but also helps stabilize the texture. Use a blend of white and brown sugar for depth—brown sugar adds a hint of molasses that complements the rose water.
The Texture Crew
The base of the dessert is a light, airy batter made from flour and a touch of cornstarch. This mixture, when toasted, develops a subtle nutty flavor and provides the structure that keeps the cheesecake from sinking. If you’re gluten‑free, swap the flour for a gluten‑free blend, but keep the cornstarch to maintain the right consistency.
Butter is the secret to that silky mouthfeel. It coats the flour mixture, preventing clumping and giving the base a smooth finish. Use unsalted butter so you can control the salt level precisely. A pinch of salt is added to bring out the flavors; without it, the dish would taste flat.
The Unexpected Star
Pistachios are the star of the show. They add a satisfying crunch and a natural green hue that makes the dessert visually stunning. Toast them lightly in a skillet until they release their oils, then chop them roughly. If you’re a nut allergy victim, you can replace pistachios with almonds or walnuts, but the flavor profile will shift slightly.
For those who love a bit of spice, a pinch of cinnamon can be folded into the batter, adding warmth without overpowering the delicate rose notes.
The Final Flourish
A splash of water or milk is added to the batter to achieve the right consistency. Too much liquid will make the base runny; too little will make it dry. Aim for a spreadable, thick batter that holds its shape when poured into the pan.
Finally, a drizzle of honey or a dusting of powdered sugar can finish the dessert. Honey adds natural sweetness and a glossy sheen, while powdered sugar gives a subtle dusting that enhances the presentation.
Everything's prepped? Good. Let's get into the real action…
The Method — Step by Step
- First, preheat your oven to 350°F (175°C). While the oven warms, gather all your ingredients. The key to a smooth base is having everything at room temperature. This step ensures the batter will blend seamlessly without lumps.
- In a medium saucepan, melt the butter over medium heat. Add the flour and cornstarch, stirring constantly until the mixture forms a smooth paste. The aroma should be nutty—this is the first hint of flavor that will carry through the dessert.
- Pour in the water slowly, whisking until the batter becomes thick and glossy. It should be thick enough to coat the back of a spoon but still pourable. This is where the texture begins to take shape.
- Remove the pan from the heat and let the batter cool slightly. Then fold in the cream cheese, sugar, and rose water until fully incorporated. The mixture should be silky and free of lumps. This is the moment of truth—if you’re not careful, lumps will ruin the finish.
- Add the lemon zest and toasted pistachios, mixing gently. The nuts should be evenly distributed but not crushed, preserving their crunch. This step adds visual contrast and a burst of flavor.
- Line a 9-inch square pan with parchment paper. Pour the batter into the pan, smoothing the top with a spatula. The surface should be even for a clean slice. At this point, you can sprinkle a pinch of cinnamon if desired.
- Place the pan in the refrigerator for at least 4 hours, preferably overnight, until the dessert is firm. The chilling process allows flavors to meld and the texture to set. If you’re in a hurry, 2 hours will suffice, but the taste will be slightly less developed.
- Before serving, drizzle a thin layer of honey over the top and sprinkle powdered sugar for a finishing touch. The honey adds a glossy sheen, while the sugar gives a delicate dusting that enhances the presentation. Slice with a hot knife for clean cuts.
That's it—you did it. But hold on, I've got a few more tricks that'll take this to another level…
Insider Tricks for Flawless Results
The Temperature Rule Nobody Follows
Many bakers assume room‑temperature ingredients are enough, but the secret lies in slightly warming the cream cheese before mixing. Warm cheese blends more easily, preventing lumps and ensuring a silky texture. I always let the cheese sit out for about 10 minutes before folding it in.
Why Your Nose Knows Best
Smelling the batter as you go is a crucial quality control step. The aroma should be sweet, floral, and buttery. If it smells off or too sugary, adjust the sugar or add a pinch of salt to balance the flavors. Trust your nose; it’s a reliable judge of taste.
The 5-Minute Rest That Changes Everything
After the batter is in the pan, let it rest on the counter for 5 minutes before refrigerating. This brief pause allows the mixture to settle and the flavors to marry. Skipping this step can result in a slightly uneven texture.
Keep It Cool, Keep It Crisp
When serving, always keep the dessert chilled. If you leave it at room temperature for too long, the texture will soften and the pistachios may lose their crunch. Serve directly from the fridge for maximum impact.
The Sweet Finish
A light drizzle of honey or a dusting of powdered sugar can elevate the presentation. Honey adds a natural sweetness and a glossy sheen, while powdered sugar offers a delicate finish. I personally prefer a combination of both for that perfect balance.
Creative Twists and Variations
This recipe is a playground. Here are some of my favorite ways to switch things up:
Chocolate‑Rose Delight
Fold in 1/4 cup of melted dark chocolate into the batter for a rich, bittersweet twist. The chocolate pairs beautifully with the rose water, creating a decadent flavor profile that will impress chocolate lovers.
Citrus Burst
Replace the lemon zest with orange zest and add a splash of orange liqueur. The bright citrus notes elevate the dessert, making it perfect for spring gatherings.
Almond Crunch
Swap pistachios for chopped toasted almonds. The nutty flavor and crunch add a new dimension, while the almond's mild taste complements the sweet base.
Nutmeg & Vanilla
Add a pinch of freshly grated nutmeg and a teaspoon of vanilla extract to the batter. This combination gives a warm, aromatic finish that’s reminiscent of a cozy winter evening.
Berry Infusion
Fold in 1/2 cup of fresh strawberries or raspberries after the batter has cooled. The berries add a burst of color and tartness that balances the sweetness.
Storing and Bringing It Back to Life
Fridge Storage
Keep the dessert wrapped tightly in plastic wrap or in an airtight container. It will stay fresh for up to 5 days in the refrigerator. The cold environment preserves the delicate texture and prevents the honey glaze from melting.
Freezer Friendly
Wrap the dessert in plastic wrap, then place it in a freezer bag. Freeze for up to 3 months. When ready to serve, thaw in the refrigerator overnight. The texture remains firm, and the flavors stay vibrant.
Best Reheating Method
If you need to warm the dessert slightly, place it in a preheated 300°F (150°C) oven for 5 minutes. Add a splash of water before reheating; it steams back to perfection, keeping the base moist and the glaze glossy.