I was standing in my kitchen, staring at a half‑finished batch of classic snickerdoodle cookies that had somehow turned into a crumbly disaster. The smell of cinnamon was everywhere, but the cookies were flat, dry, and frankly, a little boring. I dared my roommate to taste one and not beg for a second helping, and she immediately tossed the plate into the trash. That moment sparked a culinary rebellion: I would transform those sad crumbs into something that could stand proudly on a dessert platter, something that would make even the most skeptical sweet‑tooth swoon. This is how the Snickerdoodle Truffles were born, a decadent twist that took a humble cookie and turned it into bite‑size clouds of cinnamon‑kissed bliss.
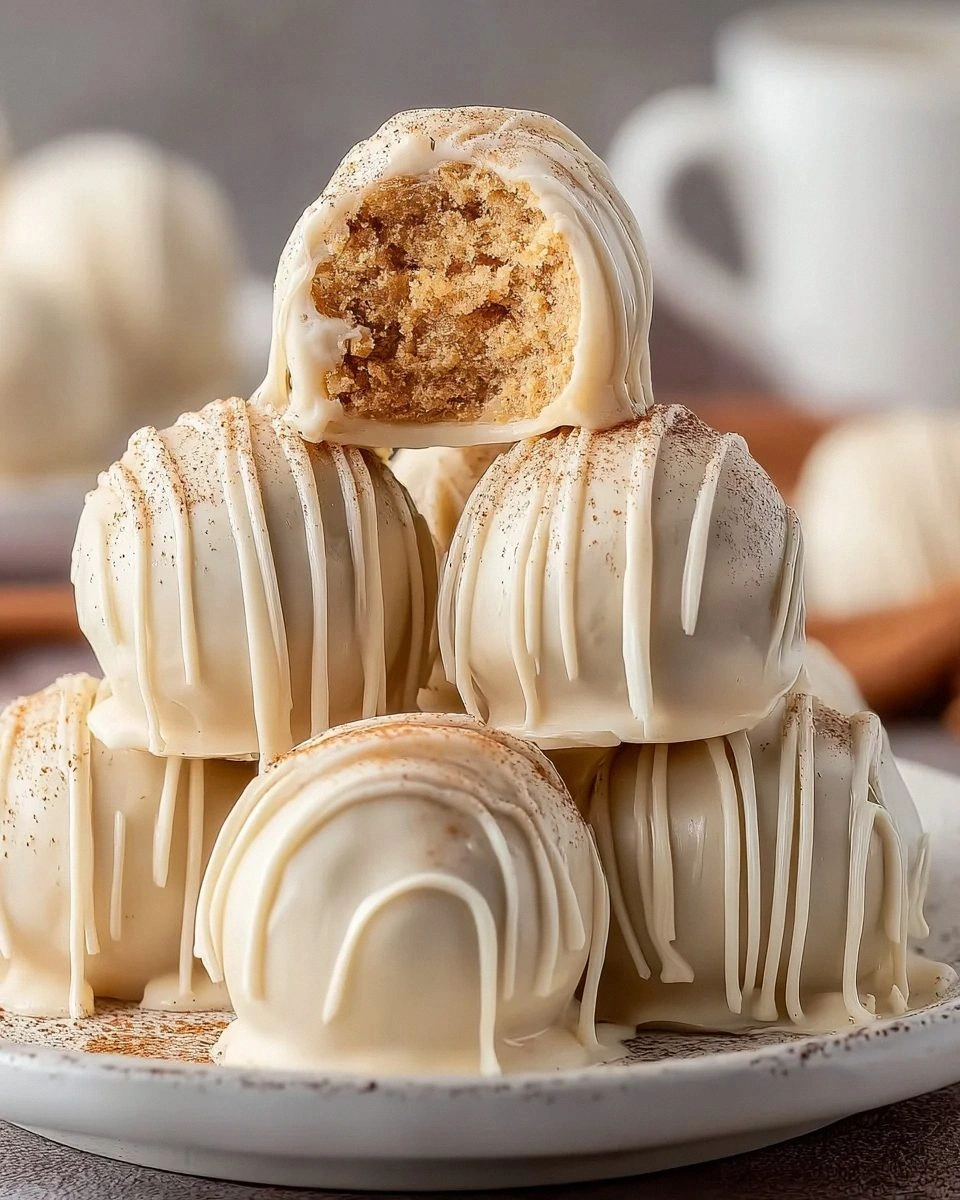
Picture this: a bowl of golden‑colored Oreo crumbs, their vanilla perfume mingling with a warm wave of cinnamon, all enveloped by a silky cream cheese mixture that feels like a hug for your taste buds. When you dip each ball into molten white chocolate, the coating glistens like fresh snow on a winter morning, and the moment it sets, you get that satisfying snap that signals pure indulgence. The first bite releases a buttery crunch, followed by a melt‑in‑your‑mouth creaminess, and finally a lingering whisper of spice that makes you close your eyes and sigh. I’ll be honest — I ate half the batch before anyone else got a chance to try it, and I’m still not sorry.
Most snickerdoodle recipes get the balance wrong: they’re either too dry, too sweet, or they completely miss that signature cinnamon‑sugar swirl. This version, however, flips the script by using Golden Oreos as the foundation, which adds a subtle vanilla depth that regular Oreos simply can’t match. The secret weapon is the Ghirardelli White Chocolate Wafers, which melt into a glossy, buttery shell that stays smooth even after refrigeration. And let’s not forget the cream cheese — it’s the glue that holds everything together while adding a luxurious richness that makes these truffles feel like a gourmet treat rather than a simple after‑school snack.
Okay, ready for the game‑changer? I’m about to walk you through every single step — from crushing those cookies to the final drizzle of chocolate. By the end, you’ll wonder how you ever made snickerdoodles any other way. I dare you to taste this and not go back for seconds. Let’s dive in.
What Makes This Version Stand Out
- Flavor Explosion: The combination of vanilla‑infused Golden Oreos and warm cinnamon creates a layered taste that’s both familiar and novel, delivering a nostalgic bite with a sophisticated twist.
- Texture Harmony: A crisp, chocolate‑coated exterior gives way to a soft, creamy interior, offering a delightful contrast that keeps you reaching for more.
- Simplicity: You only need five core ingredients, and the method relies on basic kitchen tools — no fancy equipment required.
- Ingredient Quality: Using Ghirardelli White Chocolate Wafers ensures an even melt and a glossy finish, while Golden Oreos add a vanilla nuance you won’t find in regular cookies.
- Crowd Reaction: These truffles disappear at parties, office meetings, and holiday gatherings; they’re the kind of dessert that earns you a standing ovation.
- Make‑Ahead Potential: Once set, the truffles keep beautifully in the fridge for up to a week, making them perfect for prep‑ahead entertaining.
- Versatility: The base can be flavored with other spices or extracts, allowing endless customization without compromising the core texture.
- Visual Appeal: The glossy white coating and dusting of cinnamon‑sugar create a picture‑perfect treat that looks as good as it tastes.
Inside the Ingredient List
The Flavor Base
Golden Oreos are the heart of these truffles. Their buttery, vanilla‑laden flavor sets the stage for the cinnamon to shine. If you skip them, you lose that subtle sweetness that balances the tang of cream cheese. You can substitute regular Oreos, but expect a slightly chocolatey note instead of the bright vanilla backdrop. When shopping, look for the gold‑colored sandwich cookies in the snack aisle; they’re often tucked near the regular Oreos.
The Creamy Glue
Cream cheese is the binding agent that turns crumbly dust into a pliable dough. It adds a rich, tangy depth that makes each bite feel luxurious. Use full‑fat cream cheese for the best texture; low‑fat versions can become grainy. Make sure it’s softened to room temperature, otherwise you’ll end up with clumps that are impossible to roll. If you’re looking for a dairy‑free option, try a firm tofu blended with a splash of lemon juice, but the flavor profile will shift.
The Spice Whisper
Cinnamon is the soul of any snickerdoodle, and here it’s no different. It brings warmth, a hint of earthiness, and that signature snap when you bite into the truffle. You can adjust the amount to suit your cravings — a pinch more for a bold kick, or a tad less for a milder whisper. Freshly ground cinnamon yields a brighter aroma than pre‑ground, so consider grinding whole sticks if you have a grinder handy. Skipping cinnamon would make these truffles feel like plain white‑chocolate balls, which defeats the purpose.
The Final Flourish
Ghirardelli White Chocolate Wafers provide the glossy, sweet shell that makes these truffles look bakery‑grade. Their thin, even wafers melt quickly and coat uniformly, preventing clumps. If you can’t find Ghirardelli, any high‑quality white chocolate bar works, but shave it into thin shards for a smoother melt. Granulated sugar adds a subtle sweetness that amplifies the cinnamon without making the truffle overly sugary. Too much sugar can cause the coating to crystallize, so stick to the recommended amount.
Everything's prepped? Good. Let’s get into the real action…
The Method — Step by Step
First, place the Golden Oreos in a large zip‑top bag and crush them with a rolling pin until they resemble fine sand. You want the crumbs to be uniform so the truffles hold together without crumbling. Listen for that satisfying crack as the cookies break — that’s the sound of success. Transfer the crumbs to a mixing bowl and set aside.
Add the granulated sugar and cinnamon to the crushed Oreos. Stir with a whisk until the spice is evenly distributed, creating a fragrant, amber‑tinted mixture. This step is crucial because it ensures every bite gets that signature snickerdoodle zing. If you’re feeling adventurous, add a pinch of nutmeg for an extra layer of warmth.
In a separate bowl, beat the softened cream cheese with an electric mixer on medium speed until it’s smooth and fluffy, about 2 minutes. The texture should be light enough that when you fold in the crumb mixture, it forms a cohesive dough that doesn’t stick to your fingers. This is the moment where the magic starts to happen — you’ll see the crumbs disappear into the cream cheese, forming a pliable base.
Combine the cream cheese with the crumb mixture, using a rubber spatula to fold until everything is fully incorporated. The dough should hold together when pressed; if it feels too wet, sprinkle in an extra tablespoon of crushed Oreos. Once the consistency is right, cover the bowl with plastic wrap and chill in the refrigerator for at least 20 minutes. This chill time is non‑negotiable — it firms up the dough, making it easier to roll.
Using your hands or a scoop, roll the chilled dough into 1‑inch balls. If the dough sticks, dip your fingertips in a little cold water or lightly oil them. This is the trickiest part: the dough can become gummy if it’s too warm, so keep the bowl on a cold plate. Watch Out: If the balls start to lose shape, return them to the fridge for another 10 minutes before continuing.
While the balls rest, melt the Ghirardelli White Chocolate Wafers in a double boiler. Fill a saucepan with a few inches of water, bring it to a gentle simmer, and place a heat‑proof bowl on top, ensuring the bottom doesn’t touch the water. Add the wafers and stir until completely smooth, about 3‑4 minutes. The chocolate should be glossy and free of lumps — that’s the sign you’ve achieved a perfect melt.
Now for the fun part: dip each chilled ball into the melted white chocolate, turning it with a fork to coat all sides. Let the excess drip back into the bowl, then place the coated truffle onto a fresh parchment sheet. The coating should set within a minute, forming a thin, glossy shell that cracks delightfully when you bite into it.
Allow the truffles to set at room temperature for about 10 minutes, then transfer the tray to the refrigerator for an additional 20 minutes to fully harden the chocolate shell. This chilling step locks in the texture, ensuring each bite stays firm on the outside while remaining creamy inside.
Once set, gently lift the truffles with a thin spatula and arrange them on a serving platter. They’re ready to dazzle your guests, but if you’re not serving immediately, keep them refrigerated in an airtight container. That’s it — you did it. But hold on, I’ve got a few more tricks that’ll take this to another level…
Insider Tricks for Flawless Results
The Temperature Rule Nobody Follows
Never let the cream cheese get too warm before mixing; a warm cream cheese can cause the dough to become overly soft, making it impossible to roll. Keep it chilled until just before you blend it with the crumbs. I once left the cream cheese out for a half hour and ended up with a sticky mess that never set. The rule of thumb is: if you can comfortably hold the bowl without feeling a cool breeze, it’s too warm.
Why Your Nose Knows Best
When the white chocolate is melting, trust your sense of smell. The moment you detect a faint buttery aroma and the chocolate stops smelling raw, you’re at the perfect melt point. Over‑heating will give it a burnt scent and a grainy texture. I’ve learned to turn off the heat a few seconds before the chocolate looks fully glossy — the residual heat finishes the job beautifully.
The 5‑Minute Rest That Changes Everything
After you roll the dough into balls, give them a quick 5‑minute rest on a chilled plate before dipping. This short pause allows the surface to dry just enough so the chocolate adheres without sliding off. Skipping this step leads to a patchy coating that looks unprofessional. It’s a tiny time investment for a massive visual payoff.
The Double‑Dunk Technique
For an ultra‑smooth finish, dip each truffle twice: first for a thin base coat, let it set for 30 seconds, then dip again for a thicker, shinier shell. The double‑dip creates a glossy veneer that catches the light and adds a satisfying snap. My first batch was single‑dipped and looked a bit matte; the second batch with double‑dipping looked like it came from a high‑end patisserie.
The Secret Spice Blend
Mix a pinch of ground cardamom with the cinnamon for a subtle, exotic twist that elevates the flavor without overpowering it. Cardamom adds a sweet‑spicy note that pairs beautifully with the vanilla from the Golden Oreos. I tried this on a rainy afternoon and the aroma filled the kitchen like a cozy blanket.
Creative Twists and Variations
This recipe is a playground. Here are some of my favorite ways to switch things up:
Mocha Madness
Swap half of the white chocolate wafers for dark chocolate and add a teaspoon of instant espresso powder to the crumb mixture. The result is a rich, coffee‑infused truffle that’s perfect for brunch or an after‑dinner pick‑me‑up.
Nutty Delight
Fold finely chopped toasted pecans or walnuts into the dough before chilling. The nuts add a crunchy texture that contrasts beautifully with the creamy interior, and the nutty aroma pairs well with cinnamon.
Citrus Zing
Add a tablespoon of orange zest to the crumb mixture and replace the white chocolate coating with a thin layer of dark chocolate drizzled with a zest‑infused glaze. The citrus brightens the flavor profile and makes the truffles pop on a holiday platter.
Salted Caramel Swirl
After forming the dough balls, make a small indentation in the center and fill it with a dollop of caramel sauce before sealing it back up with more dough. Once coated, sprinkle a pinch of flaky sea salt on top for a sweet‑salty experience.
Pumpkin Spice (Fall Edition)
Replace the cinnamon with a pumpkin spice blend (cinnamon, nutmeg, ginger, cloves) and add a quarter cup of pumpkin puree to the cream cheese mixture. The truffles take on a warm, autumnal flavor that’s perfect for Thanksgiving gatherings.
Storing and Bringing It Back to Life
Fridge Storage
Place the truffles in an airtight container lined with parchment paper. They’ll stay fresh for up to 7 days, maintaining their creamy interior and firm chocolate shell. If you notice any condensation, pat the tops gently with a paper towel before resealing.
Freezer Friendly
These beauties freeze like a charm. Arrange them on a baking sheet, freeze solid for 2 hours, then transfer to a zip‑top freezer bag. They’ll keep for up to 3 months. When you’re ready to serve, let them thaw in the fridge for an hour, then bring to room temperature for optimal texture.
Best Reheating Method
If the truffles have hardened too much after refrigeration, place them on a microwave‑safe plate, add a tiny splash (about a teaspoon) of water to the plate, and microwave for 5‑7 seconds. The steam generated will gently soften the chocolate shell without melting it, restoring that melt‑in‑your‑mouth feel.