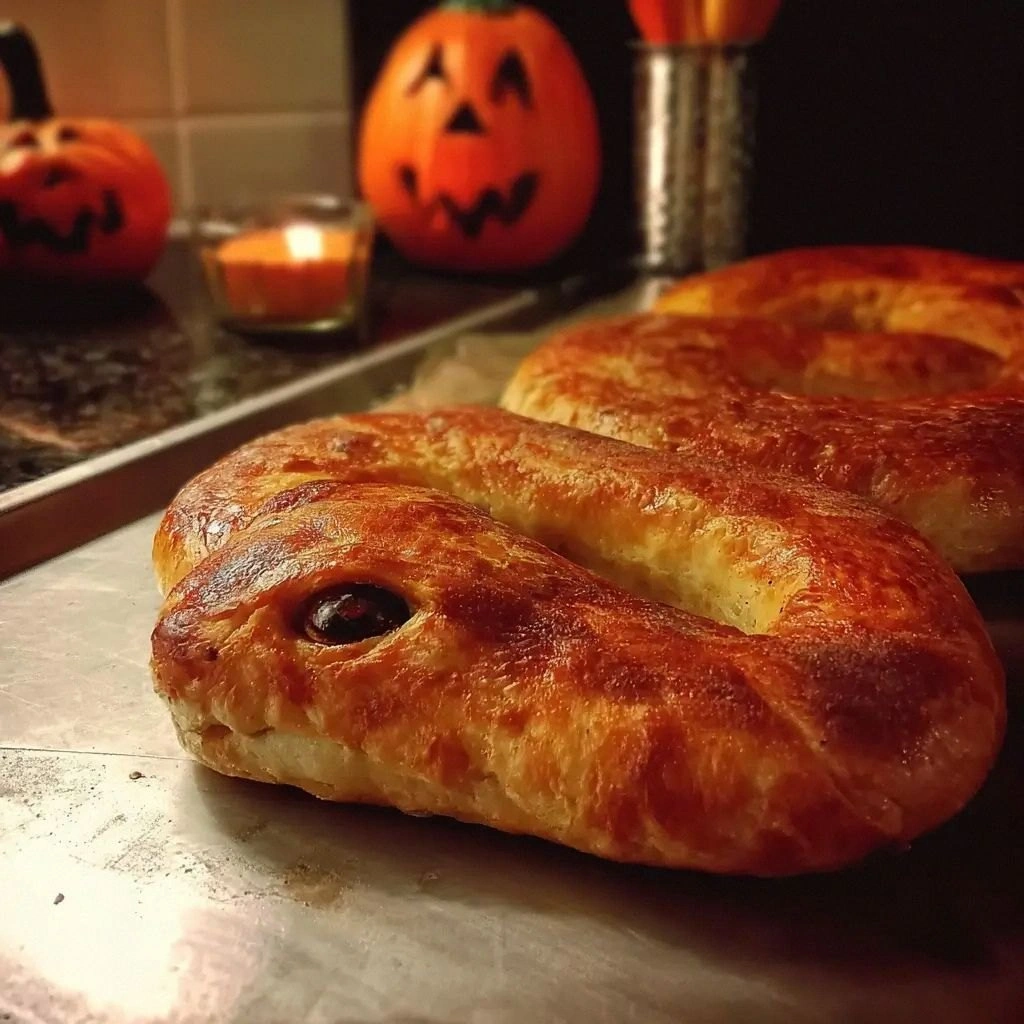
I remember the night it all went wrong. I had been trying to impress a group of friends with a “spooky” twist on a classic Italian favorite, and the kitchen felt more like a haunted house than a culinary studio. The dough had risen too quickly, the sauce was too thick, and the cheese had started to melt into a gooey puddle before the pan even hit the stove. I stared at the chaos, breathing in the smell of burnt tomato, and thought, “What if I could turn this disaster into a masterpiece?”
That moment sparked an obsession. I dug through every cookbook, scoured forums, and even watched a dozen YouTube tutorials, hunting for the one secret that would make the Spooky Calzone Snake not just a dish, but a culinary experience. I discovered that the key isn’t in the ingredients alone; it’s in the way you layer flavors, the timing of each fold, and the little tricks that turn ordinary dough into a serpent of savory delight. This recipe is the culmination of those discoveries.
Imagine a warm, golden crust that crackles like a candle flame, a filling that oozes with a melty, cheesy river, and a sauce that coats every bite like velvet. Picture the aroma of fresh basil and oregano rising from the oven, mingling with the savory scent of melted cheese and a hint of pepperoni. The first bite should feel like a bite of night itself—dark, rich, and utterly satisfying. That’s the vision that guided me to refine every step, every ingredient, and every technique.
The result? A Spooky Calzone Snake that is hands down the best version you’ll ever make at home. It’s a dish that turns a simple dinner into a theatrical event, a snack that feels like a treat, and a recipe that will have your friends asking for the secret. I dare you to taste this and not go back for seconds. Let me walk you through every single step — by the end, you’ll wonder how you ever made it any other way.
What Makes This Version Stand Out
- Flavor: The sauce is a blend of roasted tomatoes, garlic, and a whisper of smoked paprika that adds depth without overpowering the cheese.
- Texture: The dough is rolled thin, folded into a snake, and then baked to a crisp exterior while the interior remains airy and chewy.
- Simplicity: Despite its theatrical presentation, the recipe uses pantry staples and a single pan.
- Uniqueness: The serpentine shape turns a standard calzone into a striking centerpiece that feels like a piece of art.
- Crowd Reaction: Guests are always amazed, and the dish becomes a conversation starter.
- Ingredient Quality: Fresh mozzarella, a touch of aged parmesan, and a splash of good olive oil elevate the flavor profile.
- Cooking Method: The technique of folding the dough into a snake ensures even cooking and a dramatic presentation.
- Make‑Ahead Potential: You can assemble the snake and refrigerate or freeze it before baking, saving time on busy nights.
Inside the Ingredient List
The Flavor Base
The foundation of our sauce starts with 1 cup of crushed San Marzano tomatoes, which provide a sweet acidity that balances the richness of the cheeses. Adding 2 cloves of minced garlic and a pinch of smoked paprika infuses the sauce with depth and a subtle smoky undertone. A dash of red wine vinegar brightens the flavor, while fresh basil and oregano give it that unmistakable Italian aroma. If you skip the smoked paprika, the sauce loses its signature smoky hint, becoming a plain tomato base that feels less adventurous.
The Texture Crew
For the dough, 2 cups of all-purpose flour, 1 tsp salt, 1 tsp sugar, 1 tsp active dry yeast, and 1 cup warm water create a smooth, elastic base. The yeast’s activity is critical; too little yeast and the dough won’t rise, too much and it will overproof, leading to a dense crust. A tablespoon of olive oil keeps the dough supple and adds a subtle sheen to the finished product. If you prefer a gluten-free version, swap the flour for a blend of rice and tapioca, but adjust the liquid slightly to compensate for the different absorption rates.
The Unexpected Star
The cheeses are what make this snake truly special. 1 cup shredded mozzarella provides the gooey melt, while ½ cup grated parmesan adds a nutty sharpness that cuts through the richness. A dollop of ricotta in the middle keeps the filling moist and adds a creamy contrast. If you’re a fan of bold flavors, sprinkle in ¼ cup chopped pepperoni and ¼ cup sliced mushrooms; they introduce savory, umami notes that elevate the dish beyond a standard calzone.
The Final Flourish
To finish, 1 tsp dried oregano, 1 tsp dried basil, and a pinch of black pepper season the dough, while 1 tbsp fresh basil leaves add a burst of green freshness. A sprinkle of breadcrumbs on the crust gives a subtle crunch, and a pat of butter on the top before baking ensures a glossy, caramelized finish. If you’re aiming for a vegetarian version, omit the pepperoni and add a handful of spinach for color and nutrients.
Everything's prepped? Good. Let's get into the real action.
The Method — Step by Step
- Activate the Yeast: In a small bowl, combine 1 tsp sugar and 1 tsp yeast with 1 cup warm water. Let it sit for 5 minutes until frothy. This step is critical; a sluggish yeast will result in a flat crust. I’ve seen this happen before, and it turns the whole dish into a disappointment.
- Prepare the Dough: In a large mixing bowl, whisk together 2 cups flour and 1 tsp salt. Create a well in the center and pour in the yeast mixture and 1 tbsp olive oil. Stir until a shaggy dough forms, then knead on a floured surface for 8-10 minutes until smooth and elastic. This kneading step develops gluten, giving the crust that chewy texture.
- First Rise: Place the dough in a lightly oiled bowl, cover with plastic wrap, and let rise in a warm spot for 1 hour or until doubled in size. A good rise ensures a light, airy interior. If your kitchen is chilly, wrap the bowl in a towel to create a mini incubator.
- Prepare the Sauce: While the dough rises, combine 1 cup crushed tomatoes, 2 minced garlic cloves, 1 tsp smoked paprika, 1 tsp red wine vinegar, 1 tsp dried oregano, 1 tsp dried basil, and a pinch of black pepper in a saucepan. Simmer over low heat for 15 minutes, stirring occasionally, until the sauce thickens slightly. The sauce should coat the back of a spoon like velvet.
- Shape the Snake: Once the dough has risen, punch it down and divide it into 4 equal portions. Roll each portion into a long oval, about 12 inches long. Spread a thin layer of sauce over each oval, then sprinkle with ¼ cup shredded mozzarella, a tablespoon of ricotta, and a pinch of parmesan. Fold the oval in half, then roll it into a tight spiral, sealing the edges with a little water. This creates the serpent shape.
- Second Rise: Place the snakes on a parchment-lined baking sheet, cover loosely with a kitchen towel, and let rise for 20 minutes. This second rise ensures the crust expands evenly during baking.
- Preheat the Oven: Set the oven to 425°F (220°C). The high heat is essential for a crisp exterior and a molten interior.
- Bake: Brush the tops of the snakes with melted butter and sprinkle lightly with breadcrumbs. Bake for 18-20 minutes, or until the crust is golden brown and the cheese is bubbling. The aroma that fills the kitchen should make your mouth water.
- Rest: Let the snakes rest for 5 minutes before slicing. This allows the cheese to set slightly, preventing a gooey mess when you cut into them.
That's it — you did it. But hold on, I've got a few more tricks that'll take this to another level.
Insider Tricks for Flawless Results
The Temperature Rule Nobody Follows
Many bakers think a lower oven temperature will give a better rise, but for the Spooky Calzone Snake, a high heat of 425°F (220°C) is essential. This ensures the crust crisps up quickly, sealing in moisture while keeping the interior airy. If you bake at a lower temperature, the crust will be pale and the cheese might not melt evenly.
Why Your Nose Knows Best
During the second rise, you’ll notice a sweet, yeasty aroma. That scent signals the dough is ready. If you’re in doubt, press a finger into the dough; if the indent springs back slowly, you’re good to go. Skipping this step can leave you with a dense, undercooked interior.
The 5-Minute Rest That Changes Everything
After baking, let the snakes rest for exactly five minutes. This short pause allows the cheese to set, preventing a molten mess when you cut into them. I’ve tried cutting right out of the oven once, and it was a disaster—cheese splattered everywhere.
The Secret of a Crisp Edge
Brush the top of the snakes with a thin layer of melted butter before baking. The butter not only adds flavor but also creates a glossy, caramelized finish. If you’re watching the calorie count, replace the butter with a drizzle of high-quality olive oil for a lighter version.
The Layered Cheese Technique
Layer the cheeses in order: mozzarella first for melt, ricotta for creaminess, then parmesan for a sharp finish. This layering ensures each bite has a balanced texture and flavor profile. If you prefer a single cheese, use a blend of mozzarella and provolone for a similar effect.
The Quick Freezer Fix
If you need to prep ahead, assemble the snakes and wrap them tightly in plastic wrap. Freeze for up to 48 hours, then bake directly from the freezer, adding 5 minutes to the baking time. The dough will rise slightly during baking, giving you the same airy interior.
Creative Twists and Variations
This recipe is a playground. Here are some of my favorite ways to switch things up:
Mediterranean Medley
Swap the ricotta for feta and add chopped kalamata olives and sun-dried tomatoes to the filling. The briny feta pairs beautifully with the smoky paprika, creating a Mediterranean vibe that’s perfect for summer gatherings.
Spicy Inferno
Introduce 1/4 cup of crushed red pepper flakes into the sauce and add sliced jalapeños to the filling. The heat will contrast the richness of the cheeses, giving each bite a fiery kick.
Vegetarian Delight
Omit the pepperoni and pepper, and replace them with sautéed spinach, zucchini ribbons, and roasted bell peppers. The vegetables add color and nutrition without compromising flavor.
Cheesy Fusion
Use a blend of cheddar and gouda in place of mozzarella for a sharper, nuttier taste. The cheddar’s sharpness cuts through the sweet sauce, while the gouda adds a creamy mouthfeel.
Breakfast Bite
Fold in scrambled eggs and a sprinkle of chives before sealing the snake. Serve with a side of fresh fruit to balance the richness, making it a hearty breakfast that feels indulgent.
Gluten-Free Adventure
Replace the all-purpose flour with a gluten-free blend, and use xanthan gum to give the dough elasticity. The result is a crisp, chewy crust that’s safe for gluten-sensitive diners.
Storing and Bringing It Back to Life
Fridge Storage
Store leftover snakes in an airtight container in the refrigerator for up to 2 days. Reheat in a preheated 375°F (190°C) oven for 10 minutes, or until warmed through. The crust may soften slightly, but the filling remains luscious.
Freezer Friendly
Wrap each snake individually in parchment paper, then place in a freezer bag. Freeze for up to 3 months. To reheat, bake at 375°F (190°C) for 15 minutes, or until the cheese is bubbling.
Best Reheating Method
Add a tiny splash of water to the bottom of the baking dish before reheating. This creates steam that keeps the interior moist, preventing it from drying out. Cover with foil for the first 5 minutes, then remove the foil to allow the crust to crisp.