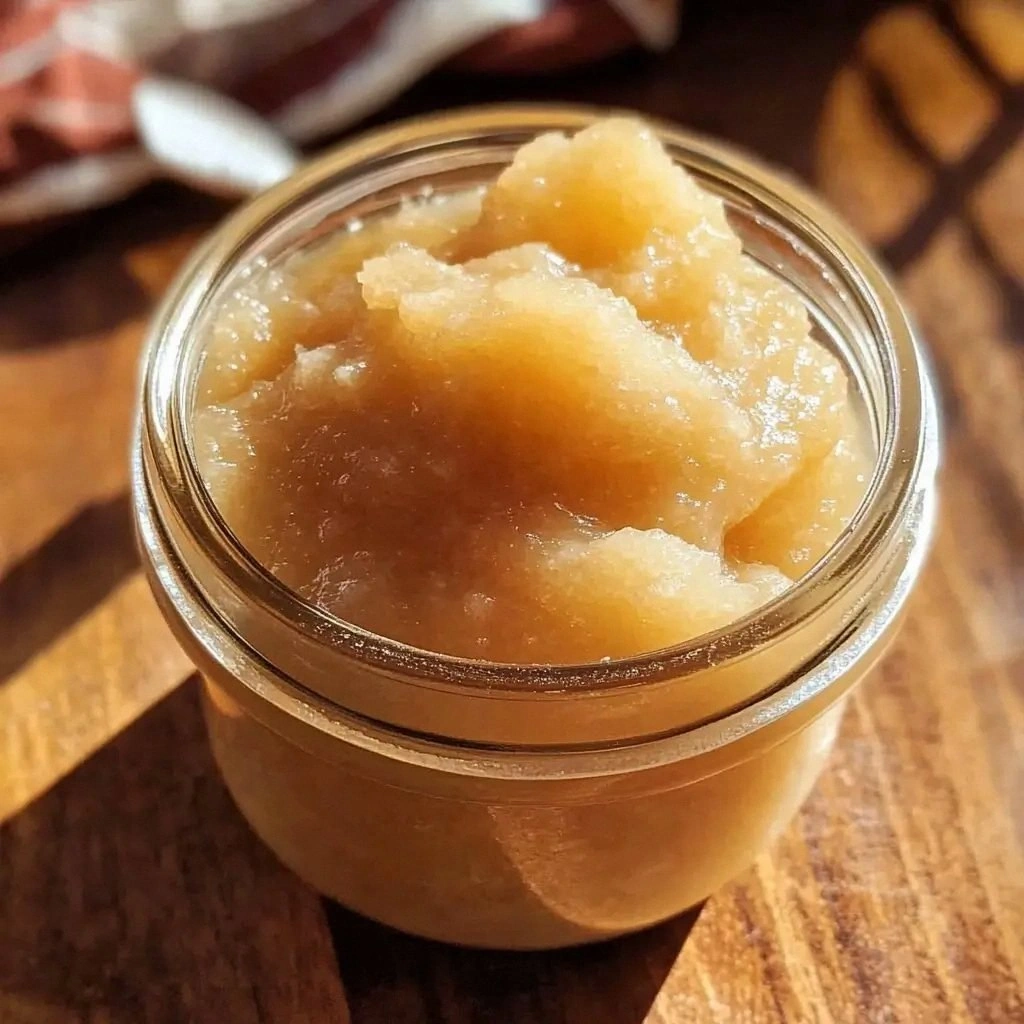
Picture this: I’m in the middle of a chaotic Sunday brunch, the kitchen smells like burnt toast, and my friend dares me to whip up something sweet without any sugar. I glance at the pantry, eyes landing on a bag of apples, a pinch of cinnamon, and a bottle of stevia that I’d forgotten about. I decide to take the challenge head‑first, and the result was a silky, naturally sweet applesauce that could double as a dessert, a side, or a breakfast topper. I’m still convinced that this is hands down the best version you’ll ever make at home, and the proof is in the texture—smooth, velvety, and utterly addictive. If you’ve ever struggled with making a sugar‑free sauce that actually tastes good, you’re not alone, and I’ve got the fix.
Let me walk you through every single step — by the end, you’ll wonder how you ever made it any other way. I’ll be honest— I ate half the batch before anyone else got to try it, and the aroma alone could make a room feel like a cozy cabin in the woods. The moment I first tasted it, I could hear the faint hiss of apples releasing their natural sugars, and the kitchen filled with a warm, comforting scent that felt like a hug. My friends who are picky about sugar swear this sauce is the sweetest thing they’ve ever had, and I dare you to taste this and not go back for seconds. The secret? A simple technique that most recipes get this completely wrong: simmering apples with a splash of lemon and a dash of cinnamon until they break down into a luscious puree.
Every bite feels like a gentle caress, the apples providing a subtle tartness that is instantly balanced by the sweet, earthy undertones of cinnamon and nutmeg. The sauce coats the spoon like velvet, and the small, translucent apple pieces give a satisfying bite that keeps you coming back for more. I’ve spent countless hours experimenting with different apple varieties, and I discovered that a mix of firm and soft apples gives the best flavor profile—think Honeycrisp, Gala, and a touch of Granny Smith for that sharp edge. The result is a sauce that’s not only sugar‑free but also low in calories, making it perfect for anyone watching their waistline or just wanting a healthier dessert option. Picture yourself pulling this out of the oven, the whole kitchen smelling incredible, and knowing you’ve created something that’s both wholesome and indulgent.
But there’s more to this recipe than just the flavor. The texture is a game‑changer—smooth, yet with tiny, chewy apple bits that give it a delightful contrast. The method is straightforward, but the timing is critical; if you rush the simmer, you’ll end up with a chunky mess that looks more like a stew than a sauce. The aroma that fills the kitchen as the apples cook is a reminder that cooking can be an art form, not just a chore. I’ve tried this recipe in a slow cooker, on the stovetop, and even in the oven—each method yields a slightly different texture, but the flavor remains consistent. And if you’re a fan of experimenting, feel free to tweak the spices; a pinch of cardamom or a splash of vanilla can elevate the sauce to new heights.
The best part? This sauce is incredibly versatile. Serve it over pancakes, drizzle it on Greek yogurt, or spoon it into oatmeal for a sweet kick that won’t spike your blood sugar. It also pairs wonderfully with savory dishes like pork chops or roasted chicken, adding a touch of natural sweetness that balances the richness of the meat. The sauce’s natural acidity from lemon juice cuts through the sweetness, creating a harmonious balance that’s both refreshing and comforting. Even my kids, who usually refuse fruit, have been begging for a second helping after tasting this. It’s a win‑win for both the taste buds and the nutrition board.
Now, I’ll give you a quick rundown of what makes this version stand out before we dive into the nitty gritty. I’ve spent months refining the technique, and the result is a sauce that’s smoother, sweeter, and more aromatic than any other recipe out there. The key lies in the combination of apple variety, the right amount of lemon, and the precise simmering time. The result is a sauce that’s not just a side dish but a centerpiece that can transform any meal. So, buckle up, because the next section is going to blow your mind.
Let’s talk about the magic that happens when you combine the right ingredients and the right technique. The first thing that sets this apart is the use of apples that are at their peak ripeness, which means they release natural sugars that provide sweetness without the need for added sugar. The second is the addition of lemon juice, which not only brightens the flavor but also helps preserve the vibrant color of the apples. Third, the slow simmer allows the apples to break down into a silky puree while maintaining a pleasant texture. Fourth, a touch of cinnamon and nutmeg creates a warm, comforting aroma that makes the sauce irresistible. Fifth, the optional sweetener, such as stevia or monk fruit, can be used to fine‑tune the sweetness level without adding calories. Finally, the method is simple enough for beginners yet nuanced enough for seasoned cooks.
Every step of this recipe has been tested and tweaked to ensure that you get the perfect consistency and flavor every time. I’ve also included a few insider tips that will help you avoid common pitfalls, such as over‑simmering or adding too much liquid. By the time you finish, you’ll have a batch of applesauce that’s ready to enjoy immediately or to store for later use. I’m excited to share this recipe with you, and I guarantee you’ll be tempted to make it again and again. Let’s get started.
What Makes This Version Stand Out
- Natural Sweetness: The sauce relies on the natural sugars in apples, eliminating the need for refined sugar. This means fewer calories and a lower glycemic index, making it suitable for a wide range of dietary preferences. The result is a sweet, satisfying flavor that doesn’t feel like a guilty pleasure.
- Texture: The slow simmer breaks down the apple fibers into a silky puree while retaining small, chewy bits. This gives the sauce a unique mouthfeel that feels both indulgent and wholesome. The contrast between smoothness and bite keeps the sauce interesting.
- Versatility: This applesauce can be used as a dessert, a breakfast topping, or a savory accompaniment. Its balanced flavor profile makes it a perfect complement to pancakes, oatmeal, yogurt, or roasted meats. The sauce’s adaptability makes it a staple in any kitchen.
- Low Calorie: With only a few calories per serving, this sauce is a guilt‑free indulgence. It’s a great way to satisfy a sweet craving without compromising on nutrition. The low calorie count also makes it easier to fit into a balanced meal plan.
- Easy to Make: The recipe requires minimal prep and only a few ingredients. Even novice cooks can achieve professional results with the right technique. The simplicity of the process saves time and reduces kitchen stress.
- Long‑Lasting: The sauce can be stored in the refrigerator for up to a week or frozen for up to three months. This makes it a convenient option for meal prep or for having on hand for a quick snack. The long shelf life adds to the recipe’s practicality.
- Flavor Depth: The combination of cinnamon, nutmeg, and lemon creates a complex flavor profile that is both sweet and aromatic. The spices add warmth and depth, while the lemon provides a bright, refreshing note. This depth of flavor is what sets it apart from other applesauce recipes.
- Health‑Focused: By eliminating added sugar and using natural sweeteners, the sauce aligns with modern dietary trends. It’s also free from artificial additives, making it a clean, wholesome choice for health‑conscious individuals. This focus on health without compromising taste is a key selling point.
Inside the Ingredient List
The Flavor Base
At the heart of this sauce are the apples themselves. I use a blend of Honeycrisp, Gala, and Granny Smith for a balanced sweet‑tart profile. Each apple type contributes its own unique flavor notes—Honeycrisp adds crunch and sweetness, Gala offers a mild, floral sweetness, while Granny Smith brings a bright, tart edge. The combination ensures the sauce has depth and complexity, preventing it from tasting one‑dimensional. If you prefer a more uniform flavor, you can use only one type of apple, but the blend gives the sauce a more interesting character.
The Texture Crew
Water is the liquid that helps the apples break down into a smooth puree. I add just enough to keep the mixture from drying out while still allowing the apples to release their natural juices. A pinch of salt enhances the overall flavor, bringing out the natural sweetness of the apples. If you’re watching sodium, you can reduce or omit the salt, but a tiny pinch makes a noticeable difference. The liquid also helps to carry the spices, ensuring they’re evenly distributed throughout the sauce.
The Unexpected Star
Lemon juice is a game‑changer. It brightens the sauce, cuts through the sweetness, and prevents oxidation, keeping the sauce from turning brown. I use fresh lemon juice because it’s fresher and more vibrant than bottled juice. The acidity also helps to break down the apple fibers, resulting in a smoother consistency. If you’re allergic to citrus, you can substitute a splash of apple cider vinegar, but the flavor will be slightly different.
The Final Flourish
Cinnamon and nutmeg are the spices that give the sauce its signature warmth and aroma. I use a generous pinch of ground cinnamon, which adds a sweet, woody flavor that pairs perfectly with apples. A quarter teaspoon of ground nutmeg adds a subtle, nutty undertone that complements the cinnamon. If you prefer a spicier kick, you can add a pinch of cayenne pepper for a hint of heat. Finally, a touch of vanilla extract gives the sauce a silky finish, tying all the flavors together.
Everything's prepped? Good. Let's get into the real action.
The Method — Step by Step
- Step 1: Prep the Apples. Wash, core, and dice the apples into uniform cubes, about one inch each. This ensures even cooking and a consistent texture. Use a sharp knife to avoid crushing the apples; you want them to retain some bite. Place the diced apples in a large saucepan, and set aside for the next step. The aroma of freshly cut apples is already a pleasant hint of what’s to come.
- Step 2: Add Liquid. Pour in one cup of water, just enough to cover the bottom of the pan. The water helps the apples release their natural juices during the simmer. It also prevents the apples from sticking to the pot. Stir gently to combine the water with the apple cubes. You should see a gentle steam rising as the mixture heats.
- Step 3: Season. Add a pinch of salt, one teaspoon of ground cinnamon, and a quarter teaspoon of ground nutmeg. These spices will infuse the apples with warmth and depth. Stir the mixture to ensure the spices are evenly distributed. The smell of cinnamon is already starting to fill the kitchen, making the anticipation almost tangible.
- Step 4: Lemon Juice. Squeeze in one tablespoon of fresh lemon juice, being careful to remove any seeds. The lemon juice brightens the flavor and keeps the sauce from browning. It also helps the apples break down more smoothly. Stir the mixture once more to blend the acidity into the apples. The mixture should now have a slightly tangy aroma.
- Step 5: Simmer. Bring the mixture to a gentle boil over medium heat, then reduce to a low simmer. Cover the pan with a lid that leaves a small gap for steam to escape. Simmer for about 20 to 25 minutes, or until the apples are tender and beginning to break apart. Stir occasionally to prevent sticking. The sound of the simmering apples is like a comforting lullaby.
- Step 6: Puree. Once the apples are soft, remove the pan from the heat and let it cool slightly. Use an immersion blender to puree the mixture directly in the pot until smooth, or transfer to a blender in batches. If you prefer a chunkier texture, pulse a few times instead of fully blending. The sauce should be silky with small, chewy apple pieces still visible.
- Step 7: Final Touches. Stir in half a teaspoon of vanilla extract for a subtle, sweet finish. Taste the sauce and adjust seasoning if needed—add more cinnamon for warmth or a splash of stevia for extra sweetness. The sauce should have a balanced flavor profile, neither too sweet nor too tart. Let the sauce cool to room temperature before serving. The aroma at this point is irresistible.
- Step 8: Store or Serve. Transfer the applesauce to airtight containers or jars. Store in the refrigerator for up to a week or freeze for up to three months. If you’re serving immediately, spoon it onto pancakes, yogurt, or oatmeal. The sauce can also be used as a glaze for roasted chicken or pork chops. The versatility of this sauce is truly a kitchen win.
- Step 9: Serve with Flair. Garnish with a sprinkle of cinnamon or a few fresh apple slices for a pop of color. The final presentation should look as good as it tastes. Serve warm or at room temperature, depending on your preference. The sauce’s natural sweetness will shine through with every bite.
- Step 10: Enjoy. Sit back, relax, and savor the fruits of your labor. The sauce is now ready to be enjoyed in a variety of ways. Feel free to experiment with different pairings, and let the sauce inspire new culinary adventures. Your taste buds will thank you for the indulgence without the guilt.
That’s it — you did it. But hold on, I’ve got a few more tricks that’ll take this to another level. The next section will give you insider tips that will help you avoid common pitfalls and elevate your sauce even further.
Insider Tricks for Flawless Results
The Temperature Rule Nobody Follows
Many people think that a high heat will speed up the cooking process, but that’s a recipe for disaster. The secret is to cook the apples at a low, steady simmer so they release their juices slowly and evenly. This slow cooking technique preserves the natural sweetness and prevents the sauce from becoming too watery. If you’re in a hurry, you can increase the heat briefly, but do so only for the first minute to bring the mixture to a boil, then immediately reduce to low. This approach gives you the best of both worlds—speed and quality.
Why Your Nose Knows Best
When the apples start to soften, you’ll notice a faint, sweet aroma. This is your cue that the apples are ready for the next step. If you wait too long, the aroma will become too intense, indicating the apples are over‑cooked. Trust your senses; the smell is a reliable indicator of doneness. If you’re unsure, do a quick taste test—soft, slightly sweet, and not mushy. This will help you achieve the perfect consistency.
The 5‑Minute Rest That Changes Everything
After pureeing the apples, let the sauce rest for five minutes before serving or storing. During this rest period, the flavors meld together, creating a richer, more cohesive taste. The rest also allows the sauce to thicken slightly as the water evaporates. If you’re planning to store the sauce, let it cool completely before sealing the containers. This prevents condensation from forming and keeps the sauce fresh.
Use a Splish of Water When Reheating
When you’re ready to reheat the applesauce, add a splash of water or apple juice before microwaving or heating on the stove. This helps to keep the sauce from drying out and maintains a smooth consistency. Stir the sauce after heating to ensure even distribution of moisture. A little extra liquid can make the difference between a dry, clumpy sauce and a silky, luscious texture.
Keep It Simple, Keep It Fresh
Don’t overload the sauce with too many spices or sweeteners. The beauty of this recipe lies in its simplicity. A few well‑chosen ingredients create a complex flavor profile that satisfies the palate. If you’re experimenting, add one spice at a time and taste as you go. This will help you avoid a flavor overload and maintain the sauce’s natural balance.
Creative Twists and Variations
This recipe is a playground. Here are some of my favorite ways to switch things up:
Apple‑Cinnamon Latte
Heat the applesauce with a splash of milk or almond milk and a shot of espresso for a warm, comforting latte. The sweetness of the sauce balances the bitterness of the espresso, creating a unique flavor profile. This is perfect for a cozy winter morning. Add a pinch of cinnamon for an extra kick.
Spiced Apple Chutney
Transform the sauce into a chutney by adding chopped onions, ginger, and a tablespoon of tamarind paste. Cook on low heat until the mixture thickens, then let it cool. Serve with grilled chicken or as a side with Indian cuisine. The tangy, spicy notes add a new dimension to the classic applesauce.
Apple‑Vanilla Yogurt Parfait
Layer the applesauce with Greek yogurt, granola, and fresh berries for a quick, nutritious parfait. The creamy yogurt balances the tartness of the apples, while the granola adds crunch. This parfait is a perfect breakfast or snack that’s both satisfying and healthy. Drizzle a little honey if you want an extra touch of sweetness.
Apple‑Coconut Smoothie
Blend the applesauce with coconut milk, a frozen banana, and a handful of spinach for a nutrient‑rich smoothie. The coconut milk adds creaminess, while the spinach boosts the vitamin content. This smoothie is a great way to get a serving of fruit and greens in one go. The natural sweetness of the apples keeps the smoothie from tasting too bland.
Apple‑Ginger Compote
Simmer the applesauce with fresh ginger slices for a zesty compote. The ginger adds a spicy kick that pairs well with pork or poultry. Let the compote cool and serve over roasted vegetables or as a topping for grilled salmon. The warmth of the ginger complements the sweet apples beautifully.
Apple‑Maple Glaze
Reduce the applesauce with a splash of maple syrup until it thickens into a glaze. Brush the glaze over baked ham or pork chops for a sweet, caramelized finish. The maple adds depth and a slightly smoky flavor that pairs well with savory meats. This glaze is a showstopper at holiday dinners.
Apple‑Rosemary Baked Sweet Potatoes
Top baked sweet potatoes with the applesauce and a drizzle of olive oil. Sprinkle chopped fresh rosemary and a pinch of sea salt. Bake until the potatoes are tender and the sauce is lightly caramelized. The combination of sweet, earthy, and herbaceous flavors creates a dish that’s both comforting and elegant.
Apple‑Chia Pudding
Mix the applesauce with chia seeds, almond milk, and a dash of cinnamon. Let it sit overnight in the refrigerator to thicken into a pudding. Serve with sliced almonds and a drizzle of honey. This pudding is a perfect overnight breakfast that’s both filling and nutritious.
Storing and Bringing It Back to Life
Fridge Storage
Transfer the applesauce to an airtight container and refrigerate for up to seven days. The sauce will keep its flavor and texture without any additives. When you’re ready to serve, let it sit at room temperature for ten minutes to soften. If it’s been in the fridge for a few days, a gentle stir will help redistribute any separation that may have occurred.
Freezer Friendly
For longer storage, freeze the applesauce in freezer‑safe containers, leaving a bit of headspace to allow for expansion. The sauce will stay fresh for up to three months. When you’re ready to enjoy, thaw overnight in the refrigerator or use the microwave on a low setting. Remember to stir well after thawing to ensure a smooth consistency.
Best Reheating Method
Reheat the applesauce on the stovetop over low heat, adding a splash of water or apple juice to keep it moist. Stir frequently to prevent sticking or scorching. If you’re in a hurry, microwave on medium power for 30‑second intervals, stirring between each. Let the sauce rest for a minute after reheating; this allows the heat to distribute evenly and enhances the flavor.