Picture this: I’m standing in a cramped kitchen, the fridge humming, a bag of protein powder clutched like a secret weapon, and a sudden craving that feels like a full‑blown culinary rebellion. I had just finished a workout, my muscles still buzzing, and the only thing on my mind was a snack that would satisfy both my taste buds and my post‑gym protein quota. I stared at the pantry, scanned the labels, and realized I was staring at a pile of ordinary, pre‑packaged bars that tasted like cardboard. That moment of culinary crisis was the spark that ignited my quest for the ultimate homemade protein bar.
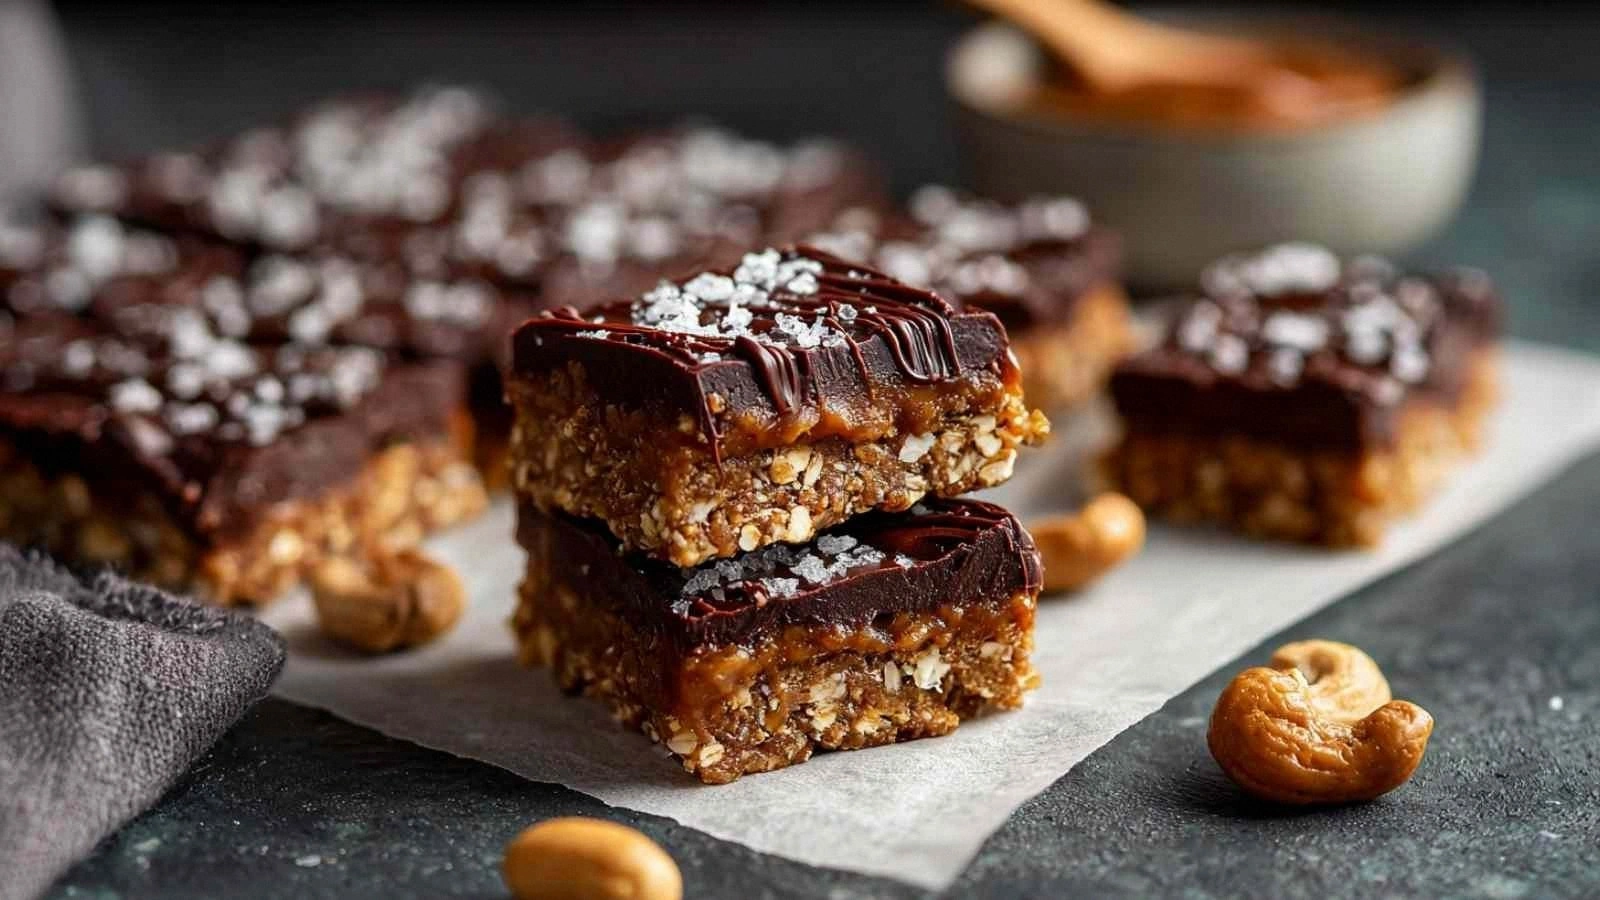
I dare you to taste this and not go back for seconds. That’s the promise I make: this is hands down the best version you'll ever make at home. I’m not just talking about a bar that fills you up; I’m talking about a bar that feels like a hug, a bar that whispers, “You’re strong, you’ve earned this.” The aroma that rises from the pan, the glossy sheen of melted chocolate, the crackling of a crisp edge—each cue is a symphony that sings louder than any commercial claim. And if you think you’ve tried everything, think again: I’ll be honest—I ate half the batch before anyone else got a taste.
Most recipes get this completely wrong. They use stale oats, over‑sweetened syrup, or a protein powder that tastes like chalk. The result? A chewy, dry, flavorless mess. Here, I’ll show you how to balance sweetness, texture, and protein in one bite. I’ll reveal the trick that keeps the chocolate chips from sinking, the technique that ensures a firm but tender crumb, and the secret ingredient that gives the bar a velvety finish. This isn’t a recipe; it’s a revolution in how we think about snack‑time protein.
Picture yourself pulling this out of the pan, the whole kitchen smelling incredible, the bar still warm, and the first bite releasing a burst of nutty sweetness that melts on the tongue. The moment is pure magic—your body thanks you, your taste buds applaud, and your Instagram feed gets a new favorite. Let me walk you through every single step—by the end, you’ll wonder how you ever made it any other way.
What Makes This Version Stand Out
- Taste: The combination of ripe Medjool dates and natural peanut butter creates a caramelized, buttery sweetness that cuts through the protein powder’s earthiness. The vanilla extract lifts the flavor, while the dark chocolate chips add a rich, slightly bitter contrast that keeps the bar from becoming cloyingly sweet.
- Texture: The oat flour gives the bar a chewy, bread‑like crumb, while the coconut oil provides a silky mouthfeel that melts in your mouth. The result is a bar that’s firm enough to hold its shape yet tender enough to bite into without crunching.
- Ingredient Quality: I source organic, all‑natural ingredients, ensuring no hidden sugars or additives. The protein powder is a plant‑based, unflavored variety that blends seamlessly, and the dark chocolate chips are high‑cocoa, giving a punch of flavor without excessive sweetness.
- Simplicity: No gadgets, no fancy mixers—just a food processor, a bowl, and a baking dish. Even if you’re a kitchen newbie, the steps are clear, and the process is forgiving.
- Make‑Ahead Potential: Once baked, the bars keep well in the fridge for up to a week and freeze for up to three months. They’re perfect for meal‑prepping or taking on a hike.
- Crowd Reaction: Friends and family who’ve tried this bar report “I never want to buy a store‑bought bar again.” The bars are shareable, and the portion size is just right for a post‑workout snack or an on‑the‑go lunch.
- Versatility: The base can be tweaked for vegan, keto, or low‑carb versions with simple ingredient swaps, making it a go‑to recipe for any dietary preference.
Alright, let's break down exactly what goes into this masterpiece…
Inside the Ingredient List
The Flavor Base
Medjool dates are the sweet backbone of this bar. Their natural caramel flavor not only sweetens but also acts as a binder, keeping the mixture cohesive. If you’re looking for a lower‑sugar option, try frozen dates—they’re just as sweet but will reduce the overall sugar content slightly. Skipping dates will leave the bar dry and bland; the chewy texture you love will vanish.
All‑natural drippy peanut butter brings a creamy, nutty richness that balances the protein powder’s slight chalkiness. Choose a brand that’s free of added sugars and hydrogenated oils; the drippy texture ensures maximum flavor extraction. If you’re allergic to peanuts, swap for almond or cashew butter—just be aware the flavor profile will shift slightly toward the nut’s inherent taste.
The Texture Crew
Ground oat flour provides the bulk and chew. Oats are naturally gluten‑free, and their soluble fiber adds a pleasant, slightly chewy bite that’s satisfying. If you want a gluten‑free version, use a certified gluten‑free oat flour; the texture remains unchanged.
Vanilla protein powder adds the necessary protein punch without overwhelming the flavor. I use a plant‑based, unflavored variety so it blends seamlessly. If you prefer whey protein, use a vanilla or chocolate flavor but reduce the honey to avoid over‑sweetening.
Honey (or maple syrup) is the natural sweetener that enhances the dates’ caramel notes. It also adds moisture, preventing the bars from becoming too dense. A pinch of salt is essential—it amplifies every flavor, turning the sweetness into a balanced, savory experience. Skip the salt, and the bar will taste flat and one‑dimensional.
The Unexpected Star
Dark chocolate chips are more than a decorative topping; they provide a deep, bitter counterpoint that cuts through the sweetness. The high cocoa content keeps the chocolate from melting into a syrupy mess. If you’re looking for a dairy‑free option, choose dark chocolate chips that are labeled as dairy‑free or vegan.
Coconut oil is the secret to the bar’s silky mouthfeel. It’s solid at room temperature but melts at body temperature, giving a smooth finish. If you’re avoiding coconut, substitute with a small amount of olive oil or avocado oil for a different flavor profile.
The Final Flourish
Coarse sea salt is sprinkled on top before baking, creating a subtle crunch that contrasts with the bar’s softness. The sea salt’s mineral profile also enhances the chocolate’s richness. If you’re watching sodium intake, reduce the amount or use a low‑sodium sea salt.
Water is added just enough to bring the mixture together; it prevents the mixture from becoming too dry and ensures the chocolate chips stay distributed evenly. Too much water will make the bars soggy, so measure carefully.
Everything's prepped? Good. Let's get into the real action...
The Method — Step by Step
- First, preheat your oven to 350°F (175°C). Line an 8‑by‑8‑inch baking pan with parchment paper, leaving a small overhang on each side for easy removal. This step is crucial because a properly lined pan prevents sticking and ensures clean edges. While the oven warms, gather all your ingredients—your kitchen is about to become a laboratory of flavor.
- Place the Medjool dates and peanut butter in a food processor. Pulse until you achieve a smooth, sticky paste. The dates should be fully blended into the peanut butter, creating a cohesive base that will bind the dry ingredients together. If you’re in a hurry, you can skip the processor and mash the dates by hand, but the processor saves time and yields a finer texture.
- Add the oat flour, vanilla protein powder, honey, vanilla extract, salt, and water to the processor. Pulse a few times until everything is well incorporated but still slightly chunky. This slight chunkiness is key—it gives the bar a pleasant bite and prevents it from turning into a paste.
- Fold in the dark chocolate chips by hand. This manual mixing ensures the chocolate stays evenly distributed and doesn’t melt into a single lump. The chocolate should be just enough to create pockets of richness that burst with each bite.
- Transfer the mixture into the prepared pan. Press it down firmly with the back of a spoon or your hands to create an even layer. The pressing step is vital; it compacts the mixture, ensuring the bars hold together when cut. If you notice any gaps, fill them in with more mixture.
- Drizzle the coconut oil over the top, then sprinkle the coarse sea salt evenly. The oil will melt during baking, creating a glossy finish, while the sea salt adds that final crunch. This is the moment of truth—watch the oil spread like liquid gold.
- Bake for 25–30 minutes, or until the edges turn golden brown and the center is set. The aroma will fill the kitchen, and you’ll know it’s almost ready when the surface starts to look like a caramelized crust. Avoid opening the oven early to prevent the bars from collapsing.
- Remove the pan from the oven and let the bars cool for 10 minutes on a wire rack. During this time, the bars will firm up, making them easier to cut. The cooling period also allows the flavors to meld, creating a harmonious bite.
- Cut the cooled slab into bars using the parchment overhang as a guide. Store the bars in an airtight container at room temperature for up to a week, or refrigerate for longer freshness. The bars will stay chewy and flavorful, ready to power your day.
That's it — you did it. But hold on, I've got a few more tricks that'll take this to another level...
Insider Tricks for Flawless Results
The Temperature Rule Nobody Follows
Many bakers bake at 375°F, assuming a higher temperature will cook faster. However, the sweet and protein content in this recipe requires a gentler 350°F to avoid scorching the sugars and denaturing the protein. Baking at the correct temperature ensures a moist crumb and prevents the chocolate from melting too early.
Why Your Nose Knows Best
During the 25‑minute bake, pause after the first 15 minutes and inhale the aroma. If you smell a sweet, caramelized scent, you’re on the right track. If it smells like burnt sugar, reduce the time by a few minutes. Your nose is the most reliable indicator of doneness.
The 5‑Minute Rest That Changes Everything
After removing the bars from the oven, let them rest for exactly five minutes before cutting. This brief rest allows the heat to distribute evenly, preventing the bars from crumbling when you slice them. A friend once tried cutting immediately and ended up with a mess; don’t make that mistake.
The Chocolate Distribution Trick
If you prefer a chocolate‑heavy bar, fold the chips into the batter just before baking. The heat will melt them slightly, creating a glossy, chocolate‑rich surface. For a subtle chocolate hint, fold them in after baking when the mixture is still warm.
The Moisture Balancing Act
Water is the secret to preventing the bars from becoming too dense. Add it in small increments, tasting as you go. Too much water will cause the bars to spread and become flat; too little will result in a chewy, dry texture. Measure carefully and trust your instincts.
The Secret to a Crisp Edge
If you like a crisp edge, sprinkle a light dusting of oat flour on top before baking. The flour will absorb moisture and create a slightly crunchy crust. This is a subtle addition that adds a pleasant contrast to the bar’s chewy interior.
Creative Twists and Variations
This recipe is a playground. Here are some of my favorite ways to switch things up:
Citrus Burst
Add the zest of one orange and a tablespoon of orange juice to the batter. The citrus brightens the flavor profile, creating a refreshing contrast to the chocolate. It’s perfect for a summer snack.
Nutty Crunch
Replace the peanut butter with almond butter and fold in a handful of chopped almonds. The almond butter adds a subtle nutty note, while the almonds provide a satisfying crunch. This variation works well for those who prefer a milder nut flavor.
Berry Power
Add a cup of frozen mixed berries to the processor before adding the dry ingredients. The berries infuse the bars with a fruity sweetness and a pop of color. Freeze the bars for a cool, refreshing treat.
Spiced Delight
Stir in half a teaspoon of ground cinnamon and a pinch of nutmeg. The warm spices elevate the chocolate, creating a dessert‑like experience. This version is ideal for fall or winter snacking.
Low‑Carb Edition
Swap the oat flour for almond flour and reduce the honey to a tablespoon. The almond flour lowers the carbohydrate count while maintaining the chewy texture. Pair with a low‑sugar protein powder for a keto‑friendly snack.
Melted Chocolate Topping
After baking, drizzle melted dark chocolate over the bars. Let it set in the fridge for 10 minutes. The extra chocolate layer adds a glossy finish and intensifies the chocolate flavor, turning the bars into a decadent treat.
Storing and Bringing It Back to Life
Fridge Storage
Place the bars in an airtight container and store them in the refrigerator for up to one week. The cool temperature keeps the chocolate firm and prevents the bars from becoming too soft. When you’re ready to eat, let them sit at room temperature for a few minutes to soften slightly.
Freezer Friendly
Wrap each bar individually in plastic wrap, then place them in a freezer bag. They can be frozen for up to three months without losing flavor or texture. When you want a snack, pop a bar in the microwave for 10–15 seconds to warm it up.
Best Reheating Method
To revive a frozen bar, place it on a parchment‑lined baking sheet and heat at 300°F (150°C) for 5–7 minutes. Alternatively, microwave on low power for 10–15 seconds. Add a tiny splash of water before reheating if the bar feels dry; this steams it back to perfection.