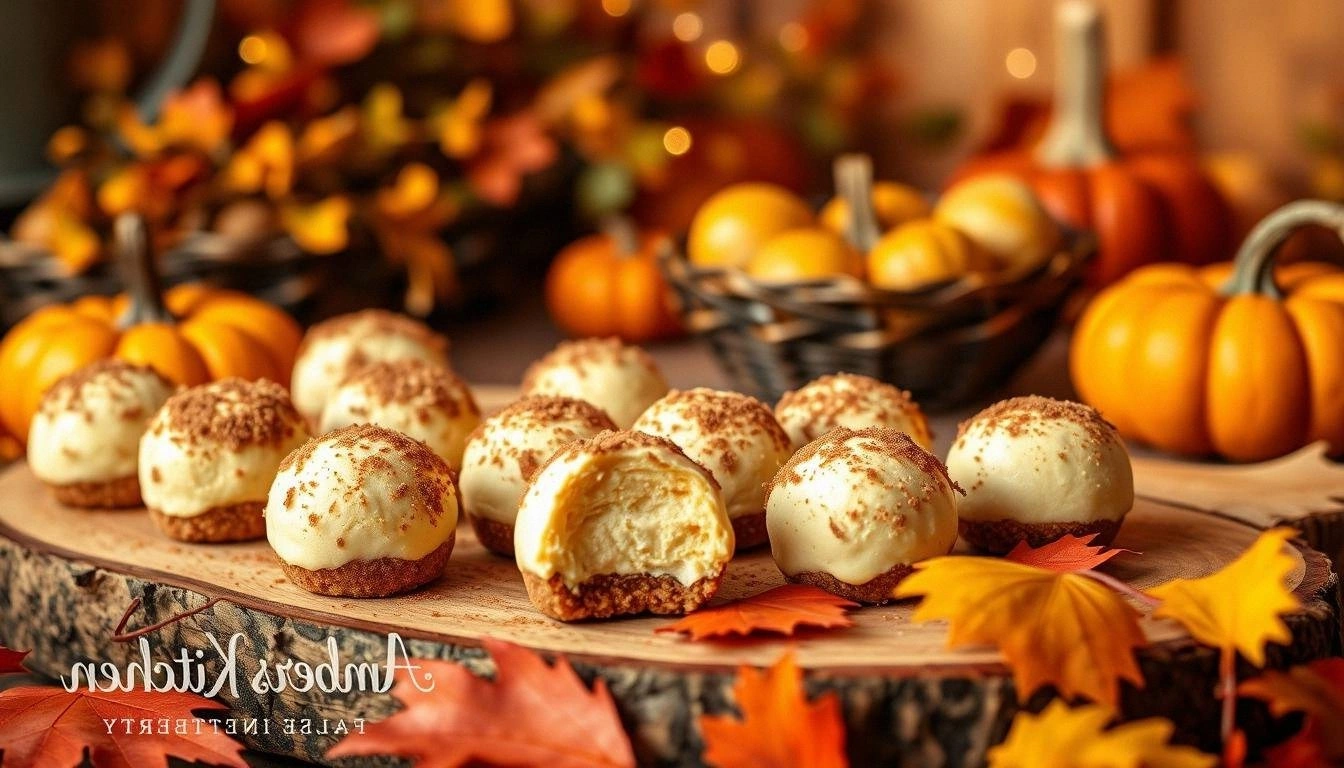
There was a moment last autumn when my kitchen turned into a pumpkin‑filled circus. I had attempted a classic pumpkin pie, but the crust collapsed, and the filling boiled over, leaving a sticky mess that smelled like burnt sugar. I stared at the chaos, realizing that a better approach was needed—one that celebrated pumpkin’s creamy potential without the risk of a baking fiasco. That night, I was determined to find a dessert that would make guests swoon, not scramble for a fire extinguisher. The result? A no‑bake pumpkin cheesecake that is as daring as it is delicious.
When I first tasted the first batch, I knew I had stumbled on something extraordinary. The texture is a silky, custard‑like dream that clings to the spoon, while the pumpkin’s natural sweetness is tempered by a bright citrus note that cuts through the richness. Every bite feels like a hug in a bowl, with a subtle warmth that lingers on the palate. The best part? No oven is required, so I can whip up dozens of servings in minutes, perfect for holiday gatherings or spontaneous dessert parties. If you’re skeptical, I dare you to taste this and not go back for seconds.
What truly sets this cheesecake apart is how it balances flavor, texture, and convenience. I’ve refined the recipe to highlight pumpkin’s natural umami while infusing it with a whisper of vanilla and a touch of spice that feels like a cozy blanket. The graham cracker base offers a gentle crunch that contrasts the creamy filling, creating a multi‑sensory experience that feels indulgent yet approachable. I’ve also added a splash of lemon juice to brighten the profile, a trick that most pumpkin desserts overlook. The result is a dessert that feels both sophisticated and comforting, like a warm cup of cocoa on a chilly day.
Imagine pulling this out of the fridge, the whole kitchen smelling like autumn, and watching the first bite melt into a silky cascade of flavor. The anticipation of that first spoonful is almost as delightful as the dessert itself, and it’s a moment that will become a favorite memory for anyone who tastes it. I’ve spent hours perfecting this recipe, and the result is hands down the best version you’ll ever make at home. The combination of creamy texture, subtle spice, and a hint of citrus is a winning formula that will leave your guests asking for the recipe. Let me walk you through every single step—by the end, you’ll wonder how you ever made it any other way.
What Makes This Version Stand Out
- Texture: The filling achieves a custard‑like consistency that coats the palate like velvet, while the graham cracker crust offers a gentle crunch that punctuates each bite.
- Flavor Balance: Pumpkin’s earthy sweetness is tempered by a bright citrus note from lemon juice, creating a harmonious profile that feels both comforting and refreshing.
- Convenience: No oven required, meaning you can prepare dozens of servings in under 30 minutes, making it perfect for last‑minute parties or potlucks.
- Ingredient Quality: Using premium cream cheese and fresh pumpkin puree elevates the dish, ensuring a richer, smoother mouthfeel that feels indulgent.
- Make‑Ahead Potential: This cheesecake can be assembled and refrigerated for up to a week, so you can prep ahead and serve fresh whenever the mood strikes.
- Versatility: The recipe lends itself to creative variations—add chocolate chips, swirl in caramel, or top with toasted pecans to suit any taste.
Alright, let's break down exactly what goes into this masterpiece…
Inside the Ingredient List
The Flavor Base
At the heart of this cheesecake is the pumpkin puree, which provides the seasonal flavor that makes the dish unmistakably autumnal. Fresh, high‑quality puree delivers a natural sweetness and a silky mouthfeel that blends seamlessly with the cream cheese. If you’re using canned puree, be sure to drain it well to avoid excess liquid that can thin the filling. A small pinch of salt balances the sweetness, preventing the dessert from feeling too cloying. The pumpkin’s earthy undertones also act as a natural thickener, reducing the need for additional stabilizers.
The Texture Crew
Cream cheese is the cornerstone of the filling’s velvety texture. Opt for a full‑fat variety to achieve a richer, smoother mouthfeel that coats the spoon like silk. Whipped cream adds airy lightness, preventing the cheesecake from feeling too dense or heavy on the tongue. The graham cracker crumbs form a crunchy base that contrasts the creamy filling, creating a delightful textural dance with every bite. Butter, when melted and cooled, helps bind the crumbs together, giving the crust a cohesive, buttery bite that doesn’t crumble.
The Unexpected Star
Lemon juice may seem like an odd pairing with pumpkin, but it’s a secret weapon that brightens the dessert’s flavor profile. The acidity cuts through the richness of cream cheese, leaving a clean, refreshed finish that lingers pleasantly. A splash of vanilla extract adds warmth and depth, rounding out the pumpkin’s natural sweetness. Pumpkin pie spice, a blend of cinnamon, nutmeg, cloves, and ginger, infuses the cheesecake with a familiar holiday aroma that instantly transports you to cozy gatherings. Together, these elements elevate the dessert from simple to unforgettable.
The Final Flourish
Heavy cream is whisked into the mixture to enhance smoothness and create a luscious, custard‑like consistency that melts in your mouth. The final touch of powdered sugar ensures the right balance of sweetness without overpowering the pumpkin’s subtle flavor. A pinch of salt, though minimal, plays a critical role in balancing the overall taste, preventing the dessert from feeling flat. When all ingredients are combined, the result is a harmonious blend of flavors and textures that dance together in perfect unison. This carefully curated list ensures that each bite delivers a burst of autumnal bliss.
Everything's prepped? Good. Let's get into the real action…
The Method — Step by Step
- Begin by melting the butter in a saucepan over medium heat until it turns a light golden color. This subtle browning adds a nutty aroma that enhances the overall flavor profile. Stir in the graham cracker crumbs, mixing until every crumb is coated in butter and begins to toast slightly. Once the mixture is fragrant and golden, pour it into a shallow dish and let it cool to room temperature; this step is crucial for achieving a firm crust.
- While the crust cools, blend the pumpkin puree in a blender until silky smooth, eliminating any lumps that could compromise the filling’s texture. Add the cream cheese to the blender and continue to blend until the mixture is completely smooth and free of chunks. The blender’s power ensures an even distribution of cream cheese, creating a velvety base that will hold together when chilled.
- In a separate bowl, whisk the powdered sugar and vanilla extract until the mixture is smooth. Gradually fold this sweetened blend into the pumpkin and cream cheese mixture, ensuring each addition is fully incorporated before adding the next. The goal is a homogeneous, glossy filling that will set beautifully when chilled.
- Fold in the pumpkin pie spice and lemon juice, stirring gently until the spices are evenly distributed. The lemon juice’s acidity will brighten the dessert, preventing it from feeling too heavy. At this point, you can add a splash of heavy cream if you prefer an even lighter texture; just be sure not to over‑whisk, or the mixture may become too runny.
- Once the filling is smooth and well‑mixed, spoon it over the cooled graham cracker crust, spreading it evenly with a spatula. This step requires gentle handling; you want to preserve the smoothness of the filling while ensuring it covers the entire crust. A well‑levelled surface will set more evenly and look more appealing when sliced.
- Cover the cheesecake with plastic wrap, pressing it directly onto the surface to prevent a skin from forming. Chill the dessert in the refrigerator for at least 4 hours, or overnight if you’re planning ahead. The cool temperature allows the flavors to meld and the filling to firm up to a perfect, sliceable consistency.
- After chilling, remove the cheesecake from the fridge and let it rest at room temperature for about 10 minutes before serving. This short rest allows the filling to soften slightly, making it easier to slice and ensuring a creamy, luscious bite. If you prefer a firmer texture, simply return it to the fridge for a few more minutes.
- Slice the cheesecake into wedges or cut it into bite‑sized cubes, depending on your preference. Serve immediately, or garnish with a dusting of pumpkin spice or a drizzle of caramel sauce for an extra touch of decadence. If you’re planning a party, consider pre‑cutting the cheesecake into small bite‑size portions and placing them on a platter for easy serving.
That's it — you did it. But hold on, I've got a few more tricks that'll take this to another level…
Insider Tricks for Flawless Results
The Temperature Rule Nobody Follows
Temperature control is critical when blending the filling; always keep your ingredients at room temperature to avoid curdling. If your cream cheese is too cold, it will create a lumpy texture that will be difficult to smooth. Conversely, if it’s too warm, the mixture may become too runny, making it hard to set. A simple trick is to let the cream cheese sit on the counter for about 15 minutes before starting, ensuring a silky finish. This small adjustment can make the difference between a mediocre cheesecake and a showstopper.
Why Your Nose Knows Best
The aroma of toasted graham crackers is a subtle indicator that your crust is ready; it should smell nutty and slightly caramelized. If it still smells raw or buttery, give it a few more minutes on the heat. A well‑toasted crust not only adds flavor but also creates a sturdier base that won’t crumble when you cut into the cheesecake. Your nose is your best ally in achieving the perfect crust, so trust it and listen to that buttery scent.
The 5-Minute Rest That Changes Everything
After chilling, let the cheesecake rest at room temperature for 5 minutes before slicing. This brief rest allows the filling to soften slightly, making it easier to cut clean slices and ensuring a creamy bite. Some people skip this step, but the difference is noticeable: a chilled, un‑rested slice can feel too dense and cold, while a rested slice feels airy and luscious. Give it a few minutes, and you’ll notice the texture transform.
Sticking to the Right Ratio
Maintaining the correct ratio of pumpkin puree to cream cheese is essential for achieving the right balance of sweetness and richness. Too much pumpkin can dilute the texture, while too much cream cheese can make the cheesecake overly heavy. The 1:2 ratio (1 cup pumpkin to 2 cups cream cheese) is the sweet spot that delivers a creamy yet light dessert. If you’re experimenting, keep this ratio in mind to avoid a disastrous outcome.
Choosing the Right Crust
While graham crackers are the classic choice, you can experiment with different crumbs like digestive biscuits or shortbread for a subtle flavor shift. Each crumb type will alter the texture and taste of the crust, so choose one that complements the pumpkin’s flavor profile. A buttery shortbread crust, for example, adds a richer base that pairs wonderfully with the creamy filling. Don’t be afraid to try new crumbs; the world of cheesecake crusts is vast and rewarding.
Creative Twists and Variations
Chocolate Swirl Surprise
Stir in a few spoonfuls of melted dark chocolate into the filling for a decadent chocolate‑pumpkin fusion. The chocolate adds depth and a slightly bitter contrast that balances the pumpkin’s sweetness. Swirl the chocolate through with a knife before chilling, creating a marbled effect that looks as good as it tastes. This variation is perfect for chocolate lovers and adds a festive touch to your dessert lineup.
Caramel Drizzle Delight
Drizzle a rich caramel sauce over the top before serving to add a buttery, sweet glaze that enhances the pumpkin’s natural flavors. The caramel’s viscosity creates a glossy finish that makes the cheesecake look irresistible. Pour the sauce in a decorative pattern for an Instagram‑worthy presentation. This simple addition elevates the dessert from classic to gourmet.
Nutty Crunch Layer
Fold toasted pecans or walnuts into the crust mixture to introduce a nutty crunch that contrasts with the creamy filling. The nuts add a layer of texture and a subtle earthy flavor that complements the pumpkin spice. Sprinkle a few extra nuts on top before chilling for a decorative touch. This variation offers a satisfying bite that keeps guests coming back for more.
Spiced Coconut Twist
Replace half of the graham cracker crumbs with toasted coconut flakes for a tropical twist. The coconut adds a sweet, chewy element that pairs wonderfully with pumpkin’s warmth. Combine the coconut with a pinch of sea salt to balance the sweetness. This version is ideal for those who love a hint of island flavor in their desserts.
Berry Burst Variation
Fold in fresh blueberries or raspberries into the filling for a burst of tartness that cuts through the richness. The berries add a pop of color and a subtle fruitiness that brightens the overall profile. Gently fold the berries in to avoid breaking them; the result is a visually stunning cheesecake with a complex flavor. This variation is especially refreshing during the late autumn months when berries are at their peak.
Storing and Bringing It Back to Life
Fridge Storage
Store the cheesecake in an airtight container in the refrigerator for up to a week. The cool temperature keeps the filling firm and prevents it from becoming overly soft. When you’re ready to serve, let the cheesecake sit at room temperature for 10 minutes to allow the flavors to bloom. A quick chill keeps it fresh, while a brief rest brings out the creamy texture. This method ensures that every bite tastes like it was freshly made.
Freezer Friendly
For longer storage, wrap the cheesecake tightly in plastic wrap and then place it in a freezer‑safe container. Freeze for up to two months; the texture remains intact when thawed properly. To thaw, let it sit in the refrigerator overnight, then allow it to warm to room temperature for 15 minutes before serving. Avoid refreezing once thawed, as the texture may degrade. This approach is perfect for busy weeks or for those who want to keep dessert ready for any occasion.
Best Reheating Method
Reheating is best done by gently warming the cheesecake in a warm oven at 300°F (150°C) for 5-7 minutes, then letting it cool slightly. This method restores the creamy texture without over‑cooking it. If you prefer a microwave, heat on low power for 10-15 seconds, checking frequently to avoid overheating. Adding a tiny splash of water before reheating creates steam, keeping the cheesecake moist and preventing it from drying out. The result is a freshly warmed dessert that tastes as good as when first made.